You have downloaded a 7z compressed file and are trying to find a way to extract it? Read this guide to learn how you can extract a 7z compressed file from the terminal in no time.
File owners choose several types of compression utilities as per their requirements. Sometimes they may use tar, unzip, bzip, and 7z, among other archiving and compression utilities.
And when you want to limit your space footprint, then 7z is an ideal compression mechanism, and that’s a reason one of the websites provides the VMware image in a 7z compressed file.
If you have downloaded the 7z compressed file and finding way to extract a 7z compressed file from terminal, you need to have p7zip and p7zip-full installed on your system.
Install the 7zip Extractor Tool in Linux
Therefore, the first and foremost step is to install p7zip-full on your Linux machine. If it is available, then you can ignore this step and follow the extraction method using the 7z command.
But how do I know the p7zip utilities are installed on my system? It’s very simple: Just run the 7z or 7za, if it prints a “bash: 7z: command not found” error.
Then you need to run the following command to install the p7zip utilities on your respective Linux distribution:
$ sudo apt install p7zip-full							// Ubuntu/Debian Based OS
$ sudo pacman -S p7zip							        // Manjaro/Arch Based OS
$ sudo dnf install p7zip                                                      	// AlmaLinux/Fedora/RHEL Based OS
Extract a 7z Compressed File Using the Command Line
Once the installation is over, you are ready to extract the 7z compressed file on Linux. Therefore, go to the directory where the file is located and run the basic command to decompress the compressed file.
Extract the 7z Compressed File in the Current Directory
When you want to extract a file from a current directory without creating or preserving the original directory structure, then you can run the below command:
$ 7z x [FILE-NAME.7Z]- x: command is used to extract the file
- [FILE-NAME.7Z]: provide a path or compressed file name
I don’t recommend you to run the above command where several files are located because it will create unnecessary confusion between files.
Extract 7z Compressed Files in a Specific Directory
The problem with the above command is that it extracted the file into the current working directory, which I don’t want.
Can you tell me what options or flags I should use to extract the compressed files to a specific location?
Yes, you can use -o parameters to define the path location and don’t give a space after -o, else you will get the error message “Too short switch: -o“.
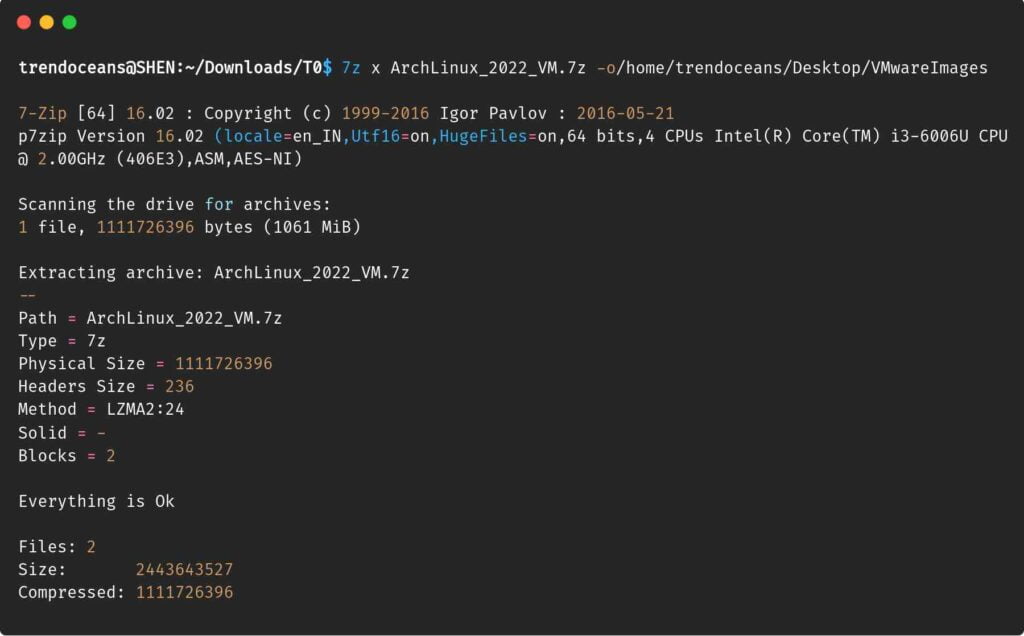
$ 7z x [PATH/TO/ARCHIVE.7z] -o[PATH/to/OUTPUT]For example, I have a compressed file at the /Downloads/TO location, but I want to extract it at /home/trendoceans/Desktop/VMwareImages.
$ 7z x ArchLinux_2022_VM.7z -o/home/trendoceans/Desktop/VMwareImagesIf the extract point is not available, then 7zip will create a respective directory at the specified output location.
Once you enter the command, wait for a while to complete the extraction because it may vary depending on the file size and your system configuration.
Extract 7z Compressed File to STDOUT
The 7z command allows you to read file content without extracting it to a physical location. This can be useful if you just want to read the content of the file and nothing else.
Also Read: How to save the command output in Linux Terminal?
$ 7z x -so [PATH/TO/ARCHIVE.7z] The result of the above command is shown below:

If you try to run this command on a non-textual compressed file, then it will print gibberish characters, which no one can understand.
If you did this by mistake, remember to use Ctrl-Z to stop the reading process.
Know more about: Interrupt or Suspend a Command Execution in Linux
Extract 7z Compressed File Using GUI
If you don’t want to use the command-line method to extract 7z compressed files, then you can use your regular file manager to extract the archive file in a pretty simple way.
Most file managers are capable of extracting 7z compressed files like other compressed files.
I’m using the Nautilus file manager on my Debian machine, and I believe the steps will be similar to those of other file managers, except for a few more options that you will get in the Dolphin file manager.
To extract a 7z compressed file, go to the directory where the file is located and right-click on it.
Choose “Extract here” in the Nautilus file manager and wait for a while to complete the extraction process.
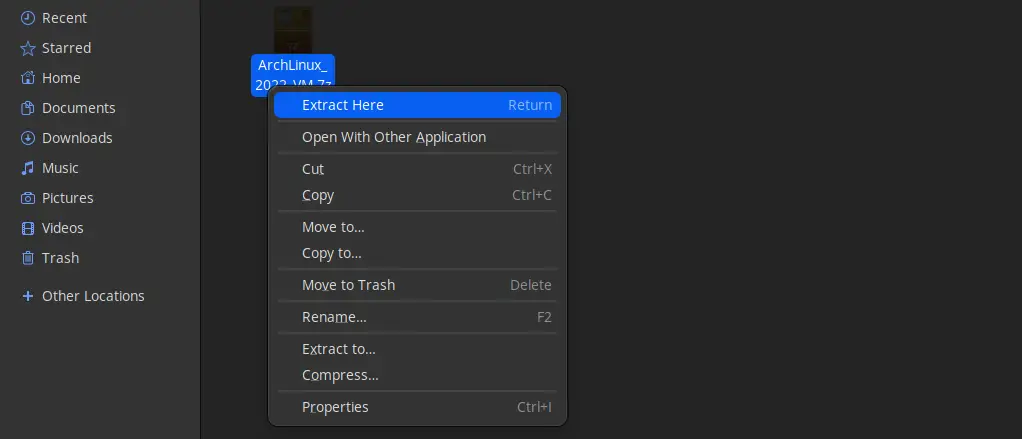
Once it is extracted, you can view the content of the archive file.
Wrap up
That’s all it takes to extract a.7z compressed file on Linux.
From this corresponding article, I hope you are able to install and use 7z to extract the compressed file. If this article worked for you, then please leave a comment about your experience.
Here is a recap of the command that we used to extract and read the 7z archive file.
- Extract the 7z file to current directory:
$ 7z x [FILE-NAME.7Z]
- Extract the 7z file to specific directory:
$ 7z x [PATH/TO/ARCHIVE.7z] -o[PATH/to/OUTPUT]
- Read the contents of the 7z archive file:
$ 7z x -so [PATH/TO/ARCHIVE.7z]
Enjoy it!