It’s necessary to take extra measures to prevent any kind of mishap. For that reason, we usually close the ports and services. In addition, we also implement firewall rules to block connections.
SELinux or AppArmor have been enforced, but sometimes it is also necessary to block the USB port, which can also be used as a means to inject something malicious into the system.
For instance, you are in charge of a computer lab, and you are solely responsible for managing the laboratory. There may be thousands of users may be accessing the system for educational and research purposes.
But there may be someone who likes to take advantage of the share system to run malicious code into the whole laboratory by injecting some kind of Trojan or executing some piece of exploit code, which can cause damage to the user or the institution’s reputation.
If it’s not identified and blocked immediately, then you may have to face the consequences.
Therefore, we want you to be aware of the USBGuard utility, which can help you to allow, block, and reject plugged-in devices. No matter whether it is a storage device, a keyboard, a mouse, a webcam, etc., it will work in most cases.
So, let’s start this guide with the question of what is USBGuard, and how it can be useful for me.
What is USBGuard?
I think the official introduction of USBGuard is pretty concise, so first see what they say about the USBGuard: “The USBGuard software framework helps to protect your computer against rogue USB devices (a.k.a. BadUSB) by implementing basic whitelisting and blacklisting capabilities based on device attributes.”
In brief, USBGuard is a command line utility tool that allows, blocks (deauthorizes), or rejects plugged devices to interact with the system according to the defined policy, which you usually need to configure by yourself, but don’t worry, we do have a default rule through which you can take it as a reference point.
USBGuard has a daemon that is running continuously, and when you connect a USB device to a USBGuard-compliant system, it checks and verifies the USB drive information in the rules.conf and, based on that, further action will be taken like whether the device should be allowed, blocked, or rejected.
If there is no rule specified, then most probably the system will block the device from use, and to regain access you need to make a couple of changes that revert the default changes.
Install USBGuard on the Linux platform
After getting brief information about USBGuard, I think you may be excited to install and test the capability of these utility tools to prevent yourself or someone else from accessing the USB port of the system.
USBGuard is available for major Linux systems, but here we are going to share the USBGuard installation steps for two major distributions.
Install USBGuard and related utilities on Debian or Ubuntu-based systems
If you are using any Debian or Ubuntu-based distribution like Linux Mint, Pop!_OS, Endeavour OS, etc., then run the below command to start the installation.
$ sudo apt install usbutils udisks2 usbguard Install USBGuard and related utilities on RedHat-based systems
If you are using any RHEL-based distribution like Fedora, AlmaLinux, CentOS, or any other, then run the below command to start the installation.
$ sudo dnf install udisks2 usbutils usbguardIf you are using another Linux distribution, don’t be discouraged as you can also install USBGuard directly from a source file. The steps are described here.
Once the installation is complete, you can start and use the USBGuard service, but I would not recommend you do so for the following reasons:
Once you start the service, all attached devices like external mice and keyboards, as well as internal webcams and Bluetooth, will stop working in the case of a desktop and laptop. If you are testing this feature on a desktop, then you must configure the default rule to avoid getting into a lock state.
So first of all, configure the default rule, then start the service.
That’s a reason I’m a bit hesitant to show you this method first. Therefore, we will first show you how to configure default rules according to your system to avoid any hassle.
Configure USBGuard rules at /etc/usbguard/rules.conf
According to the official guide, you need to configure the USBGuard daemon or service before starting the service because the /etc/usbguard/rules.conf file doesn’t contain any rules, which can be fatal if you forget to configure it, especially for desktop users.
So, to create the default rule, you can take the help of the below command, which will create a basic rule according to your system.
$ sudo sh -c 'usbguard generate-policy > /etc/usbguard/rules.conf'Once it is done, you can check the current rule by invoking the below command:
$ sudo cat /etc/usbguard/rules.confThe below image show’s the following devices we will be exempted from getting blocked

Decode usbguard-daemon.conf
The usbguard-daemon service file is stored in /etc/usbguard/, which is responsible for detecting devices and implementing rules on them.
That’s a reason I thought you should be aware of the service file to configure rules according to your custom needs because everyone has different requirements.
To check what all configuration options are available for use, then run the below command, which will remove the comments and white space which are included in the file.
$ sudo grep -vE '^#|^$' /etc/usbguard/usbguard-daemon.confRuleFile=/etc/usbguard/rules.conf
RuleFolder=/etc/usbguard/rules.d/
ImplicitPolicyTarget=block
PresentDevicePolicy=apply-policy
PresentControllerPolicy=keep
InsertedDevicePolicy=apply-policy
RestoreControllerDeviceState=false
DeviceManagerBackend=uevent
IPCAllowedUsers=root
IPCAllowedGroups=wheel
IPCAccessControlFiles=/etc/usbguard/IPCAccessControl.d/
DeviceRulesWithPort=false
AuditBackend=FileAudit
AuditFilePath=/var/log/usbguard/usbguard-audit.logOnce you are aware of the available options, you may be interested in knowing more about them, right? In that case, you should remove the grep and read the complete configuration file using less.
$ sudo less /etc/usbguard/usbguard-daemon.confFinally, we have reached the point where we will start the service after whitelisting our connected hardware.
Enable and Start USBGuard after Creating Policies.
To start the service, you can execute the below command, which will show you the default behaviour of the USBGuard.
$ sudo systemctl start usbguardIf you want to autostart the service on system boot, then don’t forget to run the below command:
$ sudo systemctl enable usbguardWhenever you connect an external device to your system, it will be blocked by usbguard-daemon, which you can verify using one of the below commands.
$ sudo systemctl status usbguardThe behaviour of the above command:
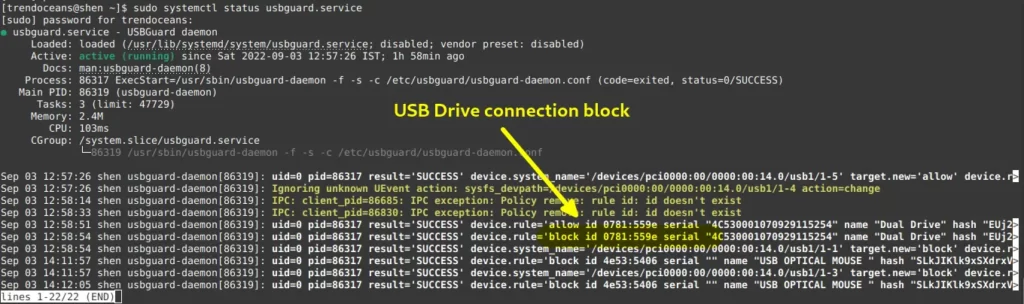
In the above image, if you noticed, I have highlighted the block id, which is 0781:559. Same as in the above section where we check the USB drive ID, which means USBGuard has blocked the connection of a newly attached USB device.
For your ease, I have added the log message to the code snippet so you can read the log.
Sep 03 12:58:54 shen usbguard-daemon[86319]: uid=0 pid=86317 result='SUCCESS' device.rule='block id 0781:559e serial "4C530001070929115254" name "Dual Drive" hash "EUj2c7wpbSFTyzK+OlNLWKlV3jsPmDrDzpaeAPqmz1k=" parent-hash "jEP/6WzviqdJ5VSeTUY8PatCNBKeaREvo2OqdplND/o=" via-port "1-1" with-interface 08:06:50 with-connect-type "hotplug"' device.system_name='/devices/pci0000:00/0000:00:14.0/usb1/1-1' type='Device.Insert'List devices
You can view or list out a device that is attached to your system using list devices.
It will not just show you the device name; it will do more than that, like show you the status id, serial number, connected device name, and a few extra details like how it’s connected to your system.
$ usbguard list-devicesThe behaviour of the above command

Don’t you think the output is messed up with allowed and blocked devices’ data all at once? If yes, then you can run the below command to sort the output on the basis of allowed or blocked USB devices.
$ usbguard list-devices -a  # Allowed devices
$ usbguard list-devices -b  # Blocked devices
If you are thinking about why I’m emphasizing ID so many times in the above section, then you will find the reason for it in the next section
Find the ID of the connected USB device
From the above installation command, you have installed usbutils, which will now help you to find the ID of the connected USB device, so simply run the below command, and extract the ID from the output.
$ lsusbFor the sake of this guide, I have selected my “Sandisk USB drive”, on which we will test out all the features. If you check the below image, I have surrounded the ID of the Sandisk USB drive in a square bracket because now we are interested in the ID number as nothing is more important than the ID number.

Once you note the ID number, you can do anything, so let’s test the default feature of USBGuard.
Allow, Block, and Reject USB devices
Once the USBGuard is running in the background, whatever kind of USB device you may attach will be blocked from getting access to your system because usbguard-deamon is running in the background, which blocks, allows, or rejects devices according to the default policy.
So first we will see how to unblock or allow a device that is blocked by usbguard-daemon. Therefore, you should be aware of how to check the ID of any USB device.
Allow or Unblock USB Device
When you want to allow any particular device to interact or connect with the system, then use the below command, which will remove any kind of restriction that has been imposed on the device.
$ usbguard allow-device { id | rule_id }From the above image, you have noticed that the device whose ID is 0781:559e is blocked, which is basically a thumb drive. If I want to allow this thumb drive to connect with my system for temporary usage, then I need to run the below command.
$ usbguard allow-device 0781:559eOtherwise, I can use the -p option to add the new policy to the /etc/usbguard/usbguard.conf file, which means that the next time the same device is connected back, usbguard-daemon will allow this device to interact with the system.
$ usbguard allow-device -p 0781:559eBlock USB Device
If you want to block any particular device from interacting or connecting with the system, then use the below command, which will block further connections.
$ usbguard block-device 0781:559eFor a permanent block, you can use the below statement.
$ usbguard block-device -p 0781:559eReject or Restrict USB Device
There is a difference between the “block” and “reject” options. Once you block the device, you can still give permission to connect with the system, but once you reject the USB device request, you need to reconnect the device to the system.
$ usbguard reject-device 0781:559eFor a permanent rejection, you can use the below statement.
$ usbguard reject-device -p 0781:559eList and Remove Rules
From the above section, if you have allowed, blocked, or rejected a device permanently, then this small piece of information gets stored in /etc/usbguard/rules.conf, which you can list out here and perform actions like appending and removing the rules that you don’t want to use anymore.
$ usbguard list-rules The behaviour of the above command

To remove the rule, you need to note the id number, which I already noted using the above command, so let’s see how I can remove rule no. 16.
$ usbguard remove-rule 16Watch the USB device in action.
If you have used the watch command before, then you may be aware of how important it is to have the watch command in your system. To learn more about the watch command, check out this article: How to monitor file content while it changes in Linux.
Whenever you attach any device to the USB port, usbguard-daemon starts executing the rules as per the defined rules, and if you want to know what is happening once you connect the device, then you should execute the below command.
$ usbguard watchTo change the current state, insert or remove a USB device from the port to see the result on your terminal screen, like in the short video.
Troubleshooting steps
If the device is not getting detected by the system, then check whether the USBGuard service is running in the background by executing the below command:
$ sudo systemctl status usbguard.serviceIf it is running, then check the rule by executing the following command:
$ usbguard list-rules After that, you may get an idea of whether the device is blocked or rejected. Accordingly, you can run the below command.
$ usbguard allow-device -p {USB_ID}Wrap up
That’s all for now.
If you want to learn more about USBGuard, then don’t forget to check the manual by running man usbguard. Apart from that, if you are facing any problems while following this guide, then do let us know in the comment section.
Bye Bye!