Brief: Today, you’ll learn about AppArmor and how to create a profile for a user-generated script or application, and modify or update permissions for an already existing profile.
AppArmor is a Debian-based Mandatory Access Control (MAC) system alternative to SELinux (for RedHat, Fedora, CentOS, AlmaLinux, etc.), allowing you the ability to restrict certain applications or scripts from doing certain things or allowing access to certain resources.
Also Read: File Permission: What is umask & Default umask value?
AppArmor does this with a profile loaded into the kernel at system startup. There are mainly two components that you should know, enforcement and complaint profile.
Enforcement profile, enforce rules of the profile and report violation attempts in /var/log/syslogauditd. Complain profile, don’t enforce any profile rules, just log the violation attempts.
In Ubuntu, AppArmor is preinstalled and loads profiles at boot. It limits the application with a profile to determine the types of files and permissions required by the program.
How to Check if AppArmor is Enabled
AppArmor is a service running in the background, not like SELinux, that merged with the operating system.
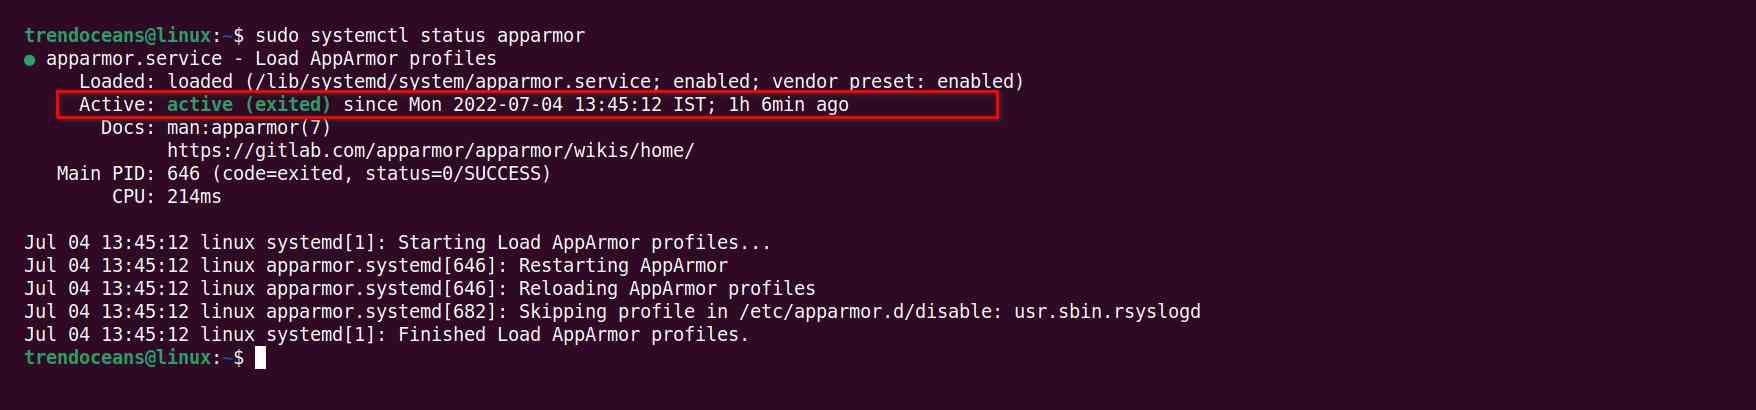
First, execute the following command to check the status of the AppArmor daemon in Linux.
$ sudo systemctl status apparmorBelow is the output of the above command.
If the AppArmor module is not loaded, execute the following command to start the AppArmor service.
$ sudo systemctl start apparmorYou can disable AppArmor service using the following command, allowing the application to have unrestricted access to your system.
$ sudo systemctl stop apparmor                #Disable the Service for Unreboot Instance
$ sudo systemctl disable apparmor             #Disable the Service to Start with Reboot
List Existing AppArmor Profiles in Linux
Execute any of the following commands in Linux to see the list of profiles along with the application or script associated with it.
$ sudo aa-status
OR
$ sudo apparmor_status
Below is the output of the above command.
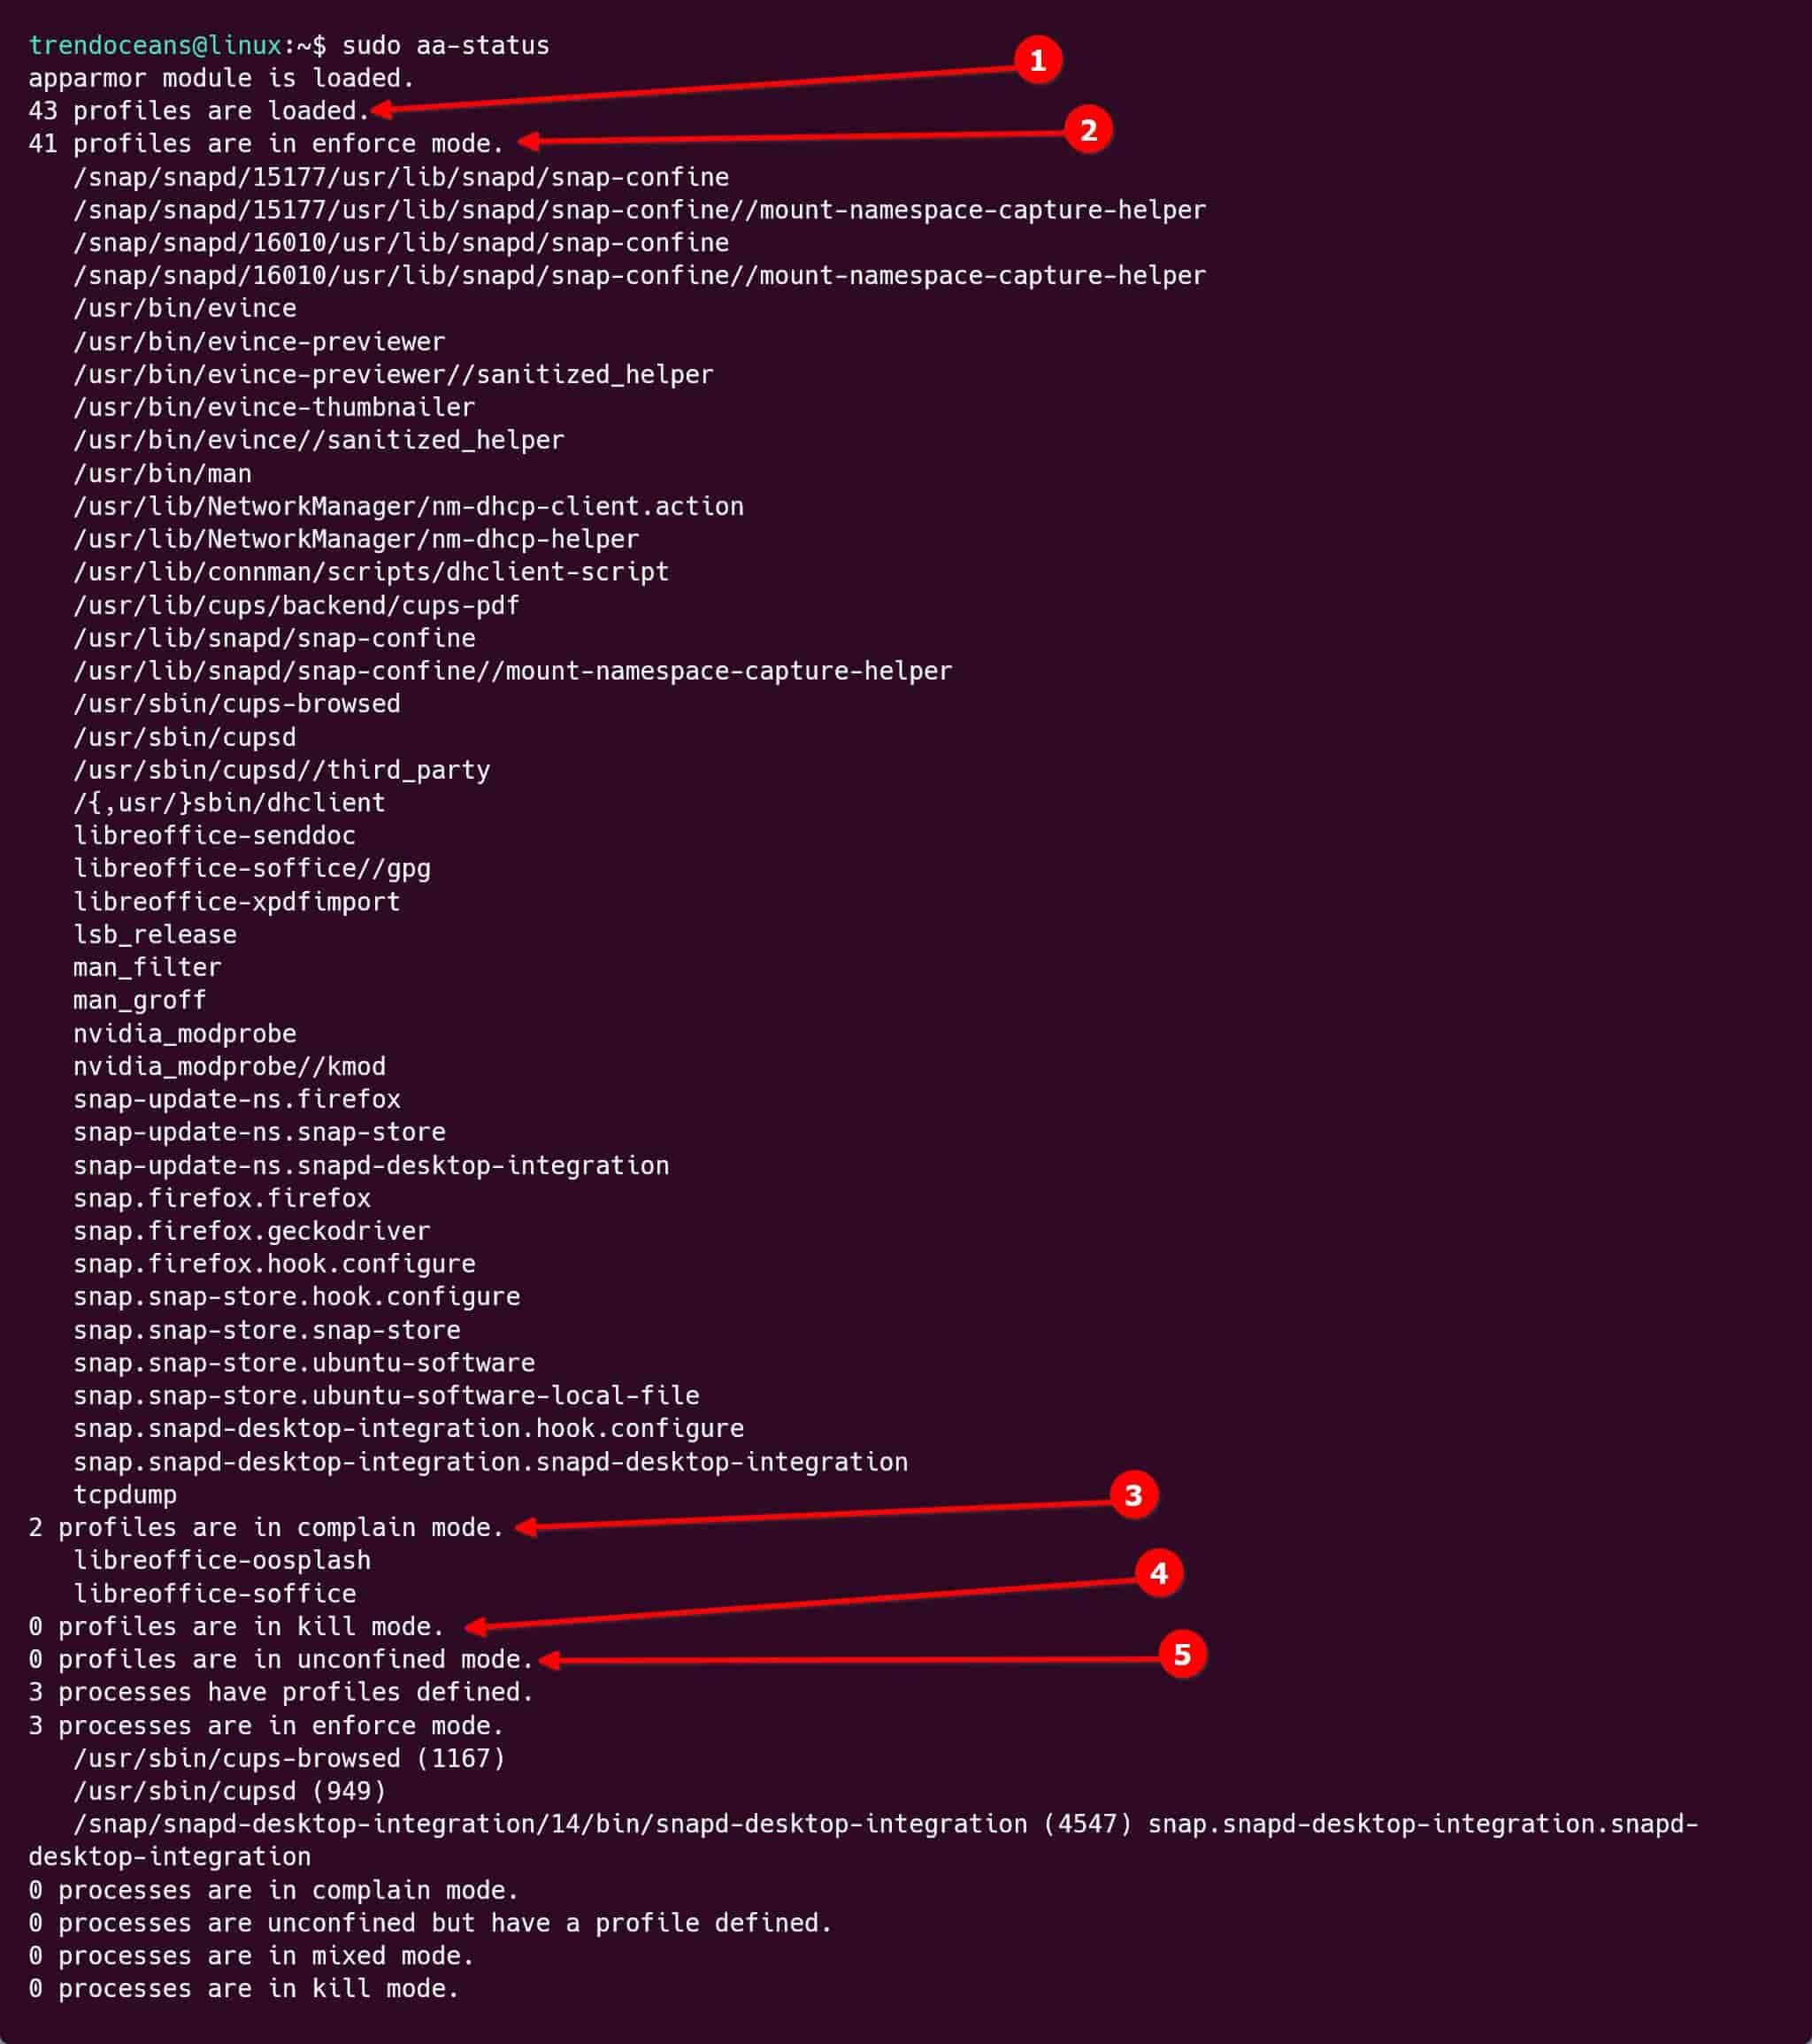
Above, you will see that all the applications are categorized into different profiles. Let us discuss the profiles along with their roles.
- Profiles Loaded: displays the number of applications including enforcing mode, complain mode, kill mode, and unconfined mode.
- Enforce mode: displays the number of applications denied to deviate or jump outside the profile restrictions.
- Complain mode: displays the number of applications allowed to deviate or jump outside the profile restrictions, but all the actions will be logged.
- Kill mode: displays the number of loaded enforcing AppArmor policies that will kill tasks on policy violations.
- Unconfined mode: displays the number of applications allowed to do whatever they want without being logged.
Installing AppArmor Utils in Linux
Modifying the application’s profiles from enforce to complain, kill, or unconfined mode cannot be done without installing the apparmor-utils package. Run the following command and press ‘Y’ when it asks for permission to install.
$ sudo apt install apparmor-utilsManage AppArmor Profile Mode on Linux
You can manage profiles for existing applications and scripts by switching them from enforce to complain mode or vice-versa, or by attaching unassociated applications or scripts to profiles.
Suggestion: Where Do Files Go When the rm Command Is Executed?
If you are new to AppArmor, I highly recommend you to read creating a profile for a user created script in AppArmor to understand more deeply the functionality of AppArmor.
Creating a Profile for a User Created Script in AppArmor
The best way to understand the workings of AppArmor is by creating the script and assigning it to the profile. For example, you will create a simple script and later attach it to the enforce mode profile to restrict its access on your filesystem.
First, open your text editor and copy the following content into it.
#!/bin/bash

echo "AppArmor Example:"

touch sample.txt
echo "File created"

rm sample.txt
echo "File deleted"
Then save it with a script.sh filename and provide executable permission using the following command.
$ chmod +x ./script.shLastly, execute the script using the following command.
$ ./script.shBelow is the output of the above command.

Great, our script worked, but for now, this script is not assigned to any profile, so whenever a new directive is added to this script, requesting other resources in your system will not prevent it from accessing them.
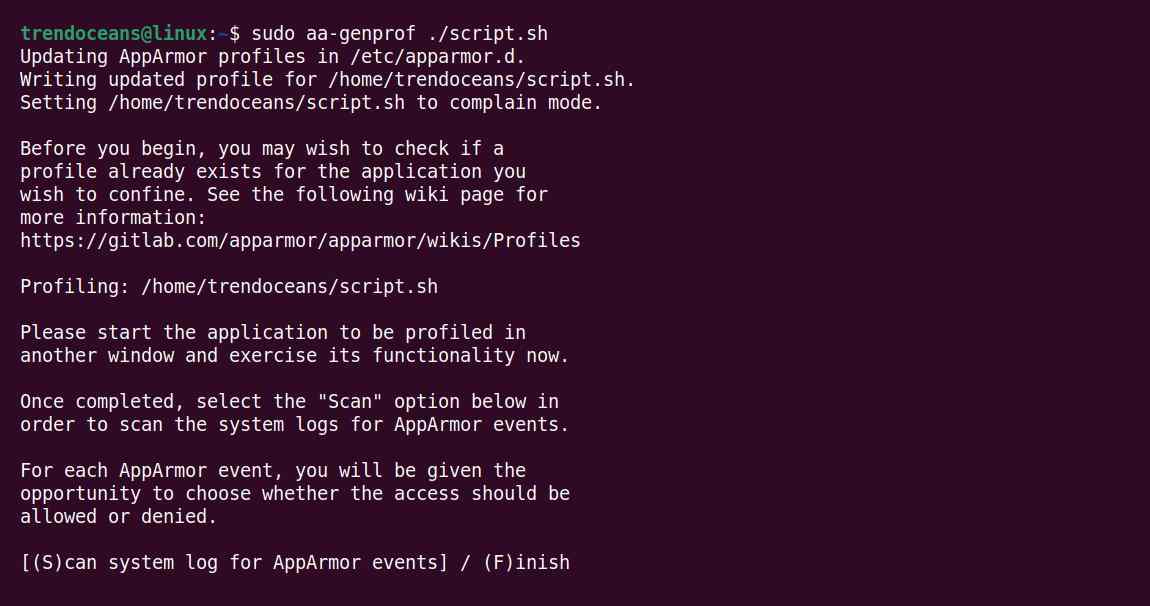
It is good practice to restrict such type of script from accessing your system resources by generating its profile. You can use the aa-genprof command with a script name to generate its profile, as shown below.
$ sudo aa-genprof ./script.shBelow is the output of the above command.
Now, the aa-genprof requires us to run the program while it’s monitoring the system process so that it can scan and create a log for the events the script creates. To provide the appropriate event information, open a new terminal window and execute the ./script.sh file.
$ ./script.shAfter the script is executed, go back to the previous window and press ‘s‘ to bring up the system log for program events.
All commands specified within the script that requires access to your filesystem will now ask for your permission (with the command) as shown in the following prompt.
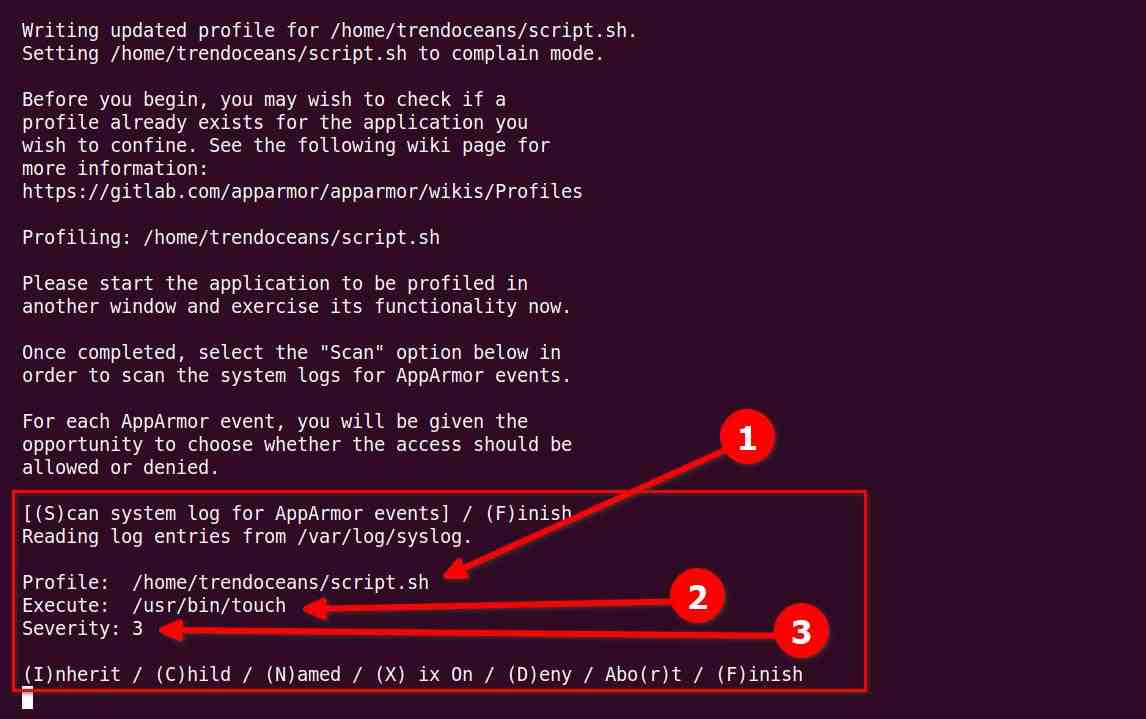
As you can see above, everything is divided into three sections.
- Profile: will output the full path to the script and the same name will be used as the profile name.
- Execute: will show you the file permission this script requires with the command path (for example, touch).
- Severity: tells what the process is trying to do in integer format (1 being a low warning and 10 being very serious)
Knowing about the profile, execution, and severity information of the script, you can handle it with several different options as described below.
- (I)nherit: Creates a rule that is denoted by “ix” within the profile and will allow/inherit the permission (for example, touch) at the time the profile is created.
- (C)hild: Creates a rule that is denoted by “Cx” within the profile, requires a sub-profile to be created within the parent profile, and rules must be separately generated for this child.
- (D)eny: Creates a rule that AppArmor prepends with “deny” at the start of the line within the profile, which restricts the script from accessing the specific resource on the filesystem.
- Abo(r)t: Close the AppArmor program without saving any changes.
- (F)inish: Exit the AppArmor program and save the changes.
For this script, it asks to allow or deny permission for the touch command. As we know, this script will create a sample.txt file and then remove it. So, I’ll inherit the touch command permission in the profile.
For that, you just need to press the ‘a‘ keyboard button, and then you will jump to the next prompt.
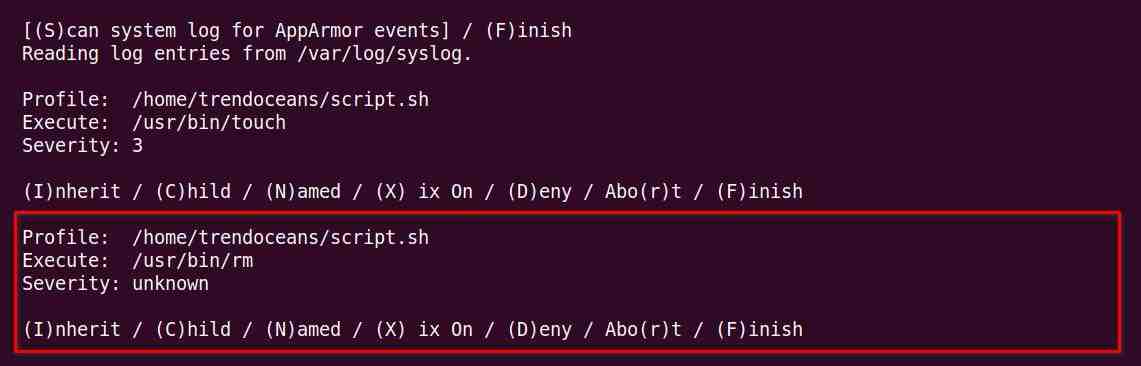
As I mentioned earlier, this script requires two permissions. The touch command (for creating the sample.txt file) and the rm command (to remove the sample.txt file).
Permission for this from both commands will be asked separately. So, simply press the ‘i’ keyboard button to inherit the rm command permission in the profile.
All the permissions defined within the script that are required to access filesystem resources are now fulfilled. The next prompt will be different from the previous two prompts.

As you can see above, there is a new field “New Mode” that tells us what permission is required while accessing the script path. In this case, it is asking to enable read and write (RW) mode, which can be done by pressing the ‘a‘ keyboard button.
In the next window, it will ask your permission to include the function to profile as shown below.
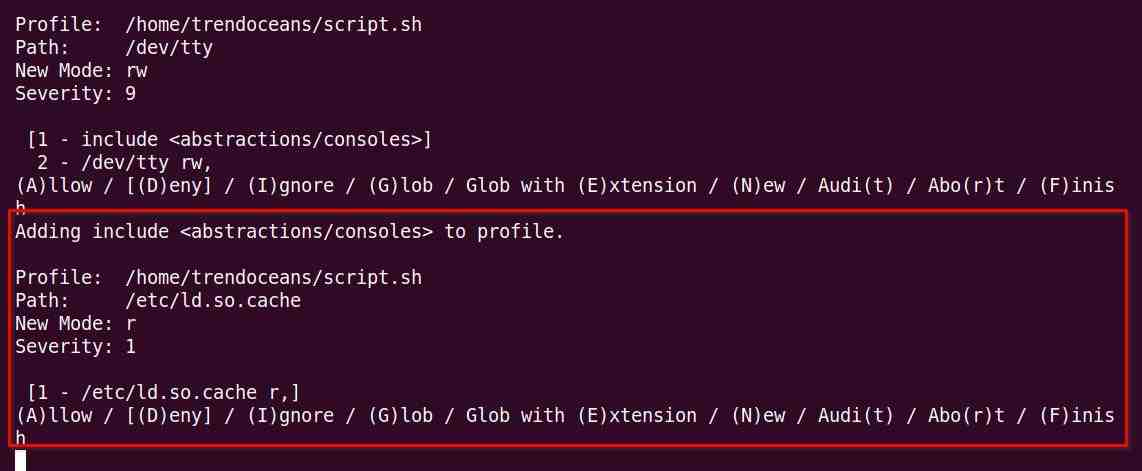
Just press the ‘a‘ keyboard button and in the next window, it will again ask for permission to add ld.so.cache to the profile, as shown below.
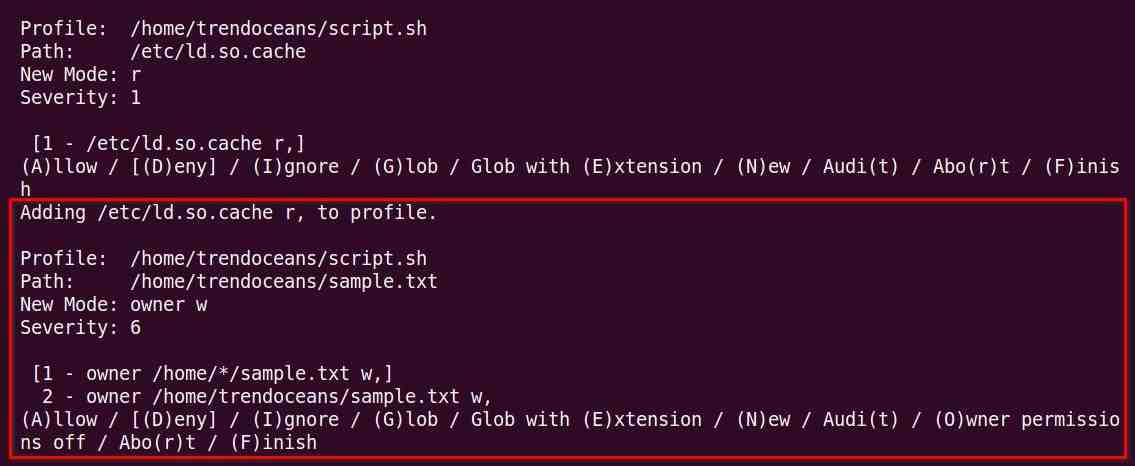
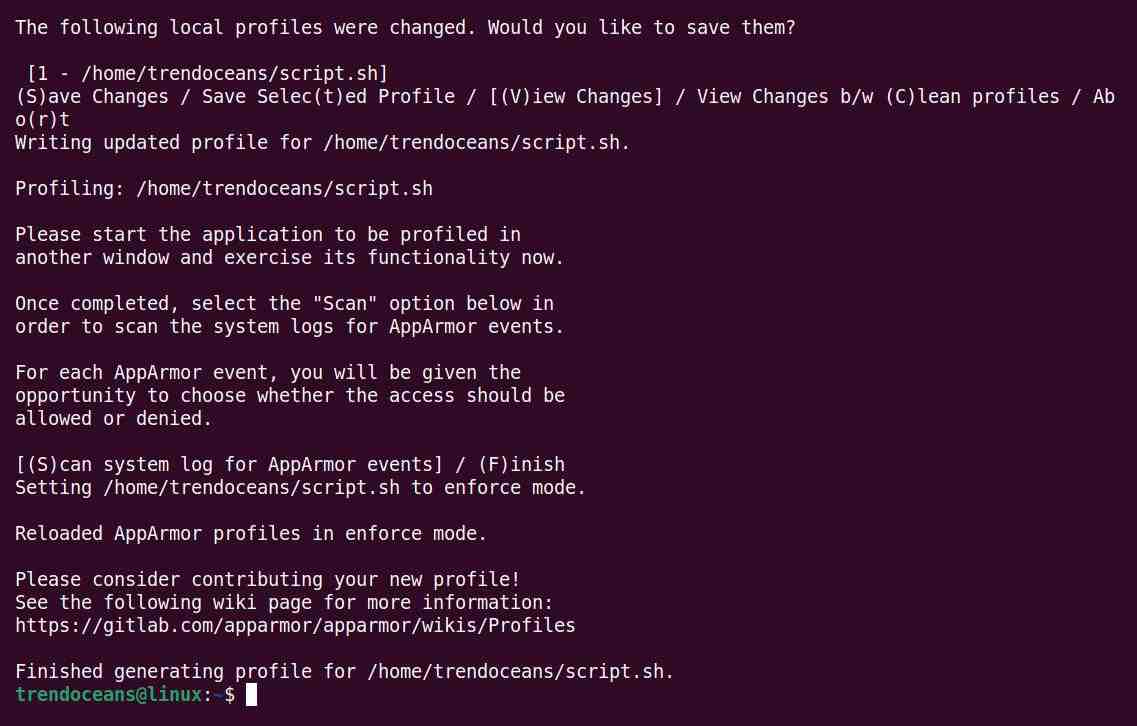
Finally, we get a prompt asking whether we want to save the changes or not. Press ‘s‘ to save changes and then ‘f‘ to finish.
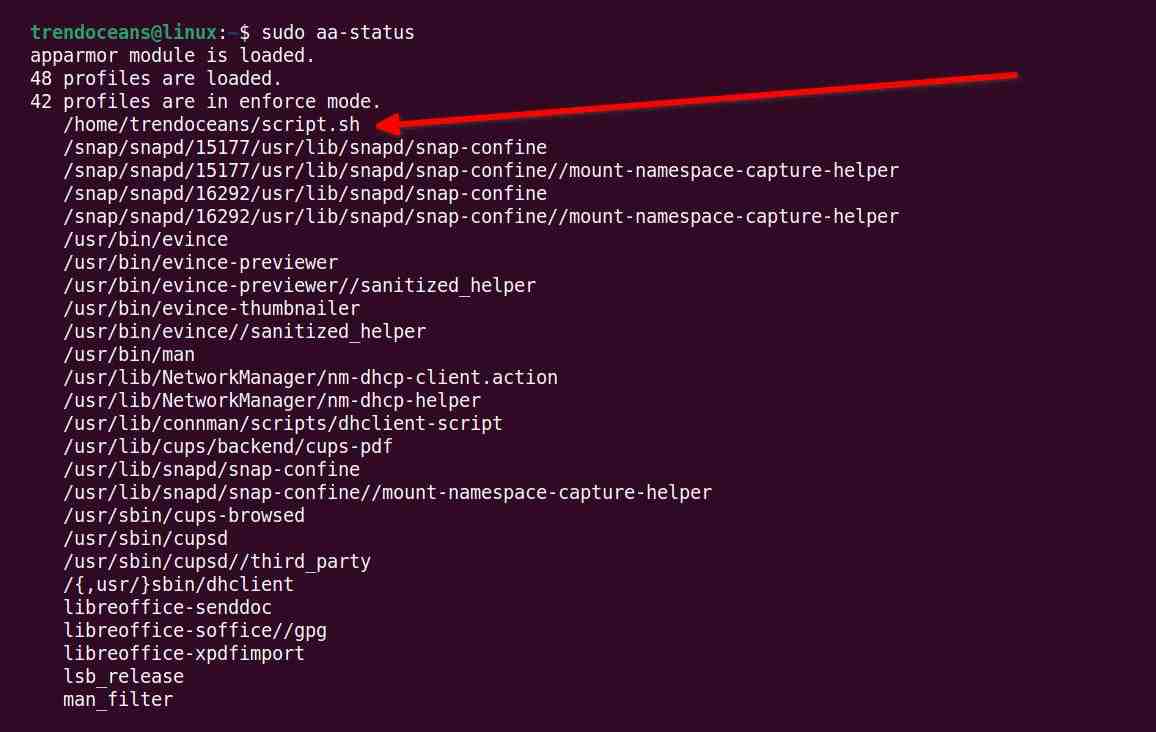
Now, you can verify the profile for the script.sh file is generated by listing the existing AppArmor profiles using the following command.
$ sudo aa-statusBelow is the output of the above command.

Now, if you execute the script file again, it will be processed and all the steps will be executed as before.
$ ./script.shBelow is the output of the above command.

But what if a new permission is added to the script.sh file which is not included in the profile will throw a permission denied error. This can be resolved either by modifying the profile for pre-existing applications or by updating the permissions for the pre-existing profiles.
Modify the Profile for Pre-Existing Applications
If you look at the list of profiles, you will find all loaded profiles, including /home/trendoceans/script.sh which is set to enforce mode.
This profile cannot access any other resources outside of the profile restriction. To make it accessible to other resources, you can change the profile mode from enforce to complain mode, which gives it access to other resources without any restrictions.
$ sudo aa-complain /home/trendoceans/script.shBelow is the output of the above command.

If you recheck the list of profiles using the command sudo aa-status, you will find the profile /home/trendoceans/script.sh

For now, the /home/trendoceans/script.sh profile has access to all resources without any restrictions, even though the logs will be generated. If you wish to revert back to enforce mode, then execute the following command.
$ sudo aa-enforce /home/trendoceans/script.shBelow is the output of the above command.

Execute the following command to check the status of the profile after the changes.
$ sudo aa-statusBelow is the output of the above command.
Now you can play with other profiles the way you want.
Updating the Permission for the Pre-Existing Profiles
In my current script.sh file, I’ve included two more commands: mkdir and rm -rf. which makes the script look like the one below.
#!/bin/bash

echo "AppArmor Example:"

touch sample.txt
echo "File created"

rm sample.txt
echo "File deleted"

mkdir demodir
echo "Dir created"

rmdir demodir
echo "Dir deleted"
While generating the profile for this script, it just took the permission for touch and rm commands. If you try to execute this script file, it will follow the first two steps of creating the file and deleting it. However, when creating a directory and deleting it, it will throw a permission denied error, as shown below.
$ ./script.shBelow is the output of the above command.
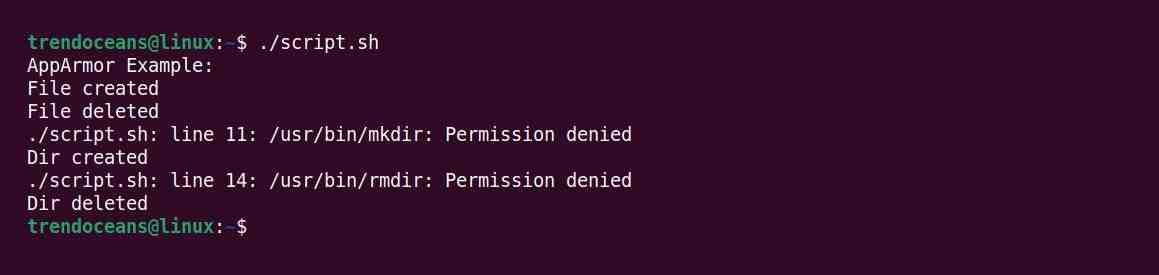
Great!!! This is good news because the script file is prohibited from making changes to the system because it no longer matches the rules described in the profile.
To fix this issue, we need to update the profile with the new permission. So, execute the below command to allow/inherit access to the new resources and then save changes.
$ sudo aa-logprofBelow is the output of the above command.

If you re-execute the script, it will now perform all the steps successfully.
$ ./script.shBelow is the output of the above command.

And just like that, you’ve updated your script profile!
Wrap Up
Now you can easily have a shell script or Python script and assign profiles to them to restrict their access to your system’s resources.
Let us know in the comment section if you want more articles on this topic.
Well Informative.
“Thank you, I appreciate the compliment!”
That helps me so much, thank.