Let me start this article with one question, which answer I’m expecting from you in the comment section. So let’s take the question: when you read the title of this article, what goes into your mind? Why should one create a separate partition?
If you are new to Linux, then you might not be able to give the answer, but those who have given some time to Linux do understand the importance of separated partitions.
Yes, it is very important to create a separate partition in Linux. So let me explain to you why it’s necessary. If you do remember, while installing any Linux-based operating system, you may get the option to choose a partition as guided or manual.
If you have followed any article or video for the installation of distribution, most likely it will suggest you choose a guided way to create a partition.
Because guided partitioning creates all the necessary partitions that are required for the system, and nothing is wrong with this approach, but later on, when you want to taste multiple Linux distributions on your system, you need to format the whole system, which means you have to copy all your files to a different location or wait for the installer to format the file. which doesn’t make sense to me.
So, to avoid this kind of problem, you can create a separate partition for your home directory, which will be safe even if you reinstall different Linux distributions.
Therefore, we will go through a series of steps where we first create a new partition, after which, we will copy the file to a new location, and finally, we will edit the /etc/fstab file to automount the drive whenever the system gets power on.
Create a new partition on the external drive
It’s always recommended that you create a separate /home directory at the time of partition, but unfortunately, we cannot go back and create a partition because all the available space will be occupied by the root system, as in the below-attached image.
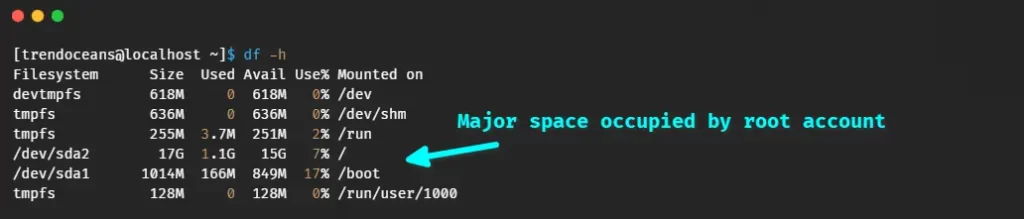
However, you can run the below-mentioned command to check if there is any available free space on your system drive.
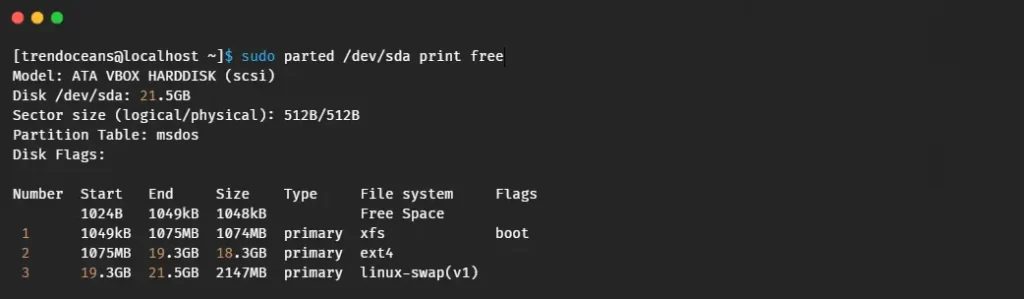
$ sudo parted /dev/sda print freeIf the system has any unallocated partition, then you can use it, but most likely you will not find any space like the below-attached output.
Although you can resize the partition and create a home directory, this is not recommended and is complicated for new users.
Therefore, we will see how to create a new partition on the external drive for the sake of the guide. I’m going to use my 16 GB thumb drive.
If you want, you can also use a hard drive or SSD to perform the following steps.
Attach an external drive
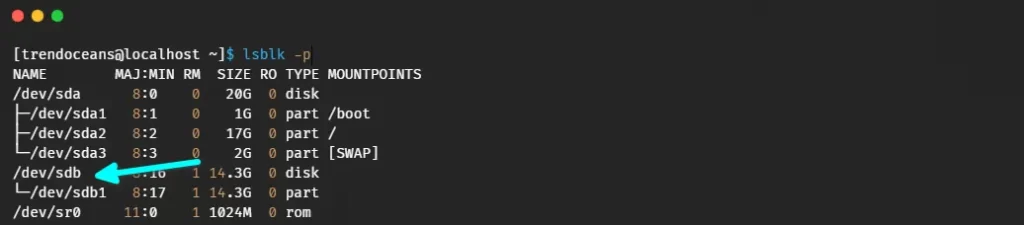
Once you attach the external device to the system, it will automatically be assigned a name, so let’s find the device name by executing the following command.
$ lsblk -pFrom the command output, we were able to understand that the device name /dev/sdb, which is not currently mounted to any location, which may be mounted in your case, and the last size of the external drive.
After collecting this information, let’s create a new partition for the external storage device. Before that, let’s umount the drive if it is mounted by running the below command.
$ sudo umount /dev/sdb1Create a new partition in Linux
To create a new partition on your plugged-in drive, you can use the fdisk command line utility to create a partition in an interactive mode.
Step 01: Select a drive
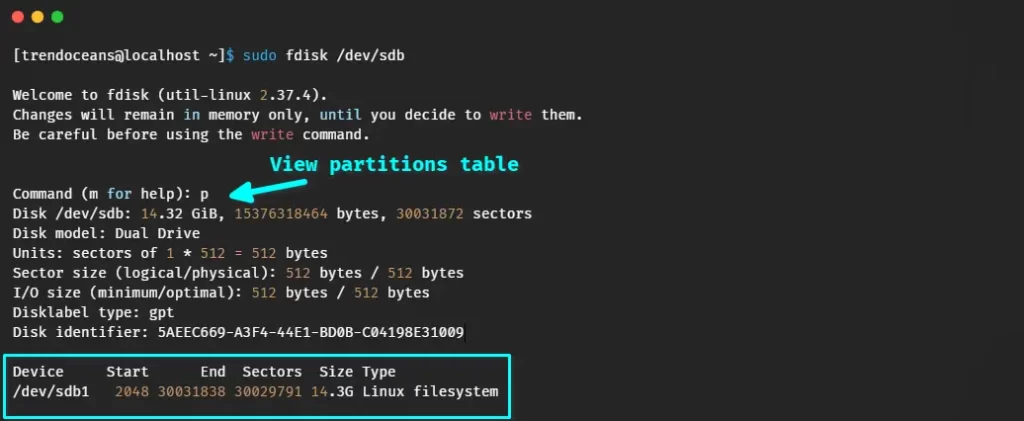
So to create a partition, first get into the device by executing the following command, and when you enter the interactive mode, type the p command to show information about the partition, which will ensure us that we have selected the right drive.
$ sudo fdisk /dev/sdbThe output of the above command.

Step 02: Delete the partition
I’m going to use a complete disk as a /home partition, so I’ll remove all the partitions from the disk by invoking the d command in the interactive mode.
Command (m for help): d
Selected partition 1
Partition 1 has been deleted.
You can skip this step if you do not have any partitions on your drive.
Step 03: Creating a new partition
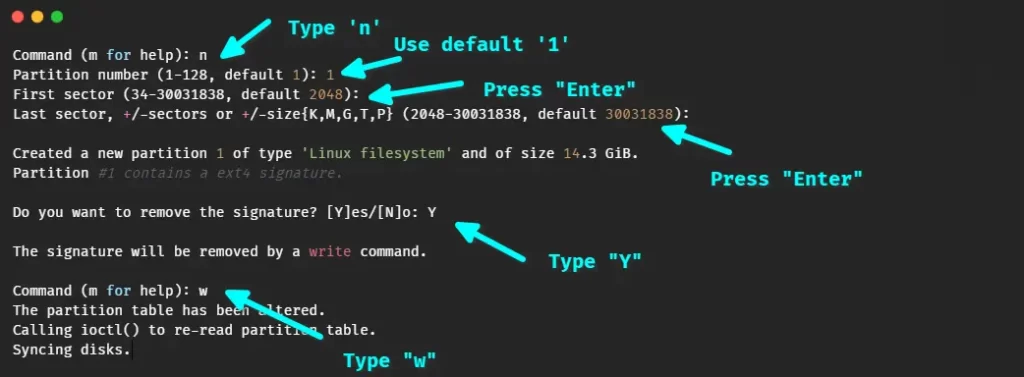
After deleting the partition, you can create a new partition on the same drive by invoking the following commands in a given sequence, like "n", "1", "press enter", "press enter", "y", and last "w" to save the changes.
Step 04: Verify changes
After creating the changes, let’s verify the partition information by executing the same fdisk command $ sudo fdisk /dev/sdb following p in interactive mode.
From the below image, we can clearly see that our execution has worked perfectly so far.
Now we are left to format our new partition into the ext4 format, which is the default format for the Linux filesystem. To format the partition, we need to get out of the interactive mode by invoking the q command.
Also read: How to Determine the File System Type in Linux (Ext2, Ext3, or Ext4)?
Step 05: Format the new partition
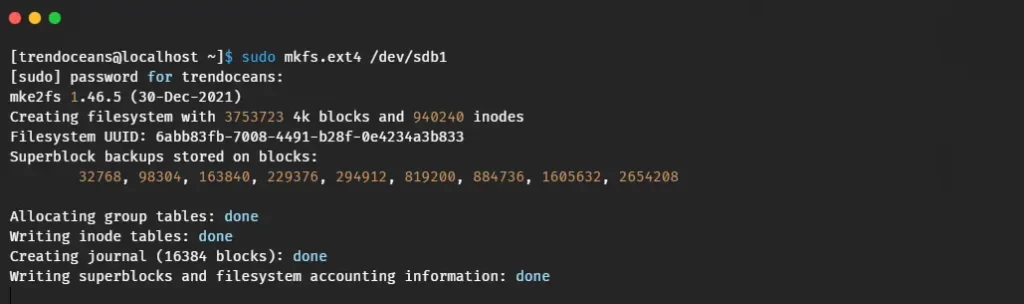
To format the newly created partition in an ext4 file format, then execute the below command.
$ sudo mkfs.ext4 /dev/sdb1
The behaviour of the above command.
Mount a newly created partition on your system
Once you are done with the above step, mount the newly created partition to your system, which will allow you to copy the content of your home directory to a new partition.
To start the mounting procedure first, you need to create a temporary directory on the /media/newpartition which will be a temporary mount point for the time being.
$ sudo mkdir /media/newpartitionAfter that, run the below command to mount the drive on the temporary mount point.
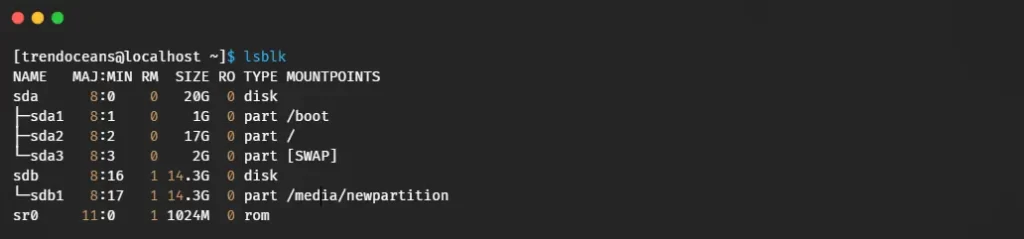
$ sudo mount /dev/sdb1 /media/newpartition/Once the drive is mounted successfully, you will not get the output. Therefore, execute the below command to check whether the drive is mounted on the given path.
$ lsblkThe behaviour of the above command.
Copy the content of a home directory to a mount point
The next step after mounting is to move or copy the content of your home directory to the mount point by running the below command, which will copy recursively all the files that are stored in your home directory.
$ sudp cp -aRv /home/* /media/newpartitionOnce all files have been copied to the location, run the ls command to verify whether all files have been moved or not.
$ ls -l /media/newpartitionRename the original home directory and change the mount point
Finally, you are replacing your original home directory, so to avoid any mishaps, you should rename the /home directory to something else, which will give you a backup of your current home directory.
To create a backup you can run the below command.
$ sudo mv /home /home_bak
Once you have renamed the file, then you need to create another directory with the name /home.
$ sudo mkdir /homeAfter that, change the mount location of the external drive to /home from /media/trendoceans/newpartition.
$ sudo umount /media/newparition
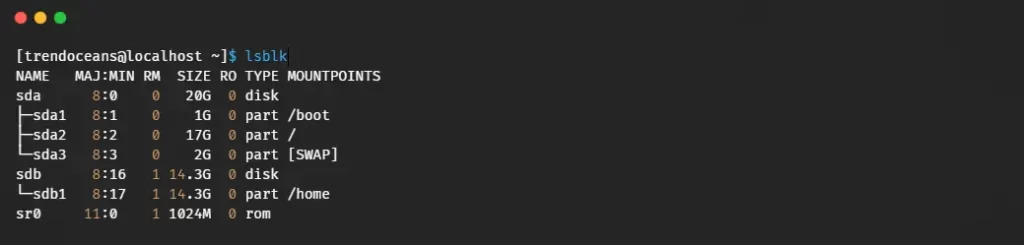
$ sudo mount /dev/sdb1/ /homeThen execute the below code to check the new location of our /home directory, which is now separate from the root directory.
$ lsblkThe output of the above command.
Congratulation! You have now created your separate home directory on your Linux system.
Add mount information to /etc/fstab for auto mounting
After coming back here, don’t close this article now. There is one thing still left to change in /etc/fstab to automount the /home partition, whenever your system gets power on or an external device is connected to the system.
Go back to the terminal and edit the below file.
$ sudo nano /etc/fstabOnce you open the file, you will find some kind of pattern for mounting the drive on /etc/fstab, which is shown below.
// Default structure to specify drive details in /etc/fstab.

<UUID> <mount point>   <type>  <options>       <dump>  <pass>
According to the structure, the first thing you should know is the UUID of your drive for the auto mounting drive, which is unique for every device, and because of that, the system can identify device information.
To find out the UUID of the drive, use the blkid command along with the partition name.
$ sudo blkid /dev/sdb1After getting the UUID of your device, copy and paste the following line of command to /etc/fstab and make sure to replace the below UUID with yours, and close the file.
UUID=6abb83fb-7008-4491-b28f-0e4234a3b833 /home ext4 defaults 0 2Your screen should look like the below-attached image.
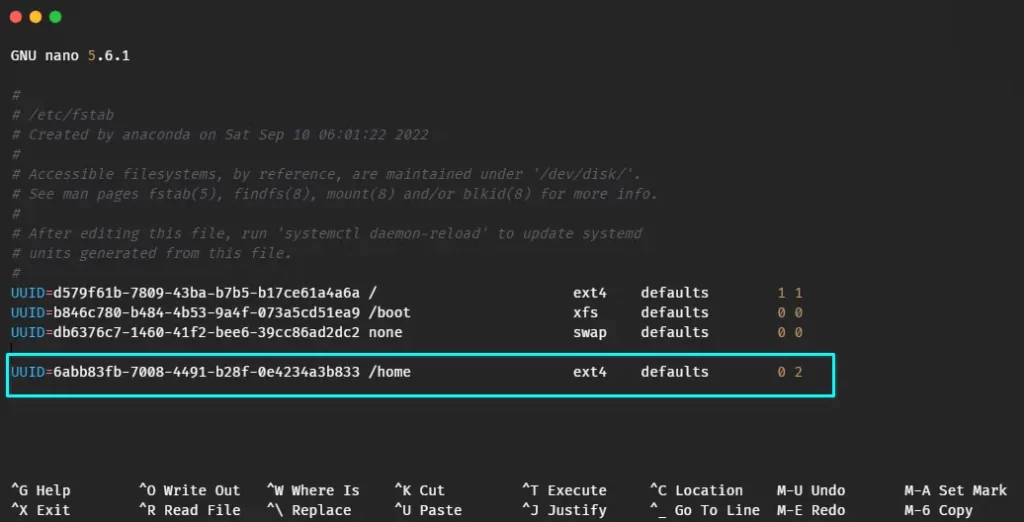
If you are sure about the changes, especially with UUID, then you can close this file to auto-mount the drive whenever the system gets rebooted or when you connect the external drive back.
To learn more about automount, you can follow one of our articles: How to automount a disk or USB in Linux GUI/CLI.
Wrap up
That’s all for creating a separate /home directory on your drive.
The only limitation of this method is that you always need to mount an external device on your system. Otherwise, your system will boot into rescue mode, and from there, you need to comment out the line that you added in /etc/fstab, and then reboot your computer.
So it’s better you have connected your external drive whenever the system gets boots up.
If you are facing any problems while following the steps, then do let me know in the comment section.