I bet once you start using the Nala package manager, there’s no way going back to the apt command.
When you try to install any application or utility using the apt command, what do you see?
Information about package names will be presented in such a monotone format that you have to stare at the screen to figure out what step is being taken now and what packages are being used or removed, right?
For example, if I install git from the default apt package manager and the same command is installed from the Nala package manager, then you can clearly see the difference from the side-by-side comparison.


And if I ask you, which output looks much more concise and unambiguous? You would simply answer, “The second one, which is running on Nala package manager, is much more concise and unambiguous.”
So, let’s learn how to install Nala package manager on Ubuntu and other derivatives of Debian-based Linux distributions, which means you can follow the same steps if you have Linux Mint, Pop!_OS, Debian 11 (Buster), etc.
What is Nala Package Manager?
Nala is a frontend for the apt command that removes the limitation and gives you a beautiful, clean, and well-organised list of packages and dependencies that will get installed on your Linux system.
And the best part is that you don’t need to meomorize the nala command and its associated options as the commands and options are the same as apt, and under the hood it uses the python-apt api to interact with apt.
If you’ve ever used the dnf package manager, then you can easily relate to or understand the output format of the Nala package manager.
That was the basic information about Nala.
Now let’s talk about the features of Nala Package Manager, which are designed and developed in such a way that you will like to replace apt with Nala.
Features of Nala Pacakge Manger
In the “Introduction” section, I’ve included an animation of how to install git using the Nala package manager.
That animation shows us what extra dependencies are needed to support a specific application, as well as the library version and size, with brevity.
I’m confident that this won’t be the case if you use the APT package manager because the output is more complicated and requires more work on your part to understand.
In addition, the APT package manager does not show the size of libraries and is not as user-friendly, which makes it difficult for beginners to make a sense out of the output.
Now you may understand what the main objective of the project creator is.
Aside from that, Nala can do parallel downloads, which means packages can be downloaded pretty quickly compared to the traditional APT package manager,
which will download packages from 3 different mirror sources, which will eventually balance the load on each mirror site and give you a better response.
Note: Nala does not use APT for package downloading and verification.
One of the key features of the Nala package manager that personally changed my mind about using it over APT is the nala history command, which is similar to the dnf history command that you will find in RedHat-based systems like Fedora.
The nala history command makes a log of every transaction in /var/lib/nala/history.json, which can be later used to undo or redo changes.
In a nutshell, you will find the following available features:
- Clean and Structured Frontend
- Parallel Download Support
- Auto fetch mirror repositories from the respective master list
- Store Install, Remove, and Upgrade in History with Unique ID
- Rollback to the previous installation using a Unique ID
Install Nala on Linux
Nala is easy to set up on multiple Linux installations, including those for amd64, arm64, and armhf packages.
At the moment, Nala is not available in older Ubuntu repositories, but you can install it on your system by following the steps below.
- Method 1: Install Nala from Official Repositories [Ubuntu 22.04]
- Method 2: Adding Custom Repositories [Recommended]
- Method 3: Install Nala package manager using Pacstall
- Method 4: Install Nala package manager using Debian Package
 Install Nala from Official Repositories [Ubuntu 22.04]
You can quickly install Nala on your system if it is running Ubuntu 22.04 or Ubuntu-derviaties by executing the one line of command that is shown below:
$ sudo apt update && sudo apt install nalaAfter the installation is complete, you can read the command usage by clicking here.
 Adding Custom Repositories [Recommended]
This is the preferred and simplest way to install Nala on a machine running an older version of Ubuntu or Debian, so all you have to do is follow the steps listed below in the order they are listed.
Copy and paste the following command into your system’s terminal to add the Volian Scar repositories, from which you can later install Nala.
echo "deb [arch=amd64,arm64,armhf] http://deb.volian.org/volian/ scar main" | sudo tee /etc/apt/sources.list.d/volian-archive-scar-unstable.listNext, add the GPG key for verification, as shown below.
wget -qO - https://deb.volian.org/volian/scar.key | sudo tee /etc/apt/trusted.gpg.d/volian-archive-scar-unstable.gpg > /dev/nullFor Ubuntu 22.04/Debian and the later versions, you need to execute the below, which will first update your system repositories and later install nala.
$ sudo apt update && sudo apt install nala -yIf you are using an older version like Ubuntu 21.04 or Debian Stable, then you should invoke the below command, which will install nala-legacy:
$ sudo apt update && sudo apt install nala-legacy Install Nala Package Manager using Pacstall
Alternatively, you can install the Nala package manager from Pacstall, but for that first, you need to install Pacstall on your Ubuntu machine by running the following command:
$ sudo bash -c "$(curl -fsSL https://git.io/JsADh || wget -q https://git.io/JsADh -O -)"Once it is done, execute the below command to install Nala.
$ pacstall -I nala-deb Install Nala Package Manager using Debian Package
If you do not prefer the above method, then you can also download the “deb” package and install it locally without an internet connection using the apt or dpkg commands.
But first, download the package from the Releases page, which will be similar to the below image:
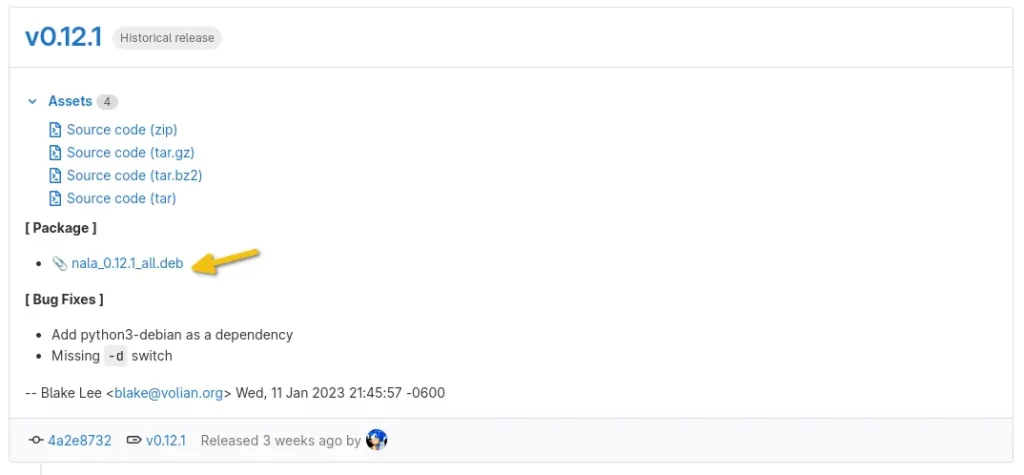
After downloading the package from the Releases page, you can then execute any of the following commands to install Nala:
$ sudo apt install /path/to/nala_version_arch.deb
#OR
$ sudo dpkg -i /path/to/nala_version_arch.deb
$ sudo apt install -f
The installation part is over.
Now let’s move on to the usage part.
Nala Command Usage
The apt and nala commands are pretty much the same, so if you are familiar with the apt command, you can easily handle and utilise the Nala package manager.
Wait, let me take a sip of coffee, and I’ll show you how to be a master user of Nala.
Updating & Upgrading system
You can easily update your system using the same apt method by replacing apt with nala package manager command, as shown below.
$ sudo nala update && sudo nala upgradeBelow is the behaviour of the above command.
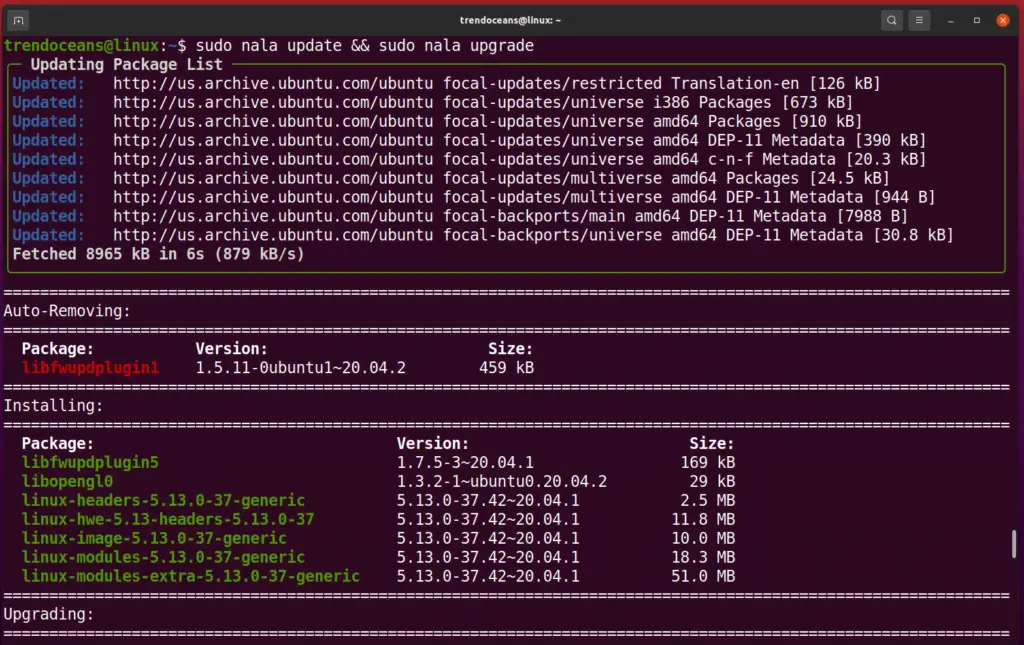
No offense, but are you still using the same old standard FTP (File Transfer Protocol) to exchange files from a remote system?
Use much better alternative SFTP!
Or, if you want to check for updates first and then want to upgrade, you can use the following commands one at a time:
$ sudo nala update
$ sudo nala ugrade
List Packages using Nala
This option is similar to dpkg --list or apt list to list out all the available applications or packages in a friendly manner where you are able to easily identify the package name along with version and short information about utilities.
To list out package information, you can use the following code:
$ nala listBelow is the behaviour of the above command.
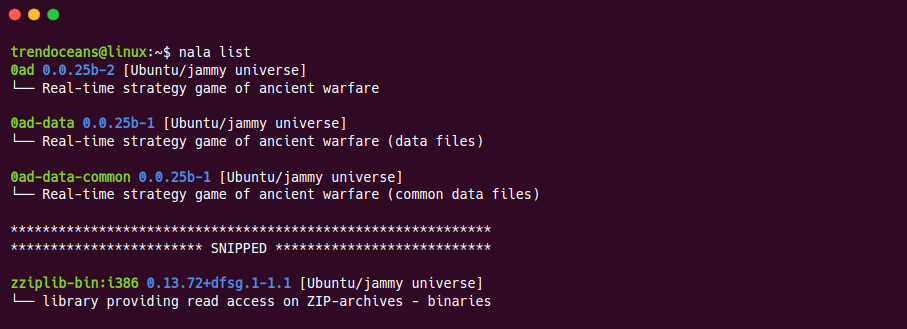
The problem with the above option is that the output completely fills up the screen with package names, which is not convenient at all, so to add scrolling capability, you can use any pager, like less or more.
$ nala list | lessIf you only want to see a list of installed packages, use the -i or --installed option.
$ nala list -i
#OR
$ nala list --installed
You can also list out the names of the packages that have been installed using the Nala package manager.
$ nala list -N
#OR
$ nala list --nala-installed
Show Package Details
When you want to know more information about a specific package, like required dependencies, the maintainer of the package, the project repo, or a detailed description of the project, then you should use the nala show command, which will print the corresponding details if they are available.
Let’s say I want to check the information about the terminator utility before installing it on my system. Then I need to invoke the following command:
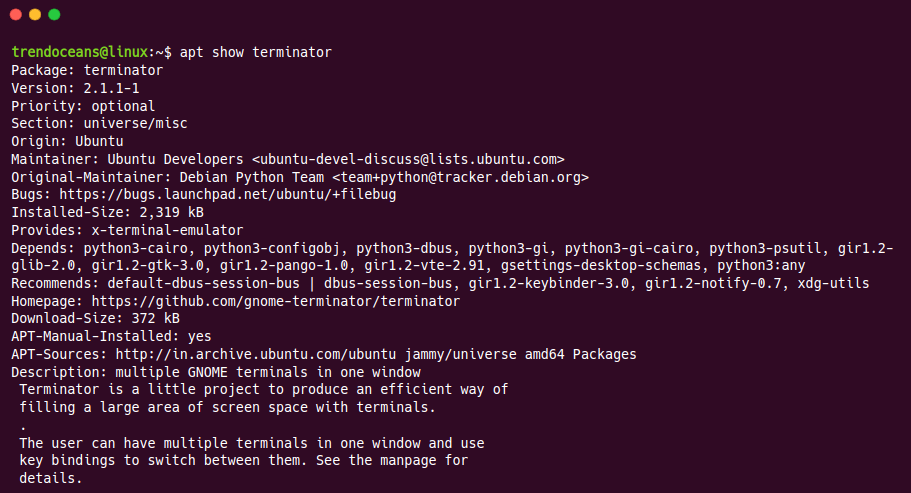
$ nala show terminatorUndoubtedly, the output of nala show is much better than that of apt show, as you can clearly see in the below image.
#nala show command output
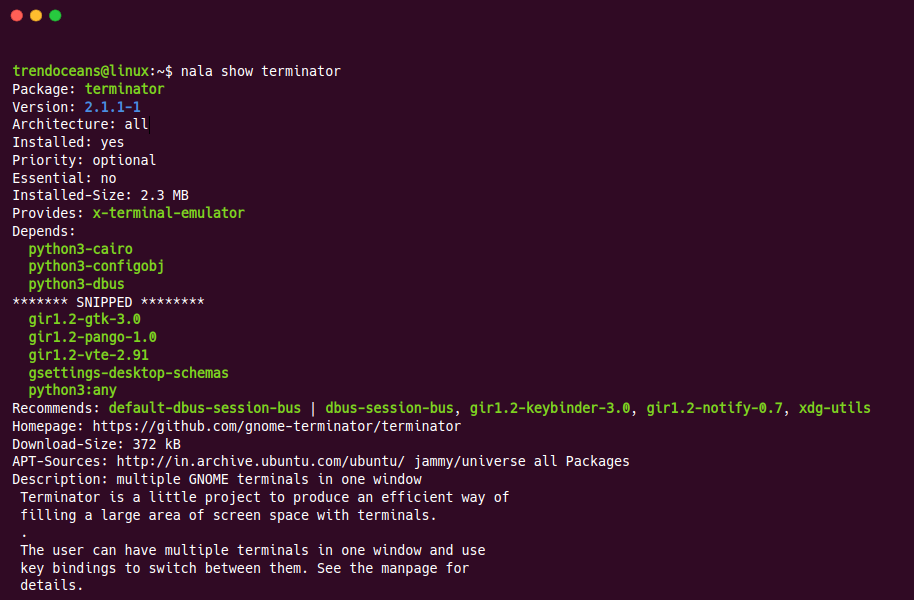
#apt show command output
Installing Package using Nala
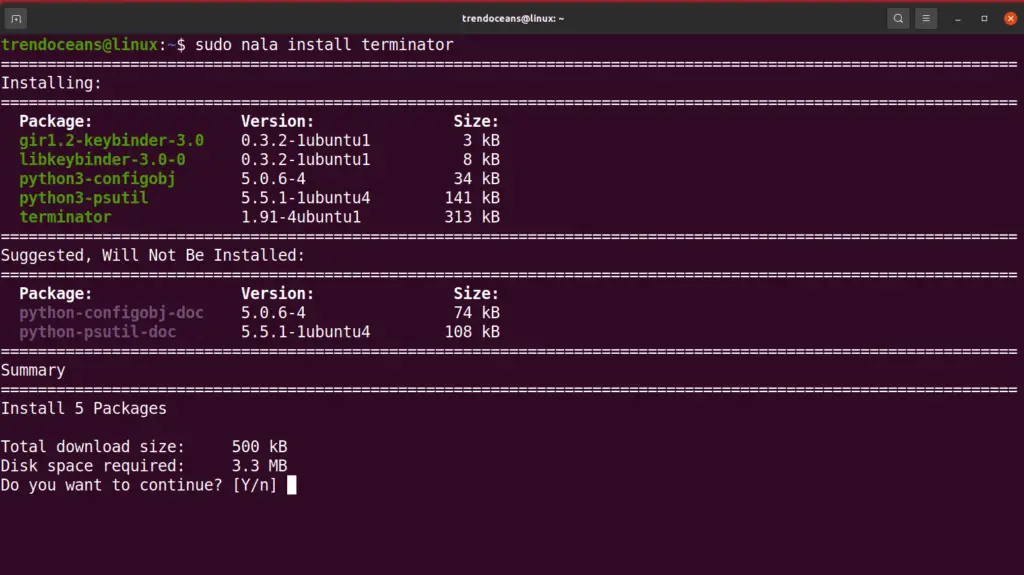
Any standard package available in the repository can be easily installed using the Nala package manager. The below command will install the terminator on your Linux system (ex: Ubuntu).
$ sudo nala install terminatorBelow is the behaviour of the above command.
Removing Packages using Nala
To remove any package, you can use the remove or purge command, depending on whether you want to keep configuration files.
The underlying package that is no longer needed is automatically removed by the Nala package manager.
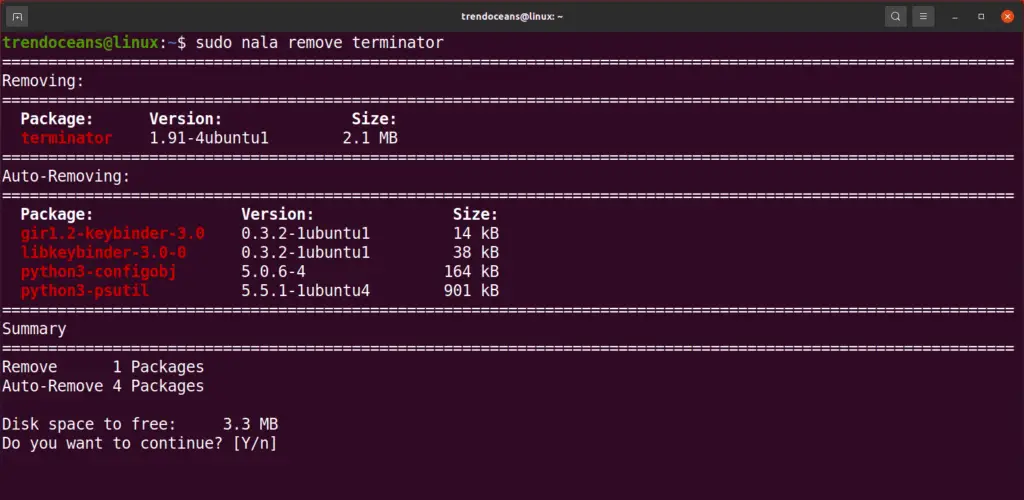
In my case, if I want to remove binary files without removing the configuration file of the terminator, then I need to use the following command:
$ sudo nala remove terminatorBelow is the behaviour of the above command.
You can also run the following command to remove the program from your system because both commands will work alike.
$ sudo nala purge terminator
#OR
$ sudo nala remove --purge terminator
Fetching all Mirrors Repositories
If you have ever used apt-select, apt-smart, netselect, or netselect-apt command line utilities, then you may be aware of how we used to find the fastest APT mirror.
Now you don’t need to use these utilities anymore because this feature is available out of the box in the Nala package manager.
The nala fetch
After fetching distribution details, it searches for the fastest mirror, where you will get the list of mirror sites according to the lowest latency and speed, which you can use on your system.
To find the fastest Ubuntu mirror, invoke the below command in your terminal window:
$ sudo nala fetchNext, you need to specify the mirror index number, as shown in the below image.
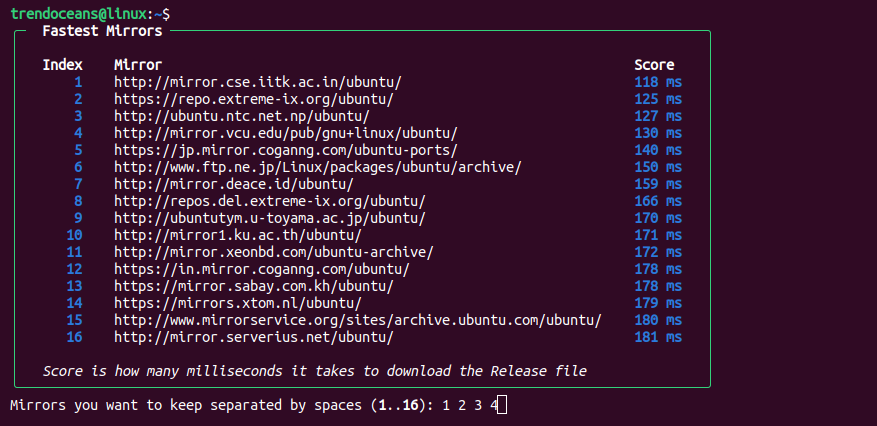
Once you specify the mirror that you want to use, press enter.
After that, it will ask you for a confirmation before adding the selected mirror to /etc/apt/sources.list.d/nala-sources.list
If you are sure about the mirror, press “y” or else “n” and choose a different mirror.

The last step is to update your system to use the following mirror.
$ sudo nala updateAnd if you don’t want to use the following mirror, then simply delete the file “/etc/apt/sources.list.d/nala-sources.list” by using the rm command.
$ sudo rm /etc/apt/sources.list.d/nala-sources.listAlso Read: How to Enable & Disable the Universe, Multiverse, and Restricted Repositories
Nala History Command
One of the prime features of the Nala package manager is nala history, which is similar to dnf history that you find in the DNF package manager.
It allows you to view all the changes, and if something doesn’t go as per your intention, then you can easily roll back to the previous state.
Yes, it is an interesting feature of the nala command, but at the same time, you may be curious about where it holds data and how I can access it.
Then let me show you everything one by one.
The nala history command stores system activity related to “Install,” “Remove,” and “Upgrade” with a “Unique ID” in the history located at “/var/lib/nala/history.json” in your system.
$ nala historyOnce you run the above command, it will print the details, like the unique ID of the command that you have executed, along with the date and time of the specific action.
The number of changes that occur under the relevant command will then be at par with the last username of the user who made the request.

Redo and Undo Command Operation
From the above image, you are able to see what all the information the nala history command stores in your system, so to get information such as packages and dependencies used for a specific command in the history, use the info command along with the ID as shown below.
$ nala history info 4When you run the above command, it will show the information about a specific transaction, which will include the header on top and the following details about packages: package name, version, and size.
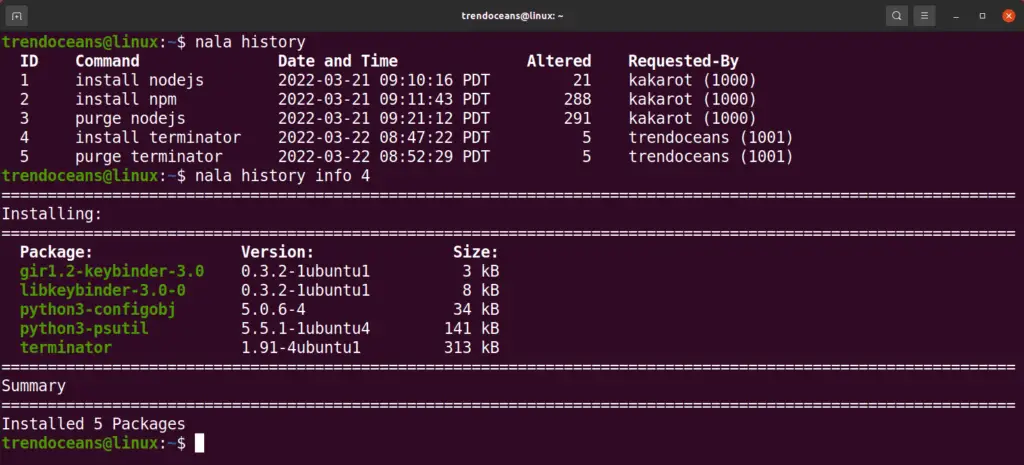
You can use the undo or redo commands in conjunction with nala to make changes as needed.
As you can see in the above image, “ID no. 4”, which installed “terminator” on your system by running "sudo nala install terminator" instead of typing "sudo nala purge terminator", we can undo the last changes by executing the below command:
$ sudo nala history undo 4Below is the behaviour of the above command.
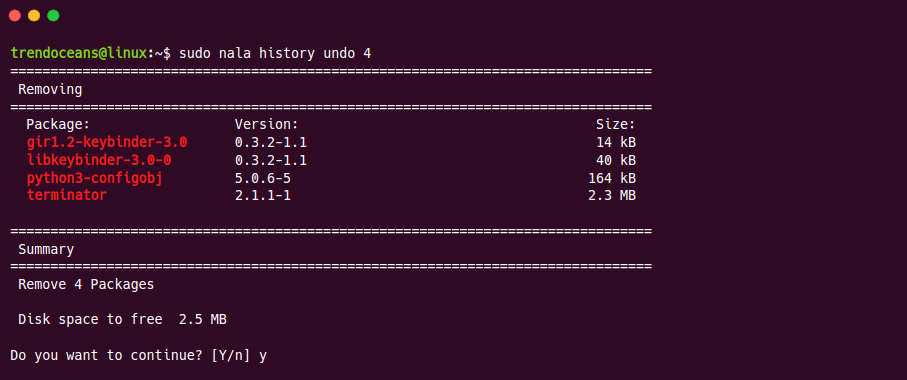
Currently, undo feature will only work for the install and not for other operations.
And if you want to install it again, then execute the below code:
$ sudo nala history redo 4Lastly, if you don’t want to store any specific transaction anymore, you can clear it from the history record by running the following command with the “Unique ID number”.
$ sudo nala history clear 4Once the history is cleared, you will get a gentle message on the screen that “History has been altered…”.
Nala Help Section
If you are not sure how to use a particular command, then the help section and manual are the best options to look for help, where most likely you will find the solution, and of course, we are there for you.
Some of the helpful commands that you can run when you are not sure how to start with the Nala or particular options, like those shown below, are:
$ nala --help or nala -h
$ man nala
$ info nala
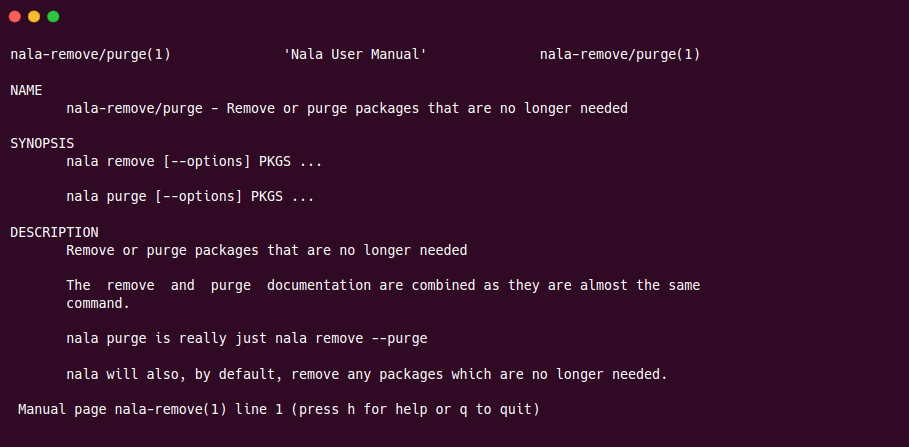
For instance, if you are not aware of how to use the purge option, then execute the below command, which will list the usage of the command, which you can see in the next available image.
$ nala purge -hBelow is the behaviour of the above command.
Wrap Up
That’s all for now. Here we have discussed how to install the Nala command line utility, as well as its features and how to use it.
The Nala command-line utility is a powerful tool that can be very useful for managing an application very easily and efficiently without staring long at the screen to find something meaningful.
You can find more information about Nala on the project’s GitLab page.
Anyway, if there is something I need to consider, please use the space below to provide any additional information or feedback.
Thank you very much for this excellent apt frontend. I am hesitant. This is giving sudo privilege to an utility which is not officially endorsed by Debian. May I have your opinion on this?
Nala is an extension to apt command, Feel free to use the sudo command with it.
I think Nala is a great extention to the apt command. I also think Blake is very helpful when you need help or assistance. I use it with fish and it runs very well and coloring of letters is very nice looking and easy on your eyes.
Thanks for the this most comprehensive info on NALA as a substitute for the APT command. Installing it on my laptop right now. Will it also substitute for the Fedora DNF command?
Hi Geoff, Thanks for your feedback. In most cases, NALA performs all the DNF operations that it used to do in RHEL and its derivatives.
I have fallen in love with Nala. I recently installed Debian 11 coming from Mint 21. Debian 11 plus Nala = Win!
How does one update/upgrade the installed Nala version to a more recent one? I am, currently, on 11 and would like to upgrade to 13.
Thank you.