When you updated your system repository, did you get an apt-key deprecation warning? If yes, then read this guide to resolve the apt-key deprecation warning message.
After adding a new PPA or whenever you try to update your system, you will find a warning message that states: W: http://ppa.launchpad.net/xyz/apps/ubuntu/dists/jammy/InRelease: Key is stored in legacy trusted

Which is not an error message it is a warning message that gives you a reminder that the following PPA gpg key is saved in /etc/apt/trusted.gpg keyrings, which is deprecated in latest versions of Ubuntu and Debian.
To suppress or remove the warning message, you need to export the keys into /etc/apt/trusted.gpg.d or /usr/share/keyrings/ directory as per the Debian official guidelines.
So let me show you how to fix the apt-key deprecation warning message in Ubuntu 22.04 and Debian 11.
Resolve the apt-key Deprecation Warning Message
Adding a third-party PPA is very useful when your system repository doesn’t provide you with the latest version of software. However, it will bring up the apt-key deprecation message if you don’t add it correctly.
So there are a couple of workarounds to fix this warning message that appears on the terminal screen, but none of them will move all the keys to the respective paths at once.
Now you may be wondering why this warning shows up on the latest Ubuntu version, right? Initially, the system graciously put the key in the /etc/apt/trusted.gpg keyring.
Still, it will accept the information in the trusted.gpg keyring, but it will also raise the warning message.
The reason for this warning message is to protect the system from potential security risks, like if you have added a PPA for particular applications (A), but the PPA is malicious or due to some odd reason, then it can use the signature key of A application to install B applications.
Another advantage of using the new approach is the ability to separate individual GPG keys for better management and security.
After getting information about the warning message, let’s move on to the resolution part.
Method 01: Adding a Key to /etc/apt/trusted.gpg.d/
One of the simplest ways to resolve the warning message is to export the key using apt-key export and pipe the output to the gpg command to import the keys to /etc/apt/trusted.gpg.d/.
This step requires you to have an 8-digit unique identification of the key, which you can get by running the apt-key list command.
Once you run the above command, it will list all the trusted keys that you have added to your system, and from that list, your work is to find the program name that raises the warning message.
Like here, I’m getting a warning message for http://ppa.launchpad.net/kubuntu-ppa/ppa/ubuntu/dists/jammy/, so let’s scroll the output and find the information.
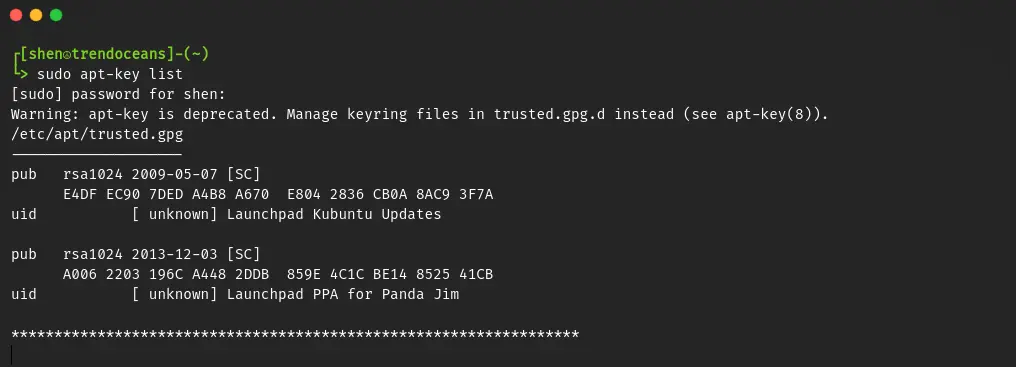
Once you have found the respective PPA, you have to copy the last 8 characters from the pub, for example, “8525 41CB”, and remove the whitespace between.
Next, you need to modify the below command with the last eight-character pub key that you want to export to /etc/apt/trusted.gpg.d/ with a gpg file keyname that should almost match the original program name so you won’t forget which key it is in the future.
$ sudo apt-key export 852541CB | sudo gpg --dearmour -o /etc/apt/trusted.gpg.d/kubuntu-all.gpgAfter executing the above command, you will find the new file has been added to the /etc/apt/trusted.gpg.d/ directory, which means almost all of your work is done.
Now you just need to update the system repository to verify the changes. If the error no longer appears, then your work is complete, and you can say thank’s to me 😉
To learn more about apt command usage you check: How to use APT Package Manager with Examples
Method 02: Adding Keys to /usr/share/keyrings
Another method to move or add keys from /etc/trusted.gpg to the official recommended path /usr/share/keyrings.
This method is almost similar to the above except for specifying the gpg key path in the source file to /usr/share/keyrings/<key-name.gpg>.
Open the terminal window and execute the following command to get the last 8 characters of the public key that you want to move to the centralized location.
$ sudo apt-key list Once you find the public key of a particular PPA, copy the last 8 characters from the public key and remove the whitespace in between.
After that, replace “852541CB” with your pub key and change “kubuntu-all” to the relevant package name.
$ sudo apt-key export 852541CB | sudo gpg --dearmour -o /usr/share/keyrings/kubuntu-all.gpgNext, you need to specify the key file for the respective PPA source file so that it can prevent you from encountering any security warnings while installing packages from that PPA.
For this purpose, open the respective PPA file and add the following line after deb and between the URL of the repo:
[signed-by=/usr/share/keyrings/key-name.gpg]For the sake of this guide, let me modify the /etc/apt/sources.list.d/ubuntuhandbook1-apps-jammy.list file to add the above line of text.
deb [signed-by=/usr/share/keyrings/kubuntu-all.gpg] http://ppa.launchpad.net/ubuntuhandbook1/apps/ubuntu jammy main>After adding the line, save and update the repository to see the response to the changes.
If you are not getting any errors or warning messages while updating, it means your work is complete.
Read: Deprecated Linux Commands you Should Avoid to Use Right Now and Use Their Replacements
Wrap up
That’s all for this guide, where you learned how to resolve the apt-key deprecation warning message in your Ubuntu or Ubuntu-based distros like Linux Mint, Pop!_OS, and so on.
This guide can also be followed on Debian distributions.
Read: How to Remove and Disable an Individual PPA in Ubuntu 22.04
If this guide helps you to resolve or suppress the apt-key deprecation message, then let me know in the comment section.