Steps to Install MySQL Workbench on Ubuntu 20.04
MySQL Workbench is a cross-platform GUI tool to Manage Database Management System. It allows the database administrator to monitor performance, manipulate user permission, and many other administrative tasks.
Whether you are a Developer or Database Architect, or Data Base Administrator, it all in one tool to perform tasks swiftly and without any hassle.
Features
- Visual Performance Dashboard
- Administer
- Develop
- Data Modelling (Design)
- Database Migration
- MySQL Enterprise Supports
MySQL Workbench Editions
MySQL Workbench is mainly available in three editions, which are given below:
- MySQL Workbench Community Edition — Open Source (GPL License)
- MySQL Workbench Standard Edition — Commercial
- MySQL Workbench Enterprise Edition — Commercial
In this guided article, we will walk you through the Installation steps of MySQL Workbench Community Edition on Ubuntu 20.04.
Prerequisite
We will not ask much from your end. First, you should be able to access the terminal with a sudo privilege, and That’s all.
Install MySQL Workbench for Ubuntu
There are multiple ways to Install MySQL Workbench on Ubuntu System such as :
- APT Package Manager
- Using mysql_config.deb file
- Install Workbench using .DEB package from Official Site
We will not advise you to go with the APT package manager as you know it takes time to get the latest version of the application on the Ubuntu Repository.
Step 1: Download MySQL Workbench Community
The first step is to get MySQL Workbench .deb package from the Official Web page. To download, click on the below button, and it will redirect you to the download page.
And Once the page is ready to take user input, select the following option to Download the correct file. For example, we want MySQL workbench to install on Ubuntu 20.04, so the following will be the same.
1.A: Select Operating System choose “Ubuntu Linux”
1.B: Select OS Version choose “Ubuntu Linux 20.04 (x86, 64-bit)”
1.C: Click on Download button
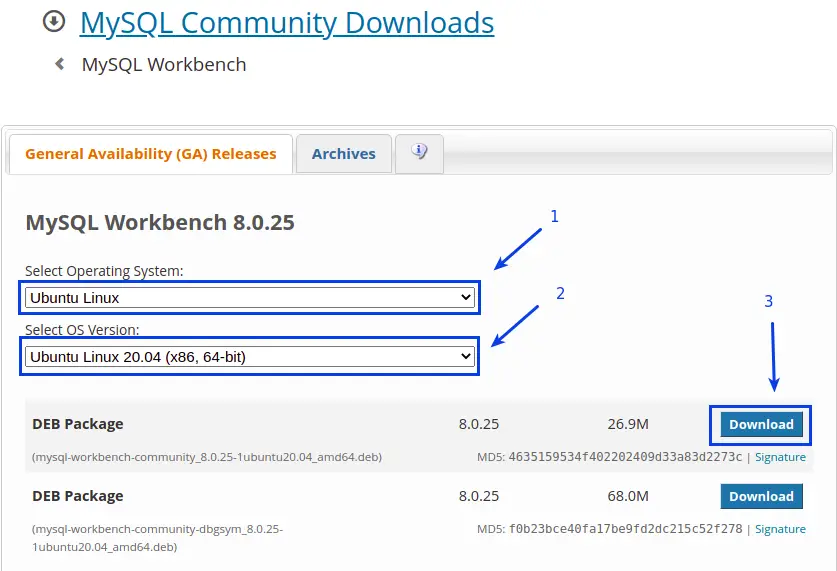
From the above snapshot, you can see we have two .deb packages to download the same version of a file, but we need to select the first one because the other one “(mysql-workbench-community-dbgsym_8.0.25-1ubuntu20.04_amd64.deb)” is used for debugging purpose.
If you want to download any particular version of MySQL Workbench, click on the Archives tab and select the version which you want to as per your system.
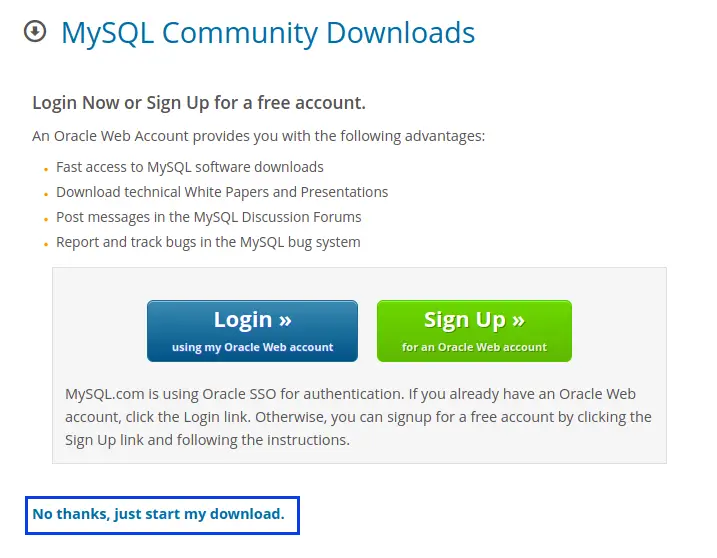
The last option is to click on “No thanks, just start my download”, to download the deb packages into your local directory.
Step 2: Install MySQL Workbench using .deb package
Once the file is downloaded, open the terminal using Ctrl + Alt + T and change the current directory where the file is stored.
After that, pass the following command into the terminal and wait for a while to complete the process.
$ sudo apt install ./mysql-workbench-community_8.0.25-1ubuntu20.04_amd64.deb Step 3: Run MySQL Workbench
Well done, we have almost done with Installation, and Once the Installation is complete, you can run MySQL workbench from the terminal using the below command.
mysql-workbenchEven you can run Workbench from the Application manager by searching “MySQL Workbench”.
Wrapping up
That’s all for How to Install MySQL Workbench on Ubuntu 20.04.
Read this to :- How to install MySQL properly in Linux?
If you are stuck somewhere, please feel free to comment down and If you like the article, or somewhere I missed something, please let me know to make this article more amazing.