Not getting package in your verse let’s teleport your machine to another parallel verse
By turning on and off the Universe, Multiverse, and Restricted repositories on your Ubuntu machine, you can get access to many software packages that aren’t in Ubuntu’s default repositories.
Perhaps you’re wondering, “Why hasn’t Ubuntu activated the following repositories?” Is there a downside to using different repositories, and how do I set them up on my Ubuntu-based computer to get more packages from the repository?
Indeed! The same thought was running through my mind when I first heard the concept of multi-repositories or so-called “verses,” but not to worry because I’m here to explain the essence of multi-repositories in a very simple way, and along with that, I’ll show you how to enable or disable the universe, multiverse, and restricted repositories.
If you are aware of the concept, then you are free to skip the next section and use the table of contents to jump right to the solution.
What is the difference between the universe, multiverse, and restricted repositories?
Let’s start with the universe and then move on to the multiverse and the restricted repository, but first you should know: what is the main repositories?
All Ubuntu users can get free and open-source software packages from the main repository, and this collection of packages is kept up-to-date by the Ubuntu developers. Even though the main repositories are safe and reliable, they might not have all of the packages you need for your system.
Therefore, we have the choice to add various repositories to the Ubuntu system, from which we can download the additional applications.
 Universe Repositories
The free and open-source (FOSS) software packages in the Ubuntu Universe Repository are maintained by the Ubuntu community and are generally thought to be stable and safe.
Here you will find the large variety of open-source applications that are available to download and use, but the catch is that you will not find the regular security updates for these category-based utilities.
Some of the common applications that you will find in the Universe repositories are: 2048-qt, 7zip, abacasa, scrot, xscreensaver, and many more.
![]() Multiverse Repositories
Multiverse Repositories
The Multiverse Repository contains non-FOSS packages that are not included in the Ubuntu Universe Repository because they may not meet the same quality requirements or may contain software that is restricted by copyright or legal issues.
Common programmes that you can find in the multiverse repositories include 1oom, abyss, amiwm, anbox, assaultcube, and many others.
![]() Restricted Repositories
Restricted Repositories
Most of the proprietary and closed-source software, like graphics drivers and multimedia codecs, is kept in the restricted repository. By using the restricted repository, users can benefit from a wider selection of software, hardware drivers, and codecs, as well as more up-to-date security updates for these packages.
For example, restricted packages could include a Broadcom network driver or an Nvidia video card driver that are not available in the main Ubuntu repository.
Let me summarise it for you:
The universe repository contains software packages that are generally regarded as stable and safe to use, in contrast to the multiverse and restricted repositories, which are maintained by Ubuntu.
The multiverse repository contains packages that are not included in the universe repository, and the restricted repository contains hardware drivers and other packages that you will not find in the universe or multiverse repositories but are necessary for Ubuntu.
I hope you are clear about the repositories that you can use on Ubuntu or any other Ubuntu-based distribution like Linux Mint, Pop! OS, Elementary OS, and so on.
GUI way to enable or disable repositories
First, let’s learn how to use “Software & Updates” to enable and disable repositories, which allows you to select which ones you want to use and which ones you do not by just ticking a box.
This can be done by accessing the ‘Software & Updates’ menu under the ‘System Settings’ section in Ubuntu, and then selecting the repository you want to enable or disable from the list
For example, if you want to enable the universe and multiverse, you need to check these two boxes and close the window to reload the changes, as shown in the below image.
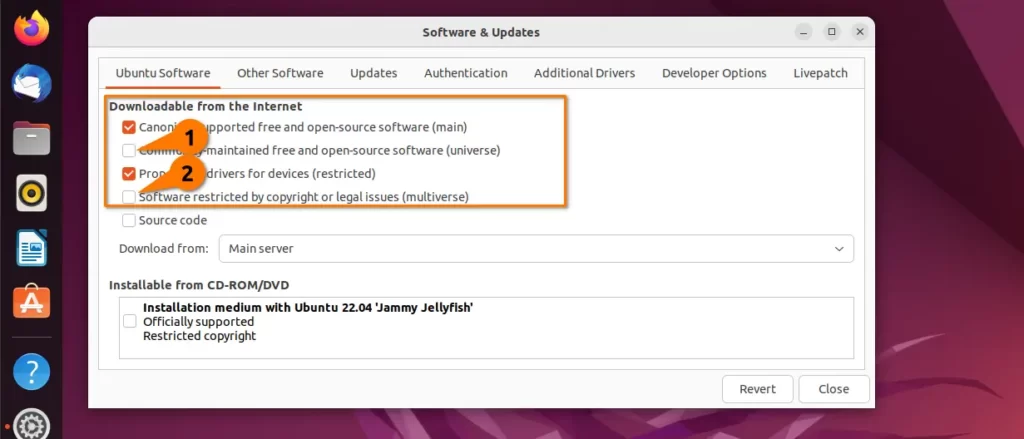
Then you can update the repositories and get the app that wasn’t available for your device before.
Command line way to enable or disable repositories
With the add-apt-repository command, you can also turn on or off repositories like universe, multiverse, and restricted on an Ubuntu computer.
How to Enable and Disable Universe Repository
To enable universe repositories, you need to open a terminal window using Ctrl + Alt + T and run the following command with sudo privilege to amend changes.
$ sudo add-apt-repository universe And use the same command as above with the -r or --remove option and the repository name as shown below to simply remove:
$ sudo add-apt-repository --remove universe
or
$ sudo add-apt-repository -r universe
How to Enable and Disable Multiverse Repository
In order to make use of multiverse repositories on your system, simply execute the following command.
$ sudo add-apt-repository multiverse If you no longer want to use a multiverse repository, you can simply run one line of command to remove the repository from your Ubuntu machine.
$ sudo add-apt-repository --remove multiverse
or
$ sudo add-apt-repository -r multiverse
How to Enable and Disable Restricted Repository
As you know, restricted support is necessary to enable users to access proprietary software, hardware drivers, and media formats that are not available in the main repository.
To enable it, you need to run the simple command, which will enable the restricted repository on your system.
$ sudo add-apt-repository restricted If you no longer wish to use the restricted repository, you can easily remove access to it from your Ubuntu machine by running a single line of code.
$ sudo add-apt-repository --remove restricted Manual Way to Enable and Disable Repositories
The above method might not work in other Ubuntu-based distributions; therefore, you need to manually make changes to /etc/apt/sources or /etc/apt/sources.list.d/official-package-repositories.list in Linux Mint.
Keep a backup of the files /etc/apt/sources.list/ or /etc/apt/sources.list.d/official-package-repositories.list so that you can always revert to the original sources list if something goes wrong.
And open the below file in your terminal window, then run the below command to update the source file.
$ sudo nano /etc/apt/sources.list.d/official-package-repositories.list              # Linux Mint
or
$ sudo nano /etc/apt/sources.list                                                   # Othe Ubuntu Based distro
When you open the file, your terminal should look like the illustration below, with information about the sources. I can see that both the main repository and the restricted repository are turned on for me.

For example, if I want to add multiverse and universe support, I must include the repo information shown in the image below.

After making the necessary changes, you must save the file and update the repository.
If you want to remove the repositories, you must go to the same file where you added the repo information and just remove the repo name, then issue the sudo apt update command.
And the following repository will be removed from your system once you close and update the system repository.
Wrap up
I hope this article has helped to explain the process and importance of adding and removing universes, multiverses, and restricted repositories from your system.
A new user might find this process hard to understand, but by following the steps above, they can easily add or remove any repository they want.
Also Read: How to Remove and Disable an Individual PPA in Ubuntu 22.04
With this message I’m reminding everyone to be mindful of the repositories you are using and make sure they are up-to-date with the latest information.