Why do you need a command-line email client such as Mutt in a world where the Gmail web app exists?
DevOps working on cloud infrastructure operating Linux server remotely don’t have any browser. In that case, they can set up Mutt on their server to send email without having any web browser.
What is Mutt?
Mutt is the best open-source terminal-based email client used to send/receive emails from the command line. While sending email uses SMTP (Simple Mail Transfer Protocol), and for receiving, it uses both IMAP/POP protocols.
Why do you use Mutt?
That’s an interesting question, and we already discussed why Mutt is so helpful for DevOps. Let us discuss a few features of Mutt.
Features
- Sure it is easy to install and configure.
- You are able to send single/multiple attachments using Mutt.
- It is also able to send mails to recipients in CC (Carbon Copy) and BCC (Blind Carbon Copy).
- It allows message threading.
- Mailing List is available to use within Mutt.
- It also support different mailbox formats like maildir, mbox, MMDF and MH.
- Available in 20 Languages.
- It also support DSN (Delivery Status Notification).
How to Install Mutt Email Client on Linux
Mutt is a popular and most used package. Available in all Linux repositories and can be installed using any package manager.
Ubuntu and Debian using APT
$ sudo apt install muttRHEL, CentOS, and Fedora using YUM
$ sudo yum install muttArch and Manjaro using PACMAN
$ sudo pacman -Sy muttMutt Configuration Files
After Mutt is installed, you must configure a few things before firing emails. Now focus on every word you are reading because we will discuss the configurations file. Any ignorance can lead you to a critical security breach.
There are two different ways to configure Mutt for an email in your system.
- Main configuration file: To make global changes you have to configure everything inside “/etc/Muttrc” file. Every changes can directly reflected to all users in that system.
- User configuration file: If you want to set specifc configuration for specific user in your system. Then you can configure those on “~/.muttrc” or “~/.mutt/muttrc” files.
Configuring Mutt for Gmail
You can configure Mutt for any email provider, but today I will show you how to configure Mutt for Google Gmail Account for a specific user.
To configure, you need to know a few settings for IMAP and SMTP of Gmail. You can visit the “Check Gmail through other email platforms” page to learn more. But we are providing you with all the configuration settings in hand.
In the first step of the configuration, you have to create a few directories where mutt can store headers, bodies, and certificates.
Execute the below command to create all mentioned folders in your system.
$ mkdir -p ~/.mutt/cache/headers
$ mkdir ~/.mutt/cache/bodies
$ touch ~/.mutt/certificates
Edit “~/.mutt/muttrc“ using your favorite Text Editor, and copy-paste the below settings. Don’t forget to replace the field with your Gmail Authentication.
# About Me
set realname = '<Full Name>'
set from = '<Gmail Username>@gmail.com'
set use_from = yes
set envelope_from = yes

# My credentials
set smtp_url = 'smtps://<Gmail Username>@[email protected]:465/'
set smtp_pass = '<Password>'
set imap_user = '<Gmail Username>@gmail.com'
set imap_pass = '<Password>'

# My mailboxes
set folder = 'imaps://imap.gmail.com:993'
set spoolfile = '+INBOX'
set postponed = '+[Gmail]/Drafts'
set record = '+[Gmail]/Sent Mail'
set trash = '+[Gmail]/Trash'
set ssl_force_tls = yes

# Where to put the stuff
set header_cache     = ~/.mutt/cache/headers # store headers
set message_cachedir = ~/.mutt/cache/bodies  # store bodies
set certificate_file = ~/.mutt/certificates  # store certs (touch file)
Understanding the Mutt configuration
- Realname: This would be your name, appear in Mutt mailbox.
- From: It will be the sender email used while sending any email from Mutt.
- SMTP_URL: Mailbox where we will send mails for delivery.
- SMTP_PASS: Replace it with your [Gmail Password] or [Generated Password] for SMTP Authentication.
- IMAP_USER: Replace it with your Gmail Account.
- IMAP_PASS: Replace it with your [Gmail Password] or [Generated Password] for Final Authentication.
- Folder: Location for your mailbox.
- Spoolfile: Folder where your emails arrive.
- Postpond: Location, where pending mails to send, will be stored. (Ex: Draft)
- Record: Location where Gmail stores sent messages.
- Trash: To store deleted messages.
- Ssl_force_tls: All connection established with remote server should be encrypted.
- Header_cache: Headers of messages are stored inside headers folder, require to download only once. This drastically improve speed while opening folders later.
- Message_cachedir: Mutt can locally cache each messages, require to download only once. Filtering operation like searching and limiting can be done using local copy.
- Certificate_file: Location where trusted certificates stored. Unknown certificate need to be accepted before saving. You can manually modify and add custom certificate in this file.
There are two ways to set a password: your Gmail password, and the second is generated password.
- Generated Password: You can generate app specify password for Mutt instead of using your gmail password from here. Make sure this option is only available for 2-Step verification enabled Google account.
- Gmail Password: You can use your gmail password but it require to Enable “Less secure app access“ from Security options.
Reading Mails in Mutt
To checkout received mails in your Mutt Mailbox. You need to first enable IMAP settings from your Gmail account using the below method.
- Login to your Gmail account from your browser.
- From the top right, click settings ⚙️ > Then “See all settings”.
- Click the Forwarding and POP/IMAP tab.
- In the “IMAP access” section, select Enable IMAP.
- Finally click on save changes.
Now pass the below command in your terminal to open the Mutt mailbox interface, from where you can read all the received messages.
$ mutt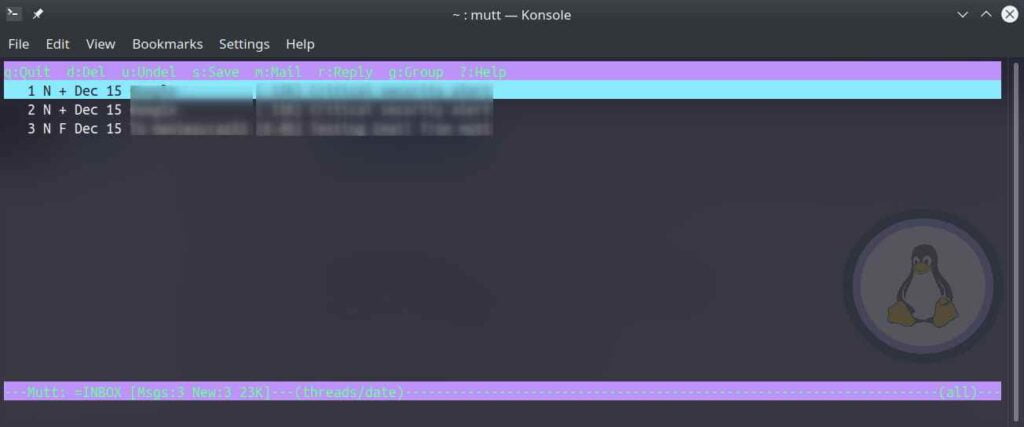
You can perform basic operations from the above mailbox interface like reading, deleting, replying, etc.
- Enter: Press "enter" to read the content of the messages.
- d: Select message and press "d" to delete pointed message. (Messages will be freezed, require relaunch to remove permanently)
- u: Accidentally deleted files can be recovered, press "u" to recover it. (If Mutt is relaunched after deleting file, then it won’t work)
- r: Point a message and press "r" to reply.
- q: To exit the interface, press "q“. If you made any changes, it would ask for yes or no.
Sending Mails in Mutt
In this example, we will send an email to “[email protected]”. We have to use the “-s” option to specify the subject of the mail.
$ mutt -s "Hi Jake!" [email protected]Press enter, and it will show up “To: [email protected]”, press enter once again. Next, it will display the specified subject “Subject: Hi Jake!”, again press enter.
Now it will open your default editor set in your terminal (Use "echo $EDITOR" to know) to write Email Body. Once you are done with writing, save it. If you were using VIM editor Press ESC and then SHIFT+ZZ. For NANO users, press CTRL+X and then Y for Yes.
Once you do, it will open up with an interface to confirm everything once again. If you want to make any changes like adding CC or BCC, you can do it now.
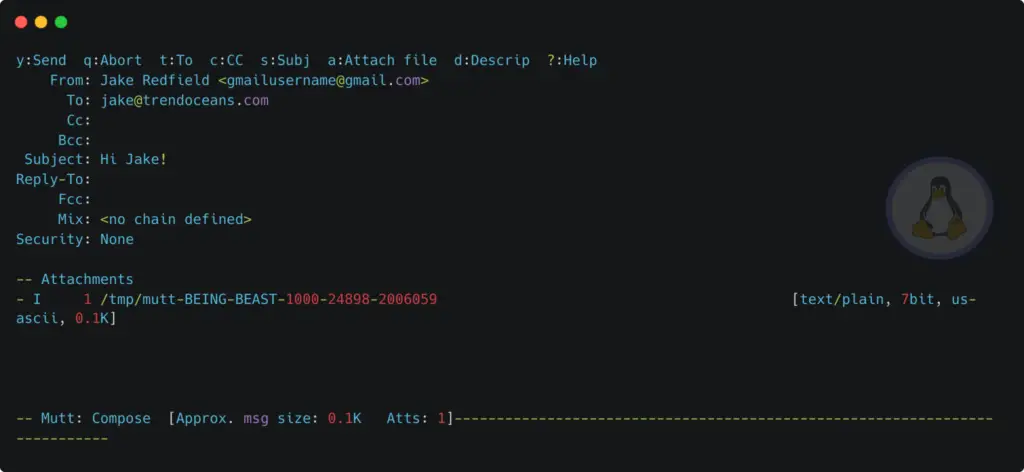
To make any changes, you can use below shortcut keys.
- y: Press to send email to recipient.
- q: Press to abort.
- t: Press to change the recipient email address.
- c: Press to add or change CC.
- s: To modify the subject.
- a: Attach file as attachments.
Once you are done, press "Y" for Yes to send a message to the recipient.
Pipe Mutt with echo command
You can use the echo command with the Mutt to pass the body of the email with a single command.
$ echo "Your Body Message" | mutt -s "Your Subject" [email protected]Press enter and wait for a few second while Mutt authenticating and send the email.
Send an Email with an Attachment
To send an attachment, along with the Mutt command, specify the location of that file in the end with -a the option.
$ echo "Your Body Message" | mutt -s "Your Subject" [email protected] -a yourfile.txtYou can specify multiple attachments, but don’t forget to select multiple -a option for those attachments.
$ echo "Your Body Message" | mutt -s "Your Subject" [email protected] -a file1.txt -a file2.txtAdd Recipients in CC and BCC Mode
To send mail to CC (Carbon copy) and BCC (Blind Carbon Copy) recipients, you can use -c and -b flag.
$ mutt -s “Your Subject” -c [email protected] -b [email protected] [email protected]You can specify multiple CC and BCC, separate them using commas.
Final Thought
Mutt is a prevalent open-source email client. The community has been active for a long time, and they were adding features in proper intervals.
If you have any issues while configuring, let us know in the comment section.
Hi i configured as everything as mentioned above ,but the message getting aut Login failed..
Sorry to hear that. Can you explain to me a bit more?