Copying files to a USB flash drive using the Terminal can be done quickly and easily with this short guide.
When you connect a USB drive to your computer, it automatically mounts so that you can move or copy files using a file manager such as Dolphin or Nautilus. However, when your system is booted into tty mode due to minimal distribution or a system error, the USB drive will not automatically mount.
which means you have to manually mount your flash drive, then use the cp command to move files from the source directory to the destination directory.
For a new user who has recently started using Linux, it can be overwhelming, but once you understand the basic commands, you can easily transfer files between your system and the USB drive.
How to Use Terminal to Copy Files to a USB Flash Drive
A USB flash drive must be connected to a computer before it can be mounted, and then the cp command can be used to copy files from the computer to the flash drive, so first connect the pendrive and follow the below guide:
Step 01: Attach and Mount USB Flash Drive
When you connect the thumb drive, you may hear a sound from the system, which means the system has detected and mounted the thumb drive and is ready for the operation. So you just need to know about the USB drive’s location, like where it is mounted.
This alert sound won’t be available when you are in tty mode, so at that time you need to manually mount the drive by specifying the device path like shown below:
$ udisksctl mount -b /dev/sdb1If you are not sure about the drive path, then run the following command, which will list all the block devices that are available to your system.
$ lsblk
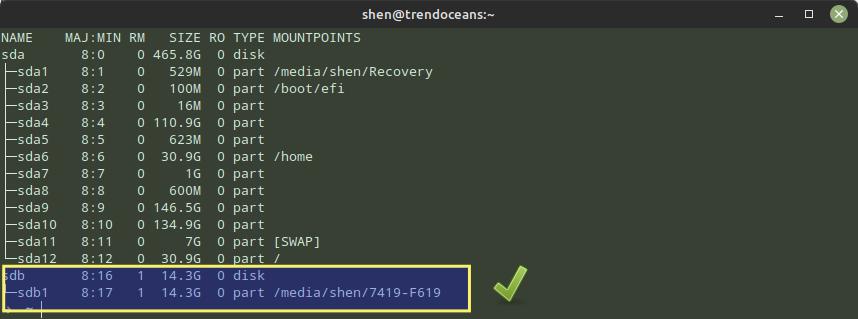
$ sudo fdisk -lHere is the result of the lsblk command, which I used to list block devices:
AME    MAJ:MIN RM   SIZE RO TYPE MOUNTPOINTS
sda       8:0    0 465.8G  0 disk
├─sda1    8:1    0   529M  0 part /media/shen/Recovery
├─sda2    8:2    0   100M  0 part /boot/efi
*****************
├─sda11   8:11   0     7G  0 part [SWAP]
└─sda12   8:12   0  30.9G  0 part /
sdb       8:16   1  14.3G  0 disk
└─sdb1    8:17   1  14.3G  0 part
Since “sda” is your physical drive, you can safely ignore anything on it. Instead, search for something on “sdb” or “sdc” and append it to the command below.
$ udisksctl mount -b /dev/sdb1If you are unable to obtain drive information, refer to this guide on How to Determine Whether Your USB Devices Are Connected to Your Linux System Using CLI and GUI Tools.
As soon as the aforementioned command mounts the drive, a message similar to the one in the image below will appear on your screen, letting you know the path to which it has been mounted.

Similarly, you can verify the same by running the lsblk command in the terminal window.
You’re all done with the mounting part, so let’s move on to the next section to learn how to copy files from USB to your Linux system and vice versa.
Step 02: Copy files from USB to your Linux machine
First, you will see how to copy files from the USB drive to the Linux machine, and then we will proceed to the next section, where you will learn how to move files from your system to the USB drive by running commands.
Change your current directory
From the above section, you will be aware of the mount point where the USB drive is mounted, right? If yes, then change your current directory to the thumb drive location by using the cd command.
$ cd /media/shen/7419-F619
$ pwd
and pwd commands will verify the location has been updated.
List all the files from the USB drive
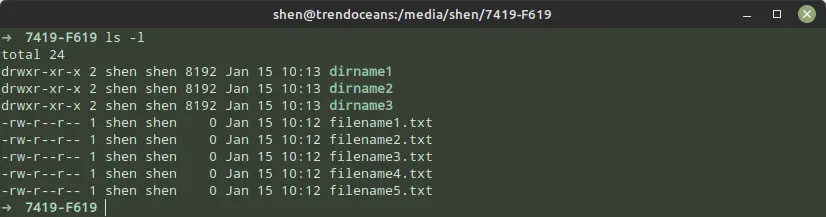
After that, run the ls -l command to list all the files that are available on your pen drive, as shown in the below image:
Run commands to move files from USB to system
After confirming the file is available on your pen drive, let’s copy some of the files from the USB drive to your Documents directory, which is available at /home/user/Documents, or else you can use tilde (~) to substitute your home path for the current user to something like ~/Documents.
For demonstration purpose I have selected two files “filename1.txt”, and “filename2.txt” from my USB drive and let me to copy them to ~/Documents by running the following command
$ cp -v filename1.txt filename2.txt /home/user/Documents
OR
$ cp -v filename1.txt filename2.txt ~/Documents
If you don’t want to keep an eye on the process, you don’t need to use -v every time.
The reult of the above command:

If you want to move an entire directory full of files instead of just one file, you can use the following command instead of the one above:
$ cp -r dirname1 ~/DocumentsAlso Read: How to copy file from local to remote server in Linux
Run commands to move files from system to USB
You can use the same cp command to transfer files from your system to a USB drive by specifying the USB drive as the destination path and your system as the source in the command.
So, if you want to move the file “filename.txt” from your “Documents” folder to the USB drive, you would type the following command:
$ cp -v /home/user/Documents/filename1.txt /media/shen/7419-F619
OR
$ cp -v ~/Documents/filename1.txt /media/shen/7419-F619
When copying a directory to a USB drive, you must use -r to properly copy the directory, as it ensures that all of the subdirectories and files are included in the copy.
If you don’t put the -r while transferring directories, you will get the following error message on your screen: “cp: -r not specified; omitting directory.”
$ cp -r ~/Documents/dirname1 /media/shen/7419-F619If you want to learn how to move or copy files without changing the current path, read this article: What are absolute and relative paths, and why do we use them?
Step 03: Unmount drive
Once you’re done moving files from the USB drive to your system or vice versa, you can safely eject the drive by running the following command:
$ udisksctl unmount -b /dev/sdb1If you receive the following error message: “Error unmounting /dev/sdb1: GDBus.Error:org.freedesktop.UDisks2.Error.DeviceBusy: Error unmounting /dev/sdb1: target is busy on your screen, then you need to change the current path to your home directory and run the umount command.
$ cd ~
$ udisksctl unmount -b /dev/sdb1
After getting the message “Unmounted /dev/sdb1,” you can remove the thumb drive.
Wrap up
I hope this article has given you enough information to feel confident using the terminal to copy or move files from a USB drive to the system or vice versa.
I’ll end this topic here, but if you have anything to add, please feel free to do so in the comment section.