Have you ever thought to taste exclusive RHEL or Arch-based distribution tools in your Ubuntu or Debian system (or vice versa)?
Distrobox is then here for you; it is an open-source wrapper for Podman or Docker (depending on your choice) to provide you with the ability to install whatever Linux system you want into your host system.
And use the containerized system tools and applications seamlessly into your host system as they are the native applications (you can literally access them from your host system search menu).
What is the Difference Between Virtual Box vs Docker vs Distrobox?
I knew that now and then you would come to this question. Let me give you a one-line example to show you the difference between each one of them, starting with:
Virtual Box is a virtualization technology that will separately require your system hardware resources, and you need to get into the virtual environment in order to access the system tools and applications (in layman’s terms, it is completely isolated).
Docker is a containerization technology that will directly take your system resources, leaving less pain for your host system. However, it’s not possible to access the Docker-installed application or tools directly from your host system.
Distrobox comes to fill the gap left by Docker by providing tight integration between your host and containers, allowing you to directly access container applications and tools from your host as if they were native applications.
Interesting, Want to Know More About Distrobox?
As I’ve told you earlier, Distrobox is a way to provide containerized (it can be an Arch or RHEL system) applications and tools as a native application.
The created container will be tightly integrated with your host system by providing access to the user’s $HOME directory, X11 sockets, networking, removable devices (like USB sticks), systemd journal, SSH agent, D-Bus, ulimits, /dev and the udev database, and many more.
So, it can be the best choice for developers to try application build for different distributions without switching or dual booting between multiple systems, including sudoless access.
In layman’s terms, you do not need to replace your host distributions just because of compatibility issues. You can have whatever distributions you want and use Distrobox to fill the gap by having backward and forward compatibility with software.
Distrobox Features
You know a lot about Distrobox so far; if you still want to know the exact features, then take a sneak peek below.
- Freedom to access multiple Linux systems without affecting the host system.
- Enjoy the containerized software seamlessly without root access.
- Easily manage and switch between multiple environments.
- You can try a variety of distributions.
How to Install Distrobox
There are a few things you have to set up before installing Distrobox, like installing either Podman or Docker. If you have a modern system, then I would suggest going with Podman; otherwise, Docker is always the best choice.
Apart from that, you can easily install Distrobox packaged in the following distributions:
- Homebrew
- Arch Linux (AUR)
- EPEL 8 and later
- Fedora 38 and later [Recommended]
- Ubuntu 22.10 and later [22.10 have some issues while writing this article]
If you are using any of the above distributions in the list, then you can prefer the repository installation. Also check out the latest distributions packaged with Distrobox. If your system is not on the list, it might be added in the future.
Now execute the following script to install Distrobox if you are a daring person.
$ curl -s https://raw.githubusercontent.com/89luca89/distrobox/main/install | sudo shThe above command will install Distrobox with superuser privileges [not recommended ]. If you are unsure about it and want to install it without sudo, then execute the following command to select a custom directory (default: ~/.local) to install Distrobox without sudo.
$ curl -s https://raw.githubusercontent.com/89luca89/distrobox/main/install | sh -s -- --prefix ~/.localCongratulations!!! You have successfully installed it on your system. Now, let’s move into the next section.
Getting Started with Distrobox
To make things easier for you, let me give you the list of commands that you will be using with Distrobox.
| Commands | Definations |
distrobox create -n CONTAINER-NAME -i OS-NAME:VERSION | Create a new distrobox |
distrobox enter CONTAINER-NAME | Enter created distrobox |
distrobox create -i ubuntu:20.04 | Add various distroboxes, eg Ubuntu 20.04 |
distrobox enter | Execute a command in a distrobox |
distrobox upgrade --all | Upgrade all distroboxes at once |
distrobox list | List running distroboxes |
distrobox stop | Stop a running distrobox |
distrobox rm | Remove a distrobox |
You can check HERE for more advanced usage, and check a comprehensive list of useful tips HERE.
Step 1: Creating A Container From An Image
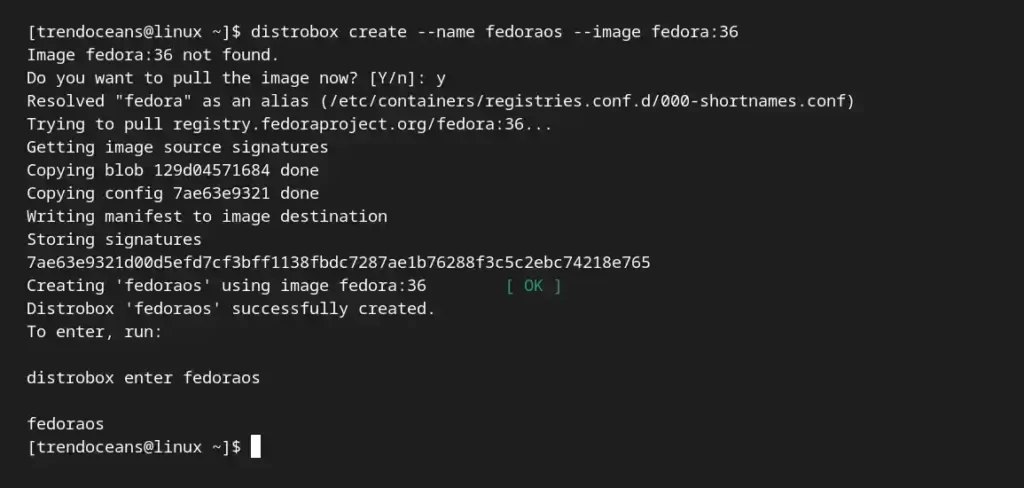
Now that you have an idea about the commands and their usage, let us create our first container for Fedora 36 with the name “fedoraos“.
Note: While specifying the OS version, you can use “latest” to download the latest available version for that particular OS.
$ distrobox create --name fedoraos --image fedora:36If you are executing it for the first time, then it will ask you to press “Y” to pull the image.
Step 2: Listing All Running Containers
Once your container is downloaded and running, you can check it in the list of containers by using the following command:
$ distrobox listBelow is the output of the above command.

Step 3: Accessing the Distrobox Container
As you can see in the list, there is the created fedoraos container. So, execute the below command to enter the container:
$ distrobox enter fedoraosWhen you enter for the first time into a newly created container, it will take quite a bit of time to download the necessary packages, as shown in the following picture.
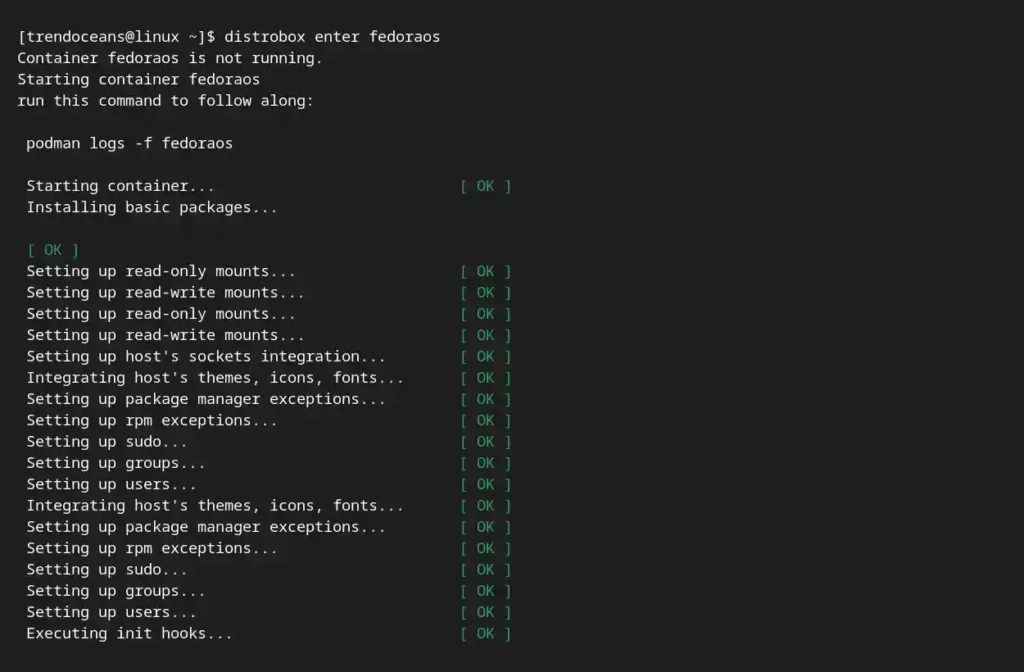
Wait for a while; once all the packages have downloaded and been configured, execute the previous command (distrobox enter fedoraos) to enter the fedora container, as shown below.

Step 4: Installing Packages On The Distrobox Container
As you are inside the Fedora 36 Distrobox container, you might be wanting to install a package to check if the application will install natively or not.
For that, we will install the FlameShot application on a Fedora 36 container by running the following command inside the container shell.
$ sudo dnf install flameshotWait a few minutes, and then execute the following command:
$ distrobox-export --app flameshotBelow is the output of the above command.

The above command makes your application (ex: FlameShot) directly accessible from your host system. You can either find it on the Ubuntu Application Menu or search for it.

Also Read: Beginners Guide for PS Command in Linux
Step 5: Running Commands On The Distrobox Container
For now, to install any package or perform any task, you are entering the container and executing the command in the container shell.
However, you can also run the command for container without entering a container shell by using the following syntax:
$ distrobox-enter --name container-name -- commandAs you can see above, we used the distrobox-enter command with the --name tag, specifying the container name, and then -- to specify the command we needed to execute inside the container.
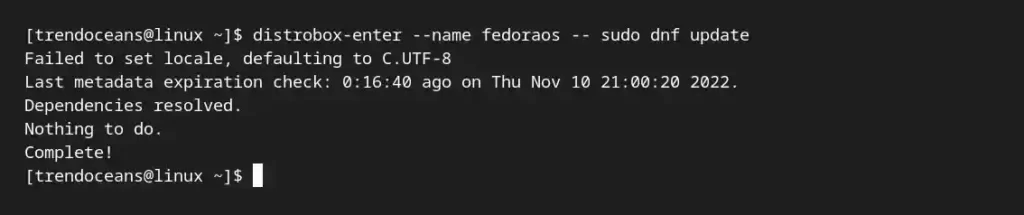
For example, if you want to update your container system (ex: Fedora 36), simply execute the following command.
$ distrobox-enter --name fedoraos -- sudo dnf updateBelow is the output of the above command.
Managing the Distrobox Image
If you are done with the container and do not require it anymore, you can easily remove it using a few commands. starting with listing the container.
The first step before removing the container is knowing its name. Execute the following command to list all the running Distrobox containers on your host system:

Since I’ve been running one container, you can check it out in the above picture. Next, note down the container name, which most likely will be different in your case depending on what you specified while creating the container.
And then stop your running container using the distrobox stop command with your container name, as shown below.
$ distrobox stop fedoraosLastly, delete the stopped container using the distrobox rm command.
$ distrobox rm fedoraosThere are a lot more things you can learn about Distrobox, which you can surely find on its Github page .
Wrap Up
Distrobox is an amazing tool. As you can see, you can easily initialize a new container and easily flush the unused container with a couple of commands.
There are many more amazing tools out there; if you want to know about them and do not want to miss any in the future, subscribe to our newsletter.