Are you stuck with the TTY interface or can’t find the network applets that allow you to connect to a Wi-Fi network from your Linux system’s graphical user interface (GUI)?
It is a very common problem for users who have installed Arch, Ubuntu server, Red Hat-based AlmaLinux, CentOS Stream, RockyLinux, and many other minimal distributions.
In this case, you could use terminal commands to connect to the internet, but for that, you would need to know the right commands and syntax to make the Wi-Fi interface look for a nearby network and connect to it after accepting the correct password.
So, let’s find out how to connect to WiFi using the command line in any Linux distribution, such as Ubuntu, Debian, Kali, Arch, CentOS Stream, etc.
How to Connect to Wi-Fi in Linux from the Terminal
There are multiple ways to connect to the available wireless network using the terminal window. Some are quite simple, while others will require some extra work.
In my opinion, there’s no reason to overcomplicate things if they can be done quickly and easily. That’s why I’ll demonstrate the easiest possible method of establishing a wireless connection by combining the nmtui and nmcli commands.
You can choose any one of the below links to establish a WI-Fi connection.
- How to Use the nmtui Command to Connect to a Wi-Fi Network
- How to Use the nmcli Command to Connect to a Wi-Fi Network
Steps to connect to Wi-Fi network using nmtui command
One of the easiest ways to connect to a wi-fi network is with the nmtui command, which stands for “Network Manager Text User Interface.” This allows you to manage network connections very easily using a terminal based user interface.
That means you can get online without straining your neck.
Step 1: Launch the terminal and execute the command
To begin the network connection, open a terminal and type the nmtui command. This will bring up a simple graphical user interface that lets you connect to the internet without having to remember a lot of commands.
$ nmtuiOnce a command is executed, you will find something similar to the below image, which we are going to discuss in the next section.
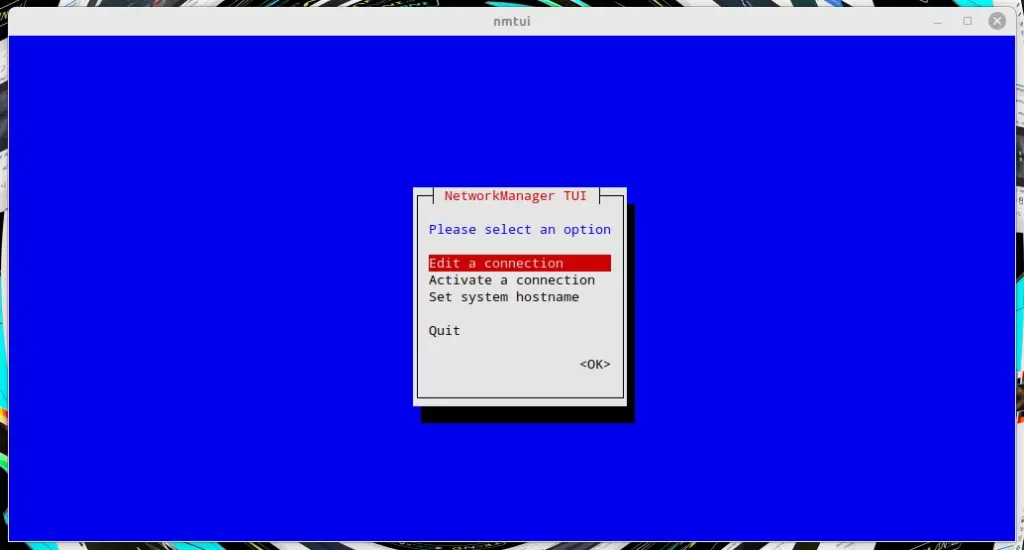
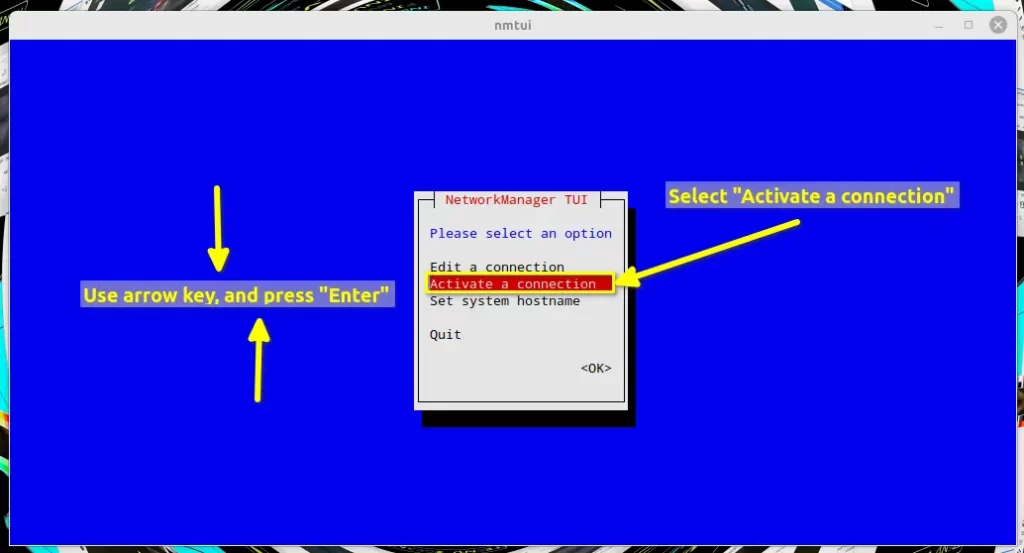
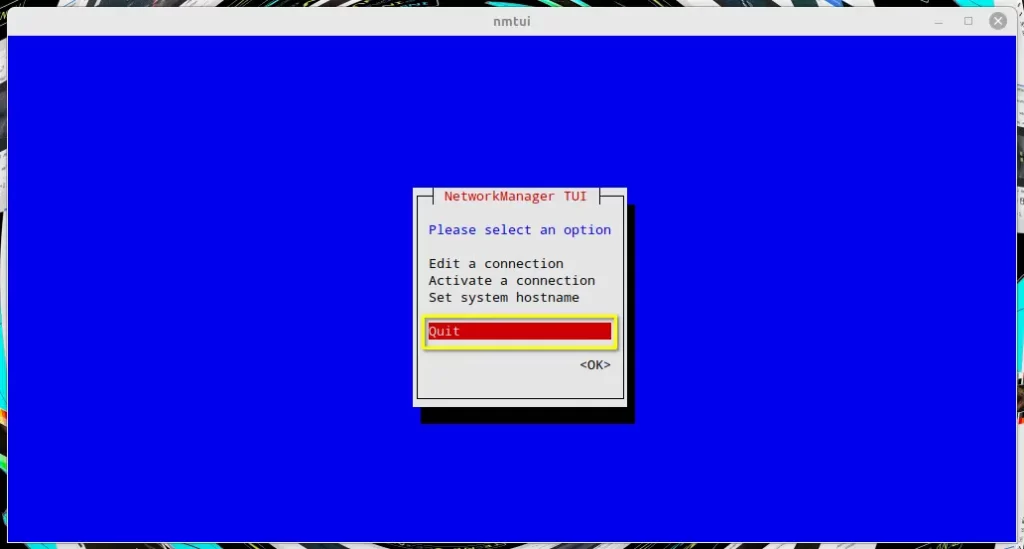
Step 2: Select Activate a connection
At the centre of the screen, you will find three options to choose from: “Edit a connection,” “Activate a connection,” and “Set system hostname.” Of these, you need to select “Activate a connection,” which can be selected using the arrow and enter keys.
And the rest of the options, like “Edit a connection,” can be used to customise and manage network connections, and the last option, “Set system hostname,” is one of the other ways to set hostname in Linux, and if you want to learn more about it, click here.
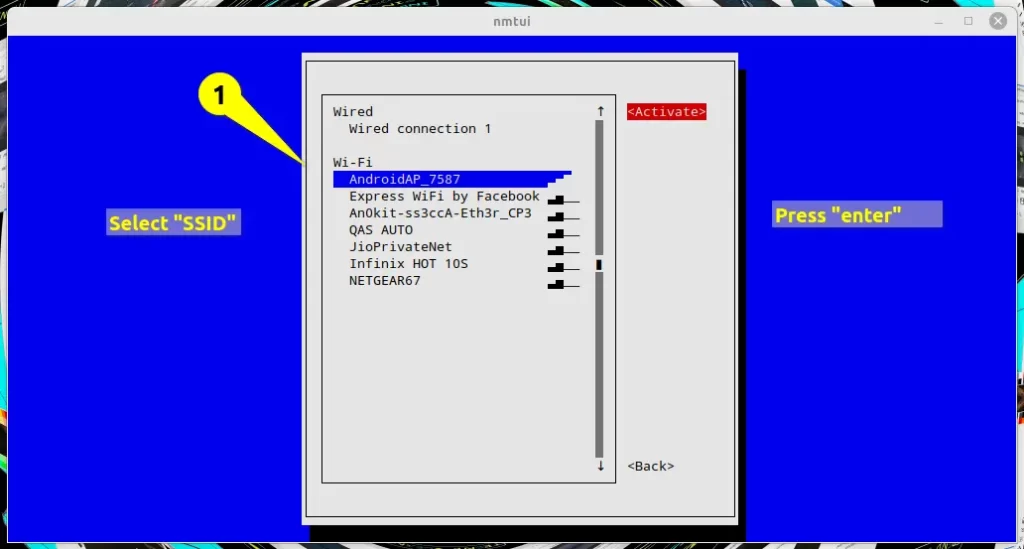
Step 3: Scan and connect to the available SSID
To connect to a wireless network, press the enter key after clicking “Activate a Connection” to bring up a list of available networks, then use the up and down arrows to select the desired SSID, and finally, click “Activate” or else press the “enter” key to finalise the connection.
If no Wi-Fi devices are listed in the “Wi-Fi section,” disable aeroplane mode or use the command below to enable the wireless network interface.
$ nmcli radio wifi on On my end, I’m able to get the name of the network, and because of that, I’m able to connect one of the access points (named “AndroidAP 7587”), which you can clearly see in the below image.
After you’ve done those things, you’ll be asked to type in your network’s password, as shown in the next picture.
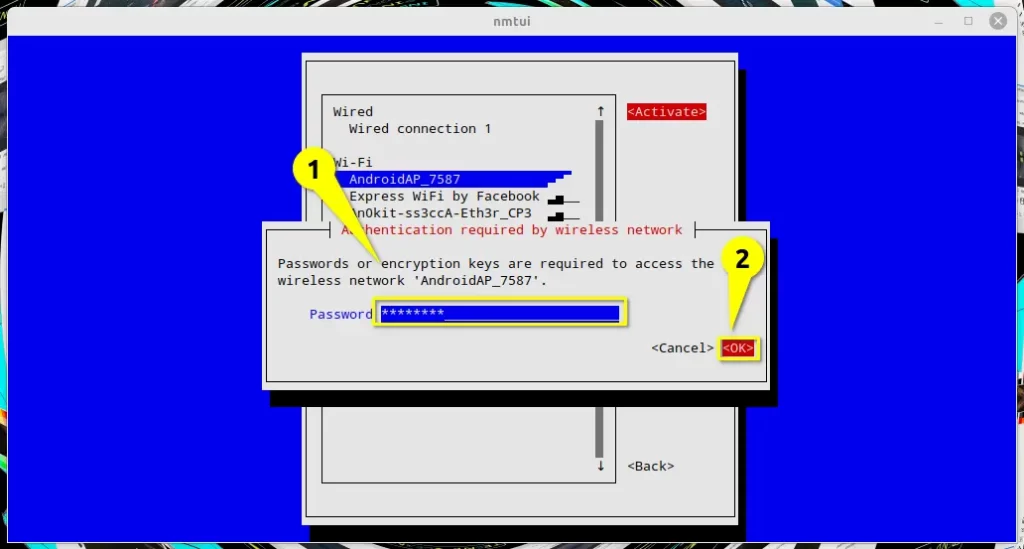
Your computer will be able to join the network if the password you entered is correct. The network connection will fail if you enter an incorrect password more than once, so be sure to use the right one.
Once the connection has been made, an asterisk (*) will appear next to the network’s name; this can be used to double-check the network’s status, and the arrow keys on the “Back” button will take you back to the previous screen.
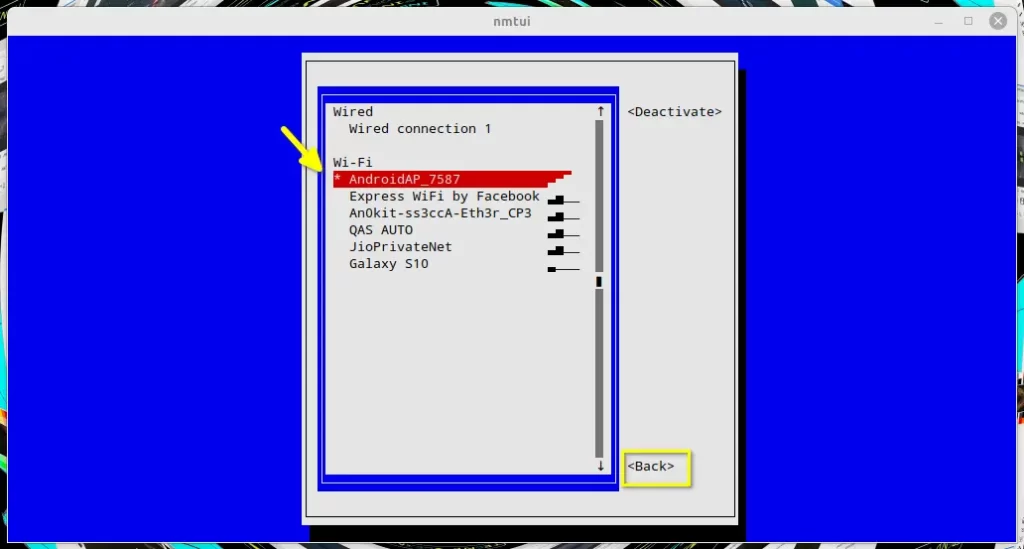
The “Quit” button will exit this utility, but you can always reopen it by typing “nmtui” into the terminal to use it again and connect to a different network adapter.
After you have successfully connected to the network, please visit trendoceans.com to let us know how it went. It will be greatly appreciated by us.
Also Read: How to Start and Stop Monitor mode in Linux
Connect to a Wi-Fi network using the nmcli command
The above-mentioned method is straightforward. All you need to do to connect wireless devices is use the arrow keys. However, if you prefer a more command-line-oriented approach to establishing a network connection, nmcli is your best bet.
Step 1: Check Wi-Fi Status
I’m excited to show you the step, but before that, I will ask you to check the status of the network interface by executing the following command:
$ nmcli general status The results of running the above command:

If the “Wi-Fi” status is disabled, then make sure to enable it by running the below command, or else disable the aeroplane mode from the keyboard.
$ nmcli radio wifi on Step 2: Connect your computer to your wireless network
Once the Wi-Fi interface is enabled, your system will begin looking for nearby wireless devices. To find the list of networks that are currently available, run the command below. It will list all of the nearby wireless networks and include information such as IN-USE, BSSID, SSID, MODE, CHAN, RATE, SIGNAL, BARS, and SECURITY.
$ nmcli device wifi listOutput of the above command:

From the above, you just need to know the SSID of the network to which you want to connect, and of course, you should have the password to authorise the connection.
I have selected the “AndroidAP_7587” access point to connect on my laptop, and the command to connect with a wireless network is listed here:
$ nmcli device wifi connect AndroidAP_7587 password 01234567
Once the connection is made, you will get the message “Device “wlo1” successfully activated with “433509b2-b651-4ce6-9493-22e3ed158f9f.” This means that the device is now connected to a wifi network.
Step 3: Ping to check the status of the connection
To check the status of the connection, you can use the same command that you used to find the status of the network interface in step 1.
$ nmcli general statusYou can check that the connection was made successfully by looking at the attached file.

I can even ping on network to check the connection.
$ ping trendoceans.comWrap up
You learned how to connect to a WiFi network via the terminal using the nmtui and nmcli commands, which I found to be the most simple and effective method of connecting to a wireless network.
Also Read: Many users don’t know CommandLine can do Web-Search too
There is more to learn about nmcli, and if you’re interested, I can write a more comprehensive guide, but for now, you can read this one.
Anyway, if there is something I need to consider, please use the space below to provide any additional information or feedback.