Here we have listed five tools to list all valid IP addresses connected to your network.
Network administrators or enthusiastic Linux users always want to know what IPs are connected to their local network and what IPs are not.
There are several situations where you want to know all the valid IP addresses are available for setting up a static IP to avoid IP conflicts, troubleshoot network issues, or to detect unauthorized devices connected to the network.
And to obtain that information, it is much easier with tools like arp, arp-scan, nmap, netdiscover, and Angry IP Scanner, which can quickly scan a range of addresses and give you the result of which address is available and occupied.
To know how to use the above command to list all the IPs connected and available in Linux, just scroll down a bit and read the complete article to get familiar with the command.
List of tools to list All the Valid IP Address Connected and Available
Some tools will be available out of the box, and some will need to be installed on your Linux system, but I promise it won’t be difficult for you to install the required tools.
So, let me first introduce the arp command.
arp: Command to List all the Connected Addresses
One of the simple commands that is pre-installed in most of the Linux distributions is useful for manipulating the system ARP (Address Resolution Protocol) cache.
The ARP protocol is necessary to assign IP addresses to MAC addresses so that machines can communicate locally with each other. To view a list of all the IP addresses that are currently connected to your network, you can use the arp command to retrieve the ARP cache.
Most likely you will find the arp command in your Linux distribution, but if for any reason it’s not available, then execute the following command as per your distribution package manager.
$ sudo apt install net-tools
$ sudo dnf install net-tools
$ sudo pacman -S net-tools
I do have the arp command, so let me execute the arp command on my terminal to check the MAC addresses and IP addresses of devices connected to my local network.
To list all the device information, including the IP address and MAC address of the device that is connected to the network, run the following command:
$ arpThe result of the above command:

The drawback of the command is that it only shows the device information if your machine has recently pinged, and to overcome you can network scanning tool.
arp-scan: Command to List all the Connected Addresses
Instead of using the arp command, you can use the arp-scan command, which sends ARP requests to range of IP addresses and displays the responses received.
To use the arp-scan command, you need to install the “arp-scan” package on your system by running the following command into your system:
$ sudo apt install arp-scanOnce you install arp-scan, let’s see its capabilities by running a simple command to scan your local network for active hosts.
When you want to print all the devices’ IP addresses with the assigned MAC address, you can use the following command, which will scan and print the results in tabular format.
$ sudo arp-scan -l
or
$ sudo arp-scan --localnet
Output of the above command:
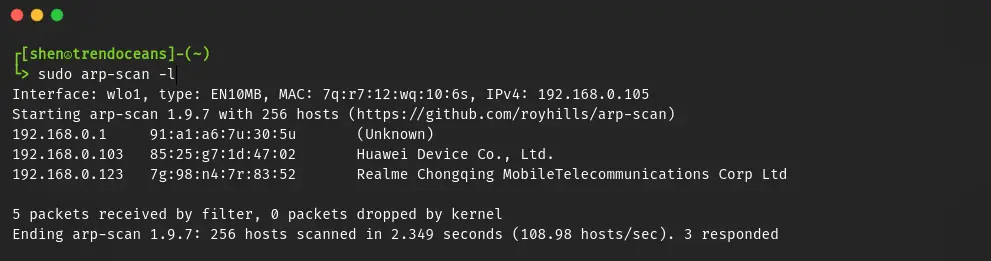
This command not only shows the IP and MAC addresses but also tells you the vendor or manufacturer of the network device, which makes it easier for you to identify the connected devices.
nmap: Command to List all the Connected Addresses
Alternatively, you can use the nmap command to list all the available IP addresses and the IP addresses that are connected to the network.
To use the nmap command, you need to first install it on your system by running the following command as per your distribution package manager:
$ sudo apt install nmapOnce you have installed Nmap, run the below command to send an ICMP echo request and check if all the hosts that are connected to the network are online or not:
$ nmap -sP 192.168.0.0/24The result of the above command:
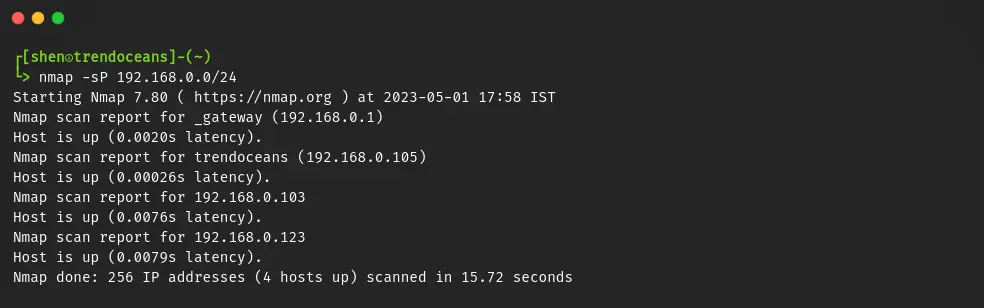
With the above command, it lists the IP address that is up, but it won’t show you which MAC address has assigned the address. To know that, you can append sudo at the start of the command, as shown below:
$ sudo nmap -sP 192.168.0.0/24There are other options for sending SYN packets over ACK using the below command:
$ sudo nmap -PS 192.168.0.0/24It not only list the IP address that is connnected, but it also show you the port status of the connected devices.
If you want to check the status of all the IP addresses in the current subnet, use the -sL option, as shown below:
$ sudo nmap -sL 192.168.0.0/24Net Discover: Command to List all the Connected Addresses
There is one more command that you can use to list all the IP addresses that are connected to your local network in a tabular format, which makes it easier for your eyes to read the output.
So to install that tool, open your system terminal window and run the following command to install Net Discover:
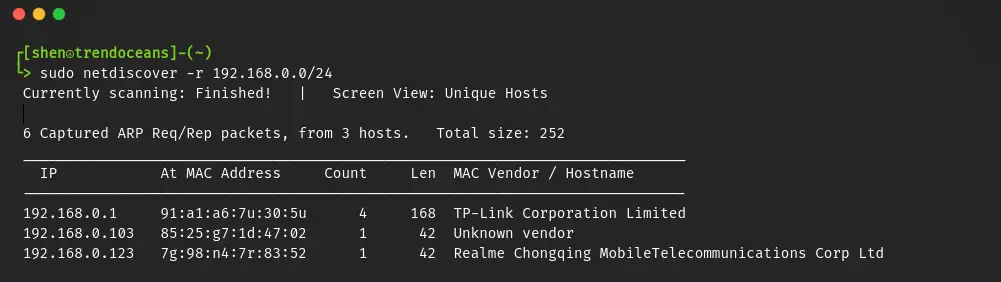
$ sudo apt install netdiscover To discover available hosts with an IP range along with the MAC address and the vendor name, run the following command:
$ sudo netdiscover -r 192.168.0.1/24The result of the above command:
Angry IP Scanner: Command to List all the Connected Addresses
Angry IP Scanner is a cross-platform GUI tool that you can install on your computer to discover host devices by specifying the IP range, exporting results, and jumping to results on an alive, dead, or open port.
With the Angry IP Scanner, you can not only list devices that are connected to the network but also all the hosts that are not in use.
To get Angry IP Scanner, you need to make a few extra efforts, like first downloading the binary package from this link.
For instance, if you have downloaded the .deb binary file, then execute the following command into your terminal:
$ sudo apt install ./Downloads/ipscan_3.9.1_amd64.debOnce the installation is done, look for “Angry IP Scanner” in Activities and run the application.
To start scanning, click on the “Start” button and wait for the process to end.
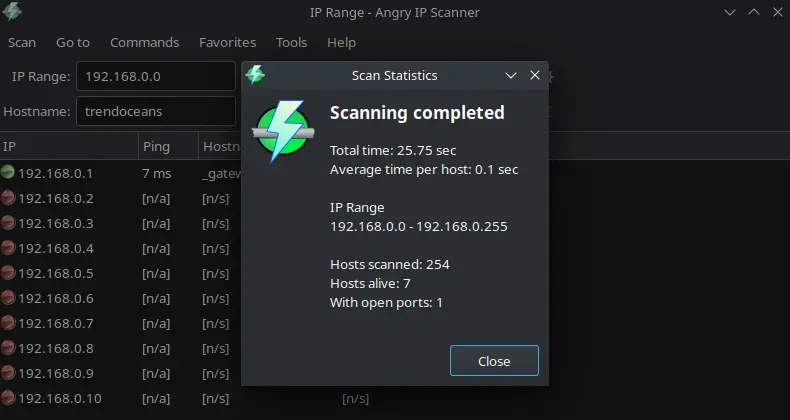
Once the scan is complete, you can check the result.
Wrap up
That’s all for this article, where I showed you how to use arp, arp-scan, nmap, netdiscover, and Angry IP Scanner to scan and list all the IP addresses that are connected to the network and available.
Here is a recap of the command that we have used to list all IP addresses that are connected to the local network.
arpsudo arp-scan --localnetnmap -sP 192.168.0.0/24sudo netdiscover -r 192.168.0.1/24
If you know any other way to achieve the same, please let us know in the comment section.