It’s a good idea to add some kind of security warning message that makes it clear to unauthorised SSH users that they are not allowed to access the system.
Giant corporate companies permit their employees to gain access to the company system remotely via SSH. They always ensure that the working environment is safe and secure, without any flaws.
Unexpectedly, when hackers found such an access point (ex: SSH server), they tried to impersonate as a company employee and brute force the remote server to gain access.
To prevent such attacks, you can show a security warning message to those unauthorized SSH users (ex: hackers) and let them know the aftermath, which will surely make them panic and think twice before doing anything.
However, as a Linux administrator, you should also be aware of the fact that this is not a technique by which you can prevent hackers from accessing your system; it is just a simple warning message.
Also Read: How To Secure The OpenSSH Server?
So considering that, let’s move on to the practical part and see how you can implement this security warning message on your own remote server.
Showing Security Warning Message To Unauthorized SSH Users
To implement this security warning message you need to edit “/etc/issue.net” file and add the warning message content and then you need to restart your ssh server after specifying the path of this file inside your ssh configuration file.
Let me show you how you can perform all the above steps one by one.
Step 1: Editing the Issue.net File
To display the security warning message you need to edit the “/etc/issue.net” file on your remote server using your choice of text editor (ex: Vim or Nano).
trendoceans@linux:~$ sudo vim /etc/issue.net
OR
trendoceans@linux:~$ sudo nano /etc/issue.net
Add the following security warning message inside the file.
#################################################################
# _ _ _ _ #
# / \ | | ___ _ __| |_| | #
# / _ \ | |/ _ \ '__| __| | #
# / ___ \| | __/ | | |_|_| #
# /_/ \_\_|\___|_| \__(_) #
# #
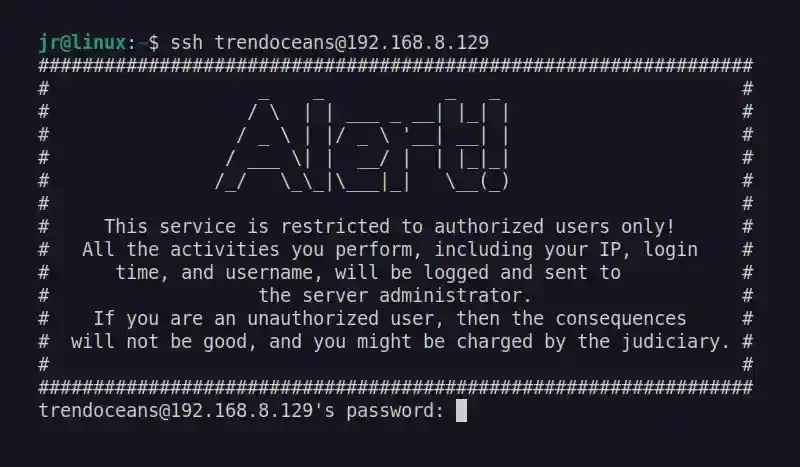
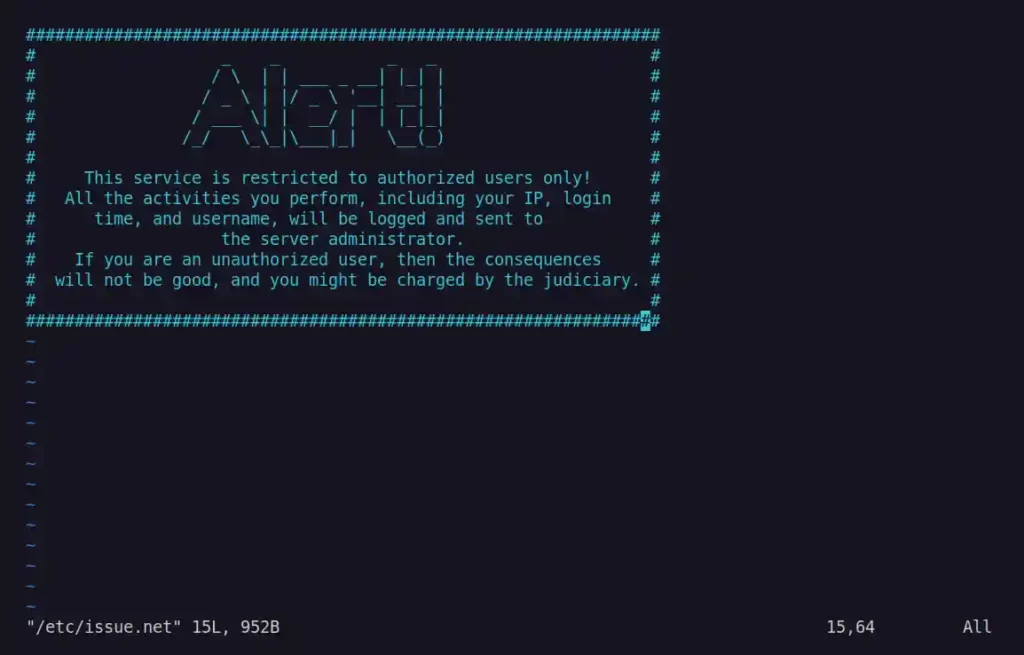
# This service is restricted to authorized users only! #
# All the activities you perform, including your IP, login #
# time, and username, will be logged and sent to #
# the server administrator. #
# If you are an unauthorized user, then the consequences #
# will not be good, and you might be charged by the judiciary. #
# #
#################################################################Your final file output will look like the one below.
Save and close the file.
Step 2: Editing the SSH Configuration File
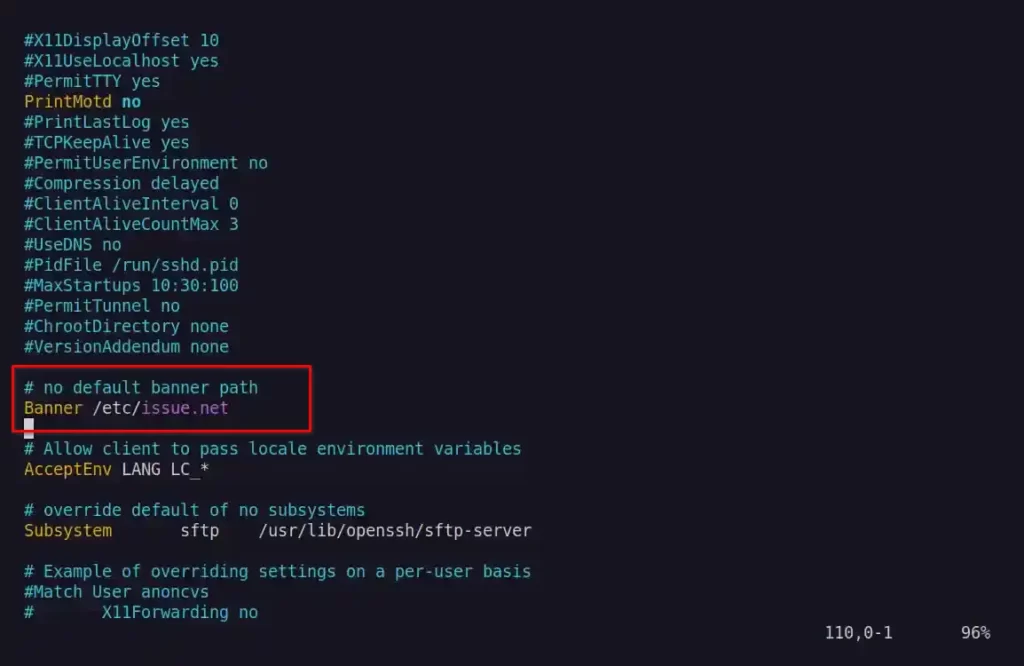
After editing the “issue.net” file you need to specify this file inside your SSH configuration file. For that, you need to edit “/etc/ssh/sshd_config” file using your choice of text editor.
trendoceans@linux:~$ sudo vim /etc/ssh/sshd_config
OR
trendoceans@linux:~$ sudo nano /etc/ssh/sshd_config
Than find the commented line “Banner none” inside the configuration file and replace with the following line.
Banner /etc/issue.net Your final file output will look like the one below.
Save and close the file.
Step 3: Restart the SSH Daemon
After making changes in “issue.net” and “sshd_config” configuration files, you need to restart your SSH server/daemon to apply the changes correctly by using the following command.
trendoceans@linux:~$ sudo systemctl restart sshStep 4: Accessing the Remote Host
Finally, after performing all the above steps, open a new terminal window and try to access the server using your username and the server host/IP address, and you will notice the following security warning message:
And that was the final part of this article. I hope you are able to follow this guide as instructed, but if you encounter any errors or are facing any problems, feel free to ask for our help in the comment section.
Till than sayonara.