Looking for a way to convert a WebP image to PNG or JPG/JPEG, then the
dwebpandffmpegcommands are the best options.
Almost every website now accepts WebP images due to their low size, which reduces image size by 25 to 34% compared to JPGs without much compromising the image quality.
But there are still some sites that will not allow you to upload a WebP image to their platform, and because of that, you need to convert the image to jpg or png.
For the conversion of a WebP image, you can take a screenshot of the image, or else you can use some online tool that is available in the public domain.
However, I don’t do this all because I know the command that can easily convert the WebP image to formats like PNG, JPEG/JPG, and so on.
So let me show you how you can use the dwebp and ffmpeg commands to convert WebP images to PNG, JPG, and JPEG format.
Steps to Convert a WebP Image to PNG, JPG, or JPEG
There are two common commands that you can use in Linux to convert WebP images, which are as follows:
- dwebp: can be used to convert WebP images into formats like pam, ppm, bmp, tiff, pgm, yuv, and the default, png.
- ffmpeg: is one of the versatile tools that can be used in several ways to manipulate video and audio, including converting, compressing, and editing multimedia files.
Use dwebp Command to Convert WebP Image
As I said, dwebp is a part of the libwebp library, so when you install libwebp, two interesting tools get installed, like cwebp and dwebp.
cwebp is used to convert a png, jpg, or any other format image into webp, and on the other hand, dwep is used to convert a webp image back to its original format.
Now that you understand which tool we are going to use for converting WebP images, please bring up the system terminal and install it by running the following command:
$ sudo apt install webp			// Ubuntu and Debian
$ sudo yum install libwebp 		// AlmaLinux, Fedora
$ sudo pacman -S libwebp 		// Arch Linux
Once the installation is complete, you can now start converting WebP images to PNG format.
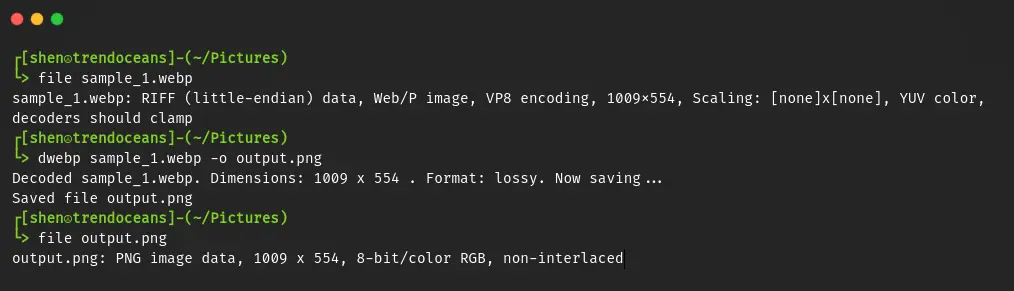
The syntax of the dwebp command is simple; you need to first specify the path where the webp image is located, use the -o parameter, and provide the output filename with the .png extension.
$ dwebp input_webp_image.webp -o output.pngNow let me use the above code syntax to convert one of the WebP images to PNG by following the above syntax:
$ dwebp sample_1.webp -o output.png Once you get the output, you can check the file information by using the file command, which will confirm the format of the output file.
And with the below screen snip, you can see how I have converted sample_1.webp to output.png.
Sometime you may need to convert more than one WebP image to PNG.
If that is the case, then the above command will not be beneficial, so you can use the for loop to loop through all the webp images in a directory and convert them to png format one by one.
Now go back to the terminal and execute the following command to convert all the WebP images to PNG format.
$ for FILE in *.webp; do dwebp "$FILE" -o "${FILE%.*}.png"; doneThe dwebp command will work fine until you don’t want to convert images into jpg format.
Use ffmpeg Command to Convert WebP Image
Alternatively, you can use the ffmpeg command to convert WebP images to PNG, JPG, or JPEG format.
To get started with the conversion, open up your terminal window and execute the following command to check the presence of ffmpeg on your system:
$ ffmpeg -versionIf the above command prints the version with configuration information, then you can skip the installation part.
For those who get ffmpeg command not found, run the following command to install ffmpeg:
$ sudo apt install ffmpeg		// Ubuntu, Debian
$ sudo yum install ffmpeg		// AlmaLinux, Fedora
$ sudo pacman install ffmpeg		// Arch Linux
Once the installation is complete, you can start with the conversion of the WebP image to JPG by running the following command:
$ ffmpeg -i input_webp_image.webp output.jpgIf you want to convert a WebP image to PNG, then change the extension to .png as shown below:
$ ffmpeg -i input_webp_image.webp output.pngBut if you want to perform batch operations, then you can use the following command to convert all the WebP files that are available in current directory to png.
$ for FILE in *.webp; do ffmpeg -i "$FILE" -y "${FILE%.*}.png"; doneOnce you are done, you can verify the type of file using the file command.
Wrap up
That’s all for this short guide where you learn how to convert WebP image to JPG and PNG by using the dwebp and ffmpeg command.
So whenever you just need to convert a WebP image, run any of the following commands:
- Convert WebP to PNG
$ dwebp input_webp_image.webp -o output.png
- Convert WebP to JPG
$ ffmpeg -i input_webp_image.webp myfile.jpg
I hope you are able to convert the image, but if for some reason you are not able to accomplish it, then let us know in the comments section.