If you are aware of the UEFI feature and just want to know the steps to enable it, then you can directly jump to the enabling part by clicking here.
Nowadays, you will find that most operating systems and hardware support UEFI mode, and when you buy new hardware that comes with a Windows operating system, you will find that the UEFI mode is the default boot firmware.
However, you can switch back to legacy boot (on some hardware), but for that, you need to reinstall the operating system.
But who will do that when UEFI has a lot of features enabled for users, like fast booting, which means you do not need to wait for a long period of time to just complete the boot process thanks to a separate EFI partition which holds the information about the operating system in a different partition.
In addition, you will get a secure boot option to verify the integrity of the operating system at startup. It supports GUI over the boring blue screen, which can be complex for some users, but it has its own advantages.
There is more to say about UEFI, but we are not here just to count the features of UEFI. But whoever is interested in getting more information about UEFI, then you can refer to this link.
I got a bit off track while telling you the advantages of UEFI, but it’s necessary for you to know some of the advantages when you are switching to UEFI firmware over legacy.
Anyway, let’s get back to our main topic.
This article will teach you how to enable or switch from legacy to UEFI in VirtualBox and VMware.
Enable UEFI in Virtual Technology Software
The process of switching to UEFI mode is very straightforward for VMware Workstation Pro and Oracle VirtualBox, but before that, I’d like to make it clear to you that once you change the firmware, you will not be able to boot the current operating system if it has legacy support.
You can choose the following option to learn the steps for the following virtual software’s.
Enable UEFI mode in VMWare Workstation Pro
To change the firmware type, you need to first turn off the virtual machine on which you want to use UEFI firmware. After that, you need to click on “Edit virtual machine settings”, which will open Virtual Machine Settings.
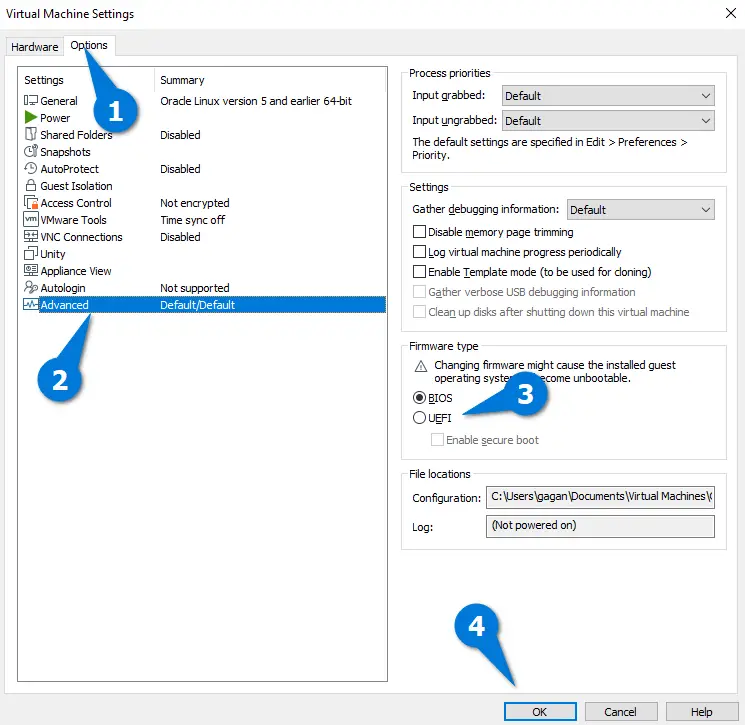
Change tab to Options from Hardware.
Next you need to select “Advanced” and under the advanced section you will find “Firmware type”. In my case, I have not yet changed the firmware type.
To change firmware from BIOS to UEFI, select UEFI and press “OK”.
And once you save the changes, your current virtual machine will use UEFI instead of BIOS, so don’t wait any longer and try to start the virtual machine.
If you are facing issues while booting up your system, then you need to revert changes, or else you have to install an operating system that complies with UEFI.
Enable UEFI mode in VirtualBox
First of all, stop the virtual machine on which you want to apply the following settings, or else you can also follow the same steps after creating a new virtual machine, but make sure that you have not installed the operating system yet on the current VM.
This time I’m going to enable UEFI mode after setting up a virtual machine, which I have not started yet. And if you want to know how to create a virtual machine, then follow these instructions.
Once you have setup the VM, click on the Settings gear, which opens another prompt, where you will find the option to enable EFI support for this particular VM.

Change the tab to System and follow the below sequence to enable EFI.
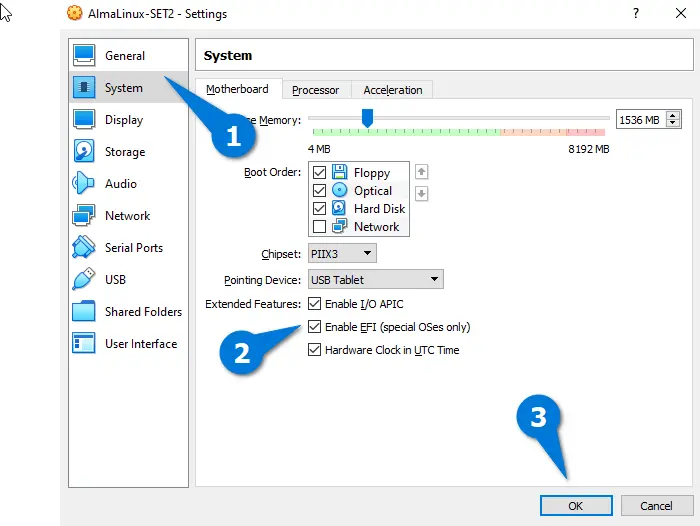
After following the above steps, you can start the virtual machine to install the new operating system on the UEFI firmware.
That’s all it takes to enable UEFI in VMware and VirtualBox.