In a few days or very soon, you might be working on your own shell script on Linux. At that time, you might be going with the traditional method by learning all the shell programming codes and applying them to your script.
What if I say there is an amazing tool called Gum, that provides you glamorous functionality, or in simple words, the beautiful syntax for your shell script?
What is Gum Tool in Linux?
Gum is an amazing tool that leverages the power of Bubbles and Lip Gloss in your script without letting you write any code. It is ready to use and highly configurable, making it easier for you to write in a single line for shell scripts and dotfiles aliases.
Let me show you how a standard shell script looks. Below is the basic shell script that will output “Hello, Trend Oceans Users!” on screen.
$ ./script.shBelow is the output of the above command.

As you look above, you find it ugly after learning how to use Gum in Linux. So, first, you will learn how to install it on your system.
Install Gum Tool on Linux
There are multiple ways to install it on Linux, starting with the Homebrew method. Recently, we have written a detailed guide on how to install your favourite macOS default package manager homebrew on Linux.
Suggestion: How do I Check if a Directory or File exists in a Bash Shell Script?
If you have not installed it on your system, then execute the following command to install it on your system.
$ brew install gumInstead of Homebrew, if you prefer to install it on Debian or Ubuntu through the external repository, then execute the following command.
$ echo 'deb [trusted=yes] https://repo.charm.sh/apt/ /' | sudo tee /etc/apt/sources.list.d/charm.list
$ sudo apt update && sudo apt install gum
On the Arch and Manjaro systems, use the default Pacman package manager to install it.
$ pacman -S gumOn the Nix system, use the following command.
$ nix-env -iA nixpkgs.gumOn Fedora, use the following command to add the repository and install it from the yum package manager.
$ echo '[charm] name=Charm baseurl=https://repo.charm.sh/yum/ enabled=1 gpgcheck=0' | sudo tee /etc/yum.repos.d/charm.repo
$ sudo yum install gum
Getting Started with Gum on Linux
Let’s see some useful commands with examples to understand Gum.
Take Single Line Input from Users
Execute the following command to take input from the user and save it in the data.txt file.
Suggestion: Zenity: Create Graphical (GTK+) Dialog Box in Command-line and Shell Scripts
$ gum input > data.txtBelow is the output of the above command.

The above command will show the input in plain text. If you are asking for sensitive data like a password, then use the following command.
$ gum input --password > data.txtBelow is the output of the above command.

Currently, the default placeholder shows the text “Type something…“. If you want to replace it with something meaningful so users can easily determine the input they have to provide, then use the following command to provide a custom placeholder.
$ gum input --placeholder "Enter your Email!" > data.txtBelow is the output of the above command.

Take Multi-Line Input from Users
You now always take single-line input. If you are taking multi-line input, then execute the following command,
Note: CTRL+D is used to complete text entry. CTRL+C and Esc will cancel.
$ gum write > data.txtBelow is the output of the above command.

Filter a List of Values
To perform fuzzy matching from a list of values by filtering them, then use the following commands.
$ echo Apple >> data.txt
$ echo Banana >> data.txt
$ echo Cat >> data.txt
$ echo Dog >> data.txt
$ cat data.txt | gum filter > selection.txt
Below is the output of the above command.

When you select the value from the above list, it will be stored in the selection.txt file.
Suggestion: How to Restrict Script/Application Permission using AppArmor on Ubuntu/Debian
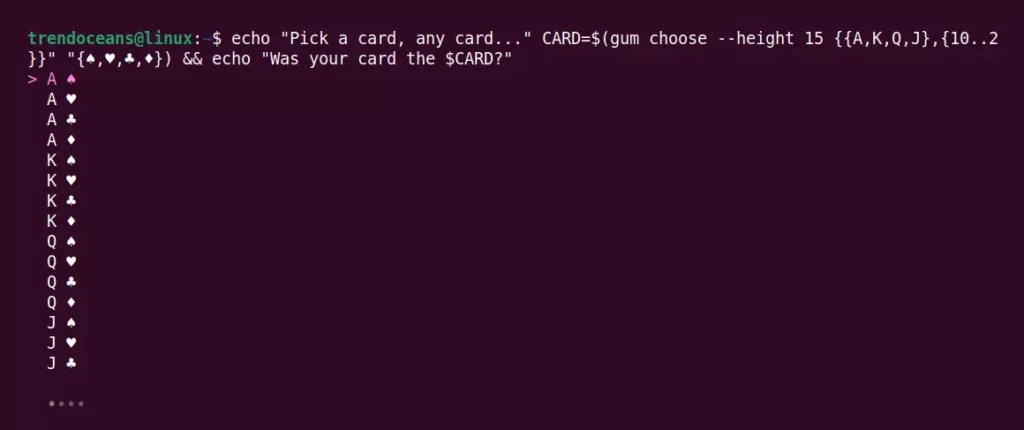
Choose an Option from a List of Choices
The following command makes it possible to select an option from the list of choices.
$ echo "Pick a card, any card..." CARD=$(gum choose --height 15 {{A,K,Q,J},{10..2}}" "{♠,♥,♣,♦}) && echo "Was your card the $CARD?"Below is the output of the above command.
Confirm User Action
It is possible to confirm user action before taking execution by using the following command.
$ gum confirm && rm file.txt || echo "File not removed"Below is the output of the above command.

Show Spinner While Command is being Executed
It is possible to show the spinner while the command is in progress. The spinner will automatically stop after the given command exits.
$ gum spin --spinner dot --title "Hello, Trend Oceans Users" -- sleep 5Below is the output of the above command.

Tutorial
Now you will learn how to create a basic shell script using the Gum tool. First, create a new file with a script.sh name and add the following line in the header of the file.
#!/bin/shNext, let’s ask the user for his/her name as an input by using the following command.
NAME=$(gum input --placeholder "Enter your Name!")Now, let’s ask the user for his/her age.
AGE=$(gum input --placeholder "Enter your Age!")Lastly, we will print the output with the user name and age using the echo command, as shown below.
echo "Hello, $NAME is your $AGE age is correct?"Below is the output of the script.

Save and close your script, then execute the following command to provide executable permission.
$ chmod +x script.shFinally, execute the script using the following command.
$ ./script.shBelow is the output of the script.
That’s all for now. If you want to explore it more, do check the help section by executing the gum -h command or check the manual by executing the man gum command.
If you have any queries related to the tool or are facing any errors or issues, do let us know in the comment section.
Till then, Sayonara!!!