While upgrading or installing any package, if you are getting an unmet dependencies error, you can resolve it with the given steps.
Unmet dependencies are quite a common problem that you will find while installing the package, especially if the package is coming from a PPA source where their latest build is not compatible with your Ubuntu installation.
Not only that, it will even occur when you try to install a specific version of the package that is not available on your system, which can lead to dependency issues and potential conflicts with other packages in your system.

If you can recall your last step, like what you were trying to do, then it will be much easier for you to troubleshoot the issue.
But don’t worry if you are not aware of how it all started.
There are a few steps that you can take to diagnose and resolve the problem, which I’m going to share with you, but before that, let’s spend some time understanding what has caused the unmet dependencies.
What has Caused the Unmet Dependencies?
As I said earlier, the main cause of this error is when you try to install an older version of a program or an application using the PPA.
But why does the system throw an error when we can install an older version of the program? Shouldn’t we install the old programm?
Of course, you can install an older version of the package, but the issue is that the latest version of the application or your Ubuntu installation may require a specific version of dependencies, which may not be available on your system.
Even if you manage to get an older dependency on your system, you will not be allowed to install a lower version of the library to prevent your system from going into an unstable state.
But there are times when even the latest version of the application fails to install because of an interruption while installing or a corrupted system database, or else you might have held the package for the upgrade, which can also contribute to the installation failure.
Also Read: How to Fix an Error Unable to Correct Problems You Have Held Broken Packages
Now let’s look out for the methods that you can use to fix the unmet dependencies error.
What are the Methods Available to fix the Unmet Dependencies Error?
There are several methods available to fix this issue, and all the methods that can solve the problem I’ll share with you in this article, so first let’s start with the simple one.
TL;DR Version
Here’s the CliffsNotes version of this article for those seeking a quick solution, but if you are new to this topic, please scroll down to read the full article.
To fix the unmet dependencies error
you can use anyone of the method to fix the problem.

# Method 01: Ask the package manager to
automatically fix any broken dependencies

$ sudo apt install --fix-broken
or
$ sudo dpkg-reconfigure  --force <package-name>

# Method 02: Install the application through Aptitude
to resolve the dependency issue.
$ sudo aptitude install <package-name>

# Method 03: If a dependency package is marked as hold, then unhold
$ apt-mark showhold
$ apt-mark unhold <package>

# Method 04: Remove Conflicting PPA
$ ls /etc/apt/sources.list.d/
$ sudo apt autoremove --purge <package-name>
$ sudo rm /etc/apt/sources.list.d/<ppa_name>.list
$ sudo apt autoclean
$ sudo apt update
Add -f or –fix-broken Flag to Force the Installation
Sometimes, due to an interruption or conflict with the package installation, it gets aborted in the middle of nowhere, and because of that, when you try to install the package again, you will see the unmet dependencies.
To resolve such an issue, you can use the -f or --fix-broken flag, which will attempt to fix any broken dependencies by installing missing packages or removing conflicting ones.
$ sudo apt install -f
or
$ sudo apt install --fix-broken
or
$ sudo dpkg-reconfigure  --force <package-name>
Aptitude to Automatically Resolve and fix Dependency issues
Always, alternative options are available in Linux, and here also, you can use aptitude instead of apt to install packages, which will automatically try to resolve any dependency issues and fix the installation failure.
The syntax of Aptitude is similar to that of APT, but it offers more advanced features. However, you will not find aptitude preinstalled, so to use it, you need to run this:
$ sudo apt install aptitudeOnce Aptitude is available for use, run the following command with the package name that you want to install and follow the on-screen instructions.
$ sudo aptitude install <package-name>If everything goes well, then the package will get installed.
 Check for any Held Packages
There might be a possibility that you have marked some packages and libraries on hold for installation, and because of that, you are now getting an unmet dependencies error.
To fix this, you need to first check if there is any dependency program or library you have marked on hold by running the following command:
$ apt-mark showholdIf there are any packages, then you can execute the below command by replacing the right package name to unhold it and resolve the unmet dependencies error.
$ apt-mark unhold <package>This can also be solved using the aptitude command, like once you try to install the application that gave you the error, then press ‘q‘, and again try to install the package.
If the application was held, then this small trick will solve the problem.
 Remove PPA that cause Problem
If you are sure that an unmet dependencies error occurred after adding the PPA, it would be highly recommended that you please remove the installed package and PPA.
To remove the PPA go to the /etc/apt/sources.list.d/ directory and list out all the PPAs that have been installed on your system.
$ ls /etc/apt/sources.list.d/Look out for the PPA name that is causing the error.
After that, remove any packages that you have installed using the PPA by executing the next line of command:
$ sudo apt autoremove --purge <package-name>Once you’re done with the above step, execute the last command to remove the PPA from your Ubuntu system.
$ sudo rm /etc/apt/sources.list.d/<ppa_name>.listNext, make sure to run the following command to clean up the local repository cache and then update the system repository.
$ sudo apt autoclean
$ sudo apt update
If you want to reinstall the same application after removing PPA, I recommend you to install manually or using Snap, Flatpak, or AppImage instead of PPA.
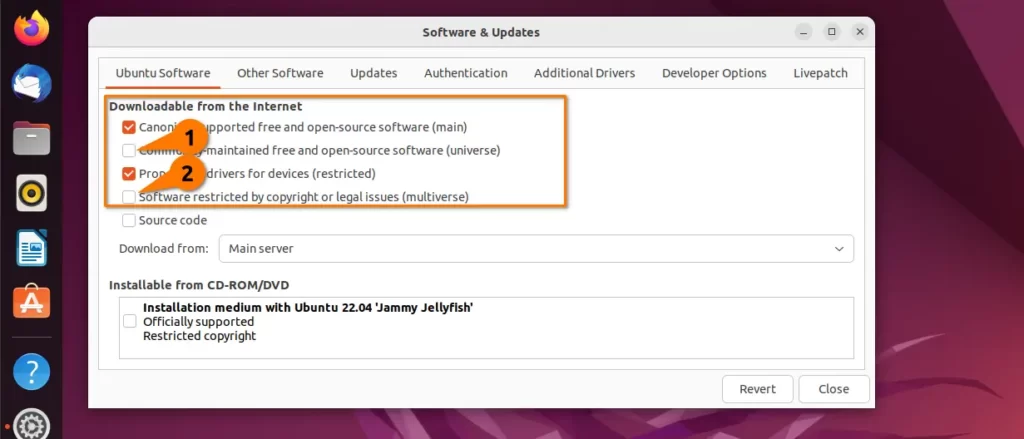
 Enable Universe, Multiverse, and Restricted Repository
Some of the packages are not available in the default repository, and due to that, the required library packages are not getting installed, which can lead to dependency issues.
As you know, Ubuntu has three more repositories, which you can enable by executing the following command:
$ sudo add-apt-repository universe
$ sudo add-apt-repository multiverse
$ sudo add-apt-repository restricted
If you want to enable repositories using the GUI, then press the dash button and search for “Software & Updates”.
Once it is open, check the following option, as shown in the below image, and close the application to reload the changes.
Wrap up
That’s all for now! I hope you might be able to resolve the problem with any of the above methods, and don’t forget to mention the method in the comment section that you used to fix the problem.
So the next user can try the same.
Keep reading, and I’ll see you later!