In the last article, we have guided you to the installation of, basic ufw guide as I promise you I will provide the advance options too.
if you want to know the basis of ufw configuration
Step by I’ll guide you how you can do this too in your system
Before proceeding first we will check the status of UFW
Step 1. Check status
$ sudo ufw status
If a ufw firewall is disable then enable it.
Step 2. Enable UFW
$ sudo ufw enable
We have enabled our firewall system,Let’s move more advance configuration.
Step 3. Block all incoming data traffic
If you want to block incoming traffic then ufw as a default which you need to call
$ sudo ufw default deny incoming
Check the status after deny

Step 4. Allow incoming data traffic
If you want to allow incoming traffic then ufw as a default which you need to call
$ sudo ufw default allow incoming
To verify the status

There is a default policy allow and deny. If you want to block outgoing data traffic the same you have to follow the rule.
Step 5. Add Specific Rules
1.Allow
If you want to apply custom rules that also you can apply by using the service name or else by specifying the port number.
We will see some examples through you will get better idea
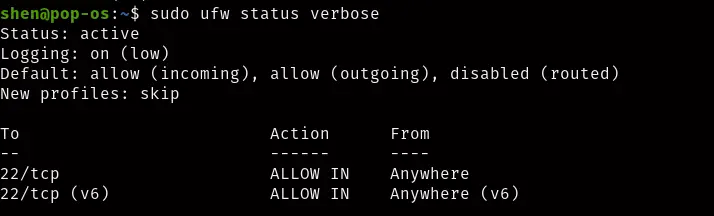
If you want to enable or allow both incoming and outgoing traffic for ssh then you can allow this way by default ssh port is 22.
If you don’t know the port number and service name then you can see all ports and their service names in the file “/etc/services”.
$ cat /etc/servicesIt will list down all the services and port number.
$ sudo ufw allow sshor
$ sudo ufw allow 22
If your ssh is not working then you can try this method to check whether the firewall is blocking request.
2.Deny
Above we have check how to allow specific port or service to request connection.
We see how we can deny specific port or service to request connection.
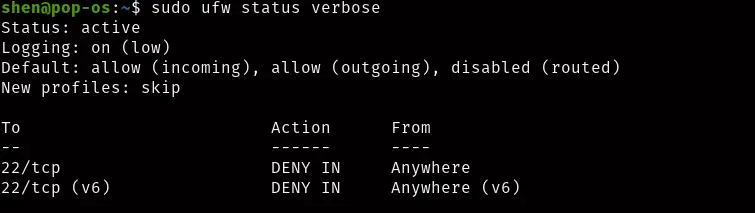
If you want to deny or disable both incoming and outgoing traffic for ssh then you can deny this way by default ssh port is 22.
$ sudo ufw deny sshor
$ sudo ufw deny 22
You can validate the changes
You can leverage “ufw” to allow packet based on TCP or UDP. To apply changes follow this way
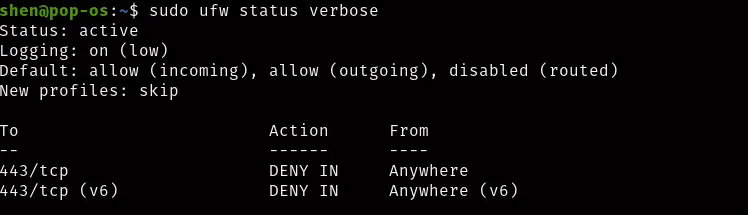
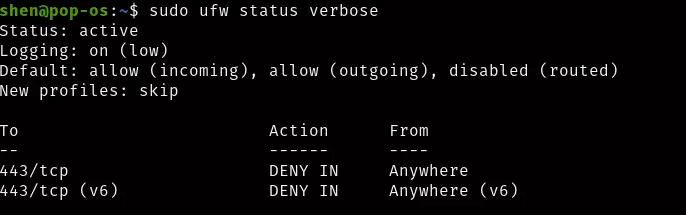
We will block the https request 443/ tcp
$ sudo ufw deny 443/tcpVerify the changes in ufw
Similarly, you can to for udp allow and deny.
Step 6. Advance ufw command
There is advance ufw option there you can allow a specific service to specific ip address .
1. Allow or Deny a specific IP address
Allow
This will allow ufw specific ip address to have allow access to all services from the remote server.
$sudo ufw allow from 10.20.60.30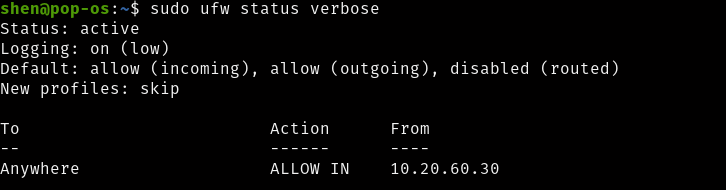
#Deny
This will deny ufw specific IP address to have deny access to all services from the remote server.
$sudo ufw deny from 10.20.60.30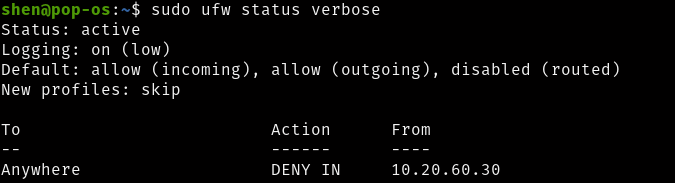
2. Allow or Deny a specific Port Range
#Allow Port Range
We will see now how we can allow specific port range to establish connection.
$ sudo ufw allow 4001:4050/tcp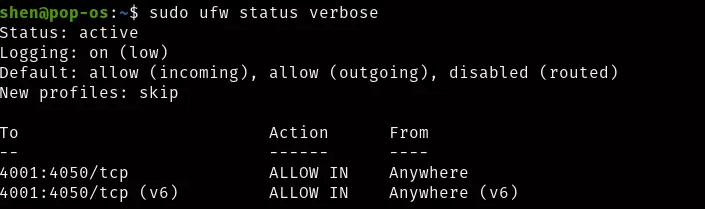
#Deny Port Range
Now we will disable the port range with udp
$ sudo ufw deny 4001:4050/udp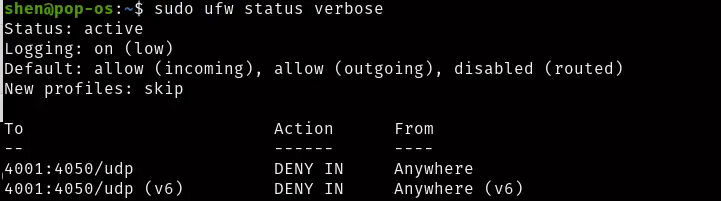
#To allow specific ip address and port combination
$ sudo ufw allow from 10.20.40.30 to any port 80 proto tcp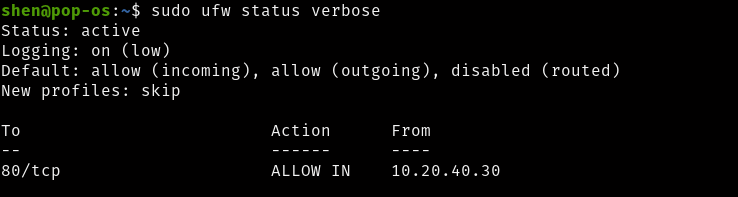
If you’re requirement id for udp then remove tcp and add udp
$ sudo ufw allow from 10.20.40.30 to any port 80 proto udpYou can do same for deny to ip with the specific port.
#Interface specify
You can even set rule even to Hardware Network interface
$ sudo ufw allow in on wlo1 to any port 80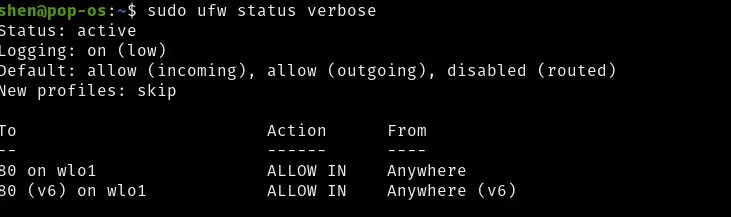
In my case, the wireless interface name is “wlo1” you can change as per your device interface name.
Step 7. Delete Rule
We have seen how to set different kinds of rules in firewall and some rules need to remove after sometime,or else you made typing error you need to remove that.
1.Using Service Name
$ sudo ufw delete deny https
2.Using Numbered
You can even remove the rule by using numbered to check rules number you need to type
$ sudo ufw status numbered It will list down the firewall rules with the numbered, you just need to mention the firewall number
$ sudo ufw delete 1
Then type the y on screen and firewall rule will be deleted.
Step 7. Disable Reset UFW Rule
After all this if you want to disable ufw even your rules will not get removed you can do that in a simple way
$ ufw disable
If you want to again enable the rules
$ ufw enable
This will enable the rule with the last rule.
Step 8. Reset UFW Rule
If you want to clean or reset all the UFW rules
$ ufw reset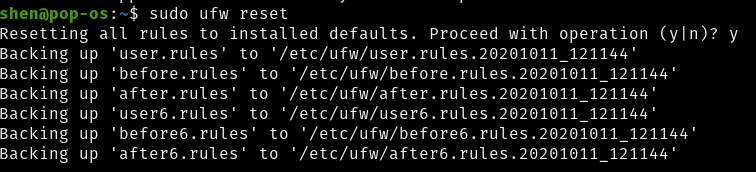
Now ufw is reset sucessfully.
Conclusion
All these pretty simple steps are required to use ufw,It requires sudo permission to make changes.
Please let us know which the next topic you want know more about.