There are a number of things you can do with ImageMagick, but for that, you need to learn how to install ImageMagick on your Debian/Ubuntu system.
If you are an editor and editing images is part of your daily life, then you should try the ImageMagick tool.
ImageMagick is a free and open-source tool to edit, create, compose, or convert digital images into other formats. It supports over 200 formats, including PNG, JPEG, GIF, WebP, HEIC, SVG, PDF, DPX, EXR, and TIFF.
It provides various editing tools such as resizing, flipping, mirroring, rotating, distorting, shearing, and transforming images, adjusting image colors, applying multiple special effects, drawing text, lines, polygons, ellipses, and Bézier curves.
That’s the basic information about ImageMagick.
Let us now look at the installation steps.
Installation of ImageMagick 7 on Ubuntu/Debian
ImageMagick 7 is available as an IMEI Script, Source file, and AppImage for installing it on Ubuntu or Debian-based distributions.
- IMEI Script is the easiest way to install the latest release of ImageMagick on your system using the shell script. If you are considering this installation method, then you should note that it takes a long time to remove ImageMagick from your system.
- AppImage is also easy to use and requires less effort, while new updates require manually changing the AppImage file.
- Source files require an understanding of development tools and the concepts of compilation and building. For beginners, I suggest installing ImageMagick using the IMEI Script or AppImage.
Method 1: Install ImageMagick 7 from a Shell Script
Installing ImageMagick 7 on Linux can be a problem for beginners who are unaware of the process of compiling and building the application from the source file.
For them, I strongly recommend installing ImageMagick 7 from the IMEI Script, which takes care of all the dependencies and supports standard formats (PNG, TIFF, etc).
You can get the additional support for HEIF/HEIC/HEIX, AVIF, and JPEG XL and incrementally update your local ImageMagick (if you have it installed) after the initial installation.
Open your terminal app using the Ctrl + Alt + t or Ctrl + Shift + t keyboard shortcut and execute the below command to install ImageMagick from the IMEI script on your system.
$ git clone https://github.com/SoftCreatR/imei
$ cd imei
$ chmod +x imei.sh
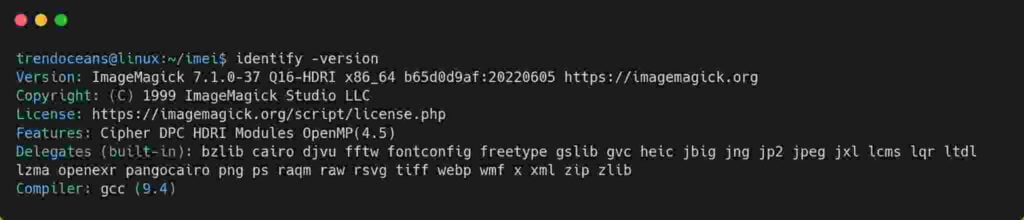
$ sudo ./imei.shAfter the installation is successful, run the identify -version command to verify the installation, as shown below.
Method 2: Install ImageMagick 7 from AppImage
ImageMagick 7 is also available as a standalone AppImage, making it easier to use on all Linux distributions. Execute the below command on your terminal to grab the latest version of the ImageMagick 7 AppImage.
$ wget https://download.imagemagick.org/ImageMagick/download/binaries/magickOnce the file is downloaded, execute the below command to give ImageMagick the required permissions.
$ chmod +x magickYou are done with the initial step; now you just need to run the below command to check if it is working or not.
$ ./magickRight now, this command is only accessible inside the file directory.
If you change the current directory, then the above command will not work.
To make the magick command available for execution from anywhere, place the file inside the user /usr/bin directory using the below command:
$ sudo mv magick /usr/bin/Finally, as shown below, you can execute the magick command from anywhere.
$ magickBelow is the output of the above command.
Removing ImageMagick 7 from AppImage
If you were using AppImage within the directory, remove it using the rm magick command, or you can execute the below command to remove it from the user /usr/bin directory.
$ sudo rm /usr/bin/magickMethod 3: Install ImageMagick from Source File
Before downloading the ImageMagick source file for compilation and building, install the development tools in your system, which provide the necessary tools for building and compiling an application from the source file.
Installing Development Tools
Install the build-essential package on your system to install all the necessary tools for compiling and building, as shown below.
$ sudo apt install build-essentialDownload the Source File
After the development tools are installed, grab the latest ImageMagick.tag.gz package from the official site, or you can use the wget command to download the compressed file from your terminal app.
$ wget https://download.imagemagick.org/ImageMagick/download/ImageMagick.tar.gzAfter downloading the package, uncompress and move it into the directory using the following command:
$ tar xvf ImageMagick.tar.gz
$ cd ImageMagick-7.1.0-37/
Configuring & Building the Source File
Now it’s time to configure the source below before compilation, as shown below.
$ ./configureAfter the configuration is finished, start the compiling process with the following command:
$ makeIf the compilation is finished without throwing any errors, you are ready to install it and configure dynamic linker run-time bindings on your system using the following command:
$ sudo make install
$ sudo ldconfig /usr/local/lib
Check out the ImageMagick Version
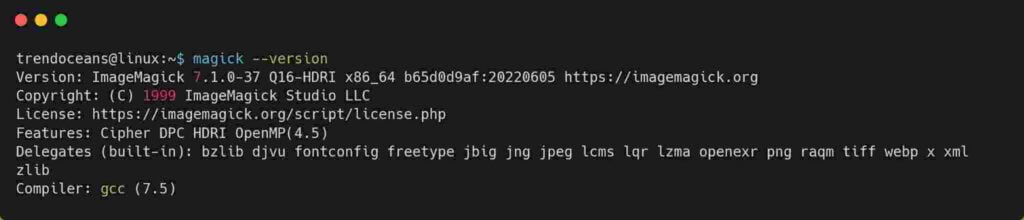
Once the above process is complete, you can use the following command to check the version of ImageMagick.
$ magick -version
OR
$ identify -version
If everything went smoothly, you will find the information like shown below

Removing ImageMagick 7 from the Source File
To remove the ImageMagick installed via compilation and building from the source file, move into the source file directory used for compilation in step 2 and execute the below command.
$ sudo make uninstallWrap up
That’s all for now.
Here we have discussed three different methods on how to install ImageMagick on a Debian or Ubuntu-based system. If you have a question regarding the installation process, let us know in the comment section.
After installation is over, click here to learn things you can do with ImageMagick CLI options like Inline crop, extract image, and so on.
Also Read: How to Install ImageMagick or Imagick PHP Extension in Linux
See you in the next article.