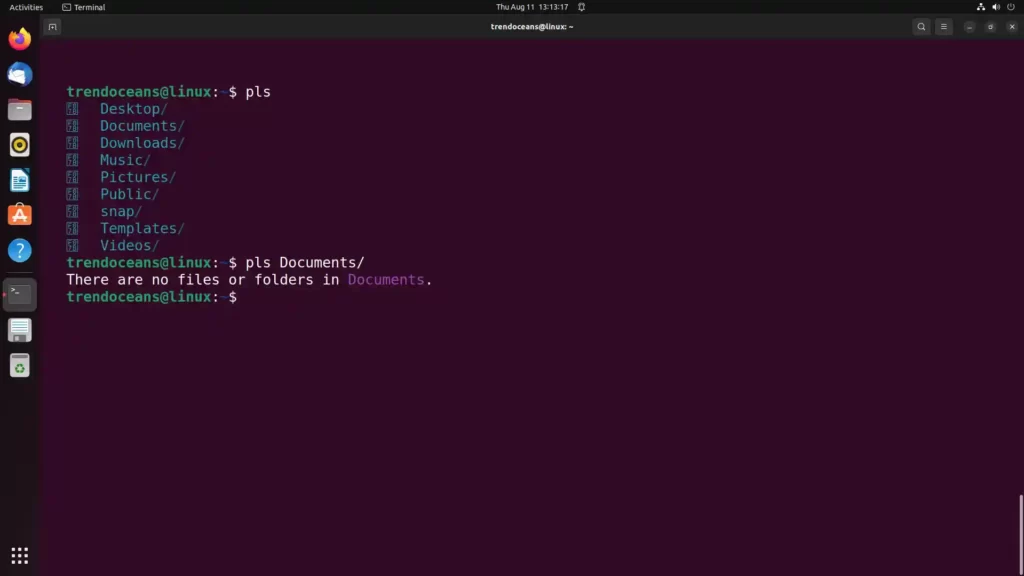
Breif: If you were still using the ls command for listing files and directories on your Linux system, then it’s time to switch to the better alternative, the pls command.
The pls (prettier and more powerful) is a modern alternative to the ls command to list your files and directories. It outputs the data in a prettier and more powerful format for easy understanding.
The development of the application is actively focused on providing developers with developer-friendly features like showing icons next to file and folder names, 10 different attributes to sort files, classifying files by their priority, and many more.
However, it is not the replacement of the ls command and the ls command still stands ahead while using it in the scripts. Then why should you consider using the pls command? One thing will be presenting you with clean and faster directory content. The rest of the things you can find in the below features section.
Features
Below are the known features of the pls command.
plsuse a nuanced, cascading match algorithm- Hand-picked icon codepoints for various file types
- It’s written in Python, so it runs everywhere
- Placing a
.pls.ymlfile in the repo root enables you to tweak almost every functionality of the app plscan filter nodes in or out, by their types and by regex comparisons of their namesplsplsuses suffixes to depict the type of the node, such as/for directories and|for FIFO pipes
If you decide to install it, please make sure to check the below requirements section.
Requirements
To install pls, ensure you have the following application installed on your system:
- Python 3.8 or newer
- pip or pipx (depends upon your choice)
If the above requirement is not fulfilled, then follow the below methods to install it.
Python Installation with PIP or PIPX
Python 3.8 or newer must be installed on your system. However, if it is not installed, then run the following command to install it on your system.
$ sudo apt install python               #On Debian, Ubuntu, Pop!_OS, LinuxMint
$ sudo dnf install python               #On RHEL, Fedora, AlmaLinux, CentOS
$ sudo pacman -Sy python                #On Arch, Manjaro
After that, you can follow any of the below-mentioned methods to install either pip or pipx.
Installing PIP for Python
First, grab the get-pip.py file and run it using the python command, as shown below.
$ python3 get-pip.pyIt will install the latest Python package manager on your system.
Installing PIPX for Python using PIP
Ensure pip is installed on your system by executing the pip -v command. Once the installation is verified, use the following command to install pipx for Python using the pip command.
$ python3 -m pip install --user pipx
$ python3 -m pipx ensurepath
After the installation is complete, move to the next part of the installation of the pls package using the pip or pipx command.
Also read: Python PIP Complete guide
Installing pls Package
Once Python 3.8 or a newer version is installed on your system, there are two ways to install pls using the pipx (great tools for managing Python binaries) or the pip (used to manage Python packages).
With pipx
pipx
Note: While running the installation, if you find the error “The virtual environment was not created successfully because ensurepip is not available. On Debian/Ubuntu systems, you need to install the
python3-venvpackage using the following command.” then install the python virtual environment package using thesudo apt install python3-venvcommand.
To install, pls use pipx using the following command.
$ pipx install plsTo update the pls to its latest release, use the following command.
$ pipx upgrade plsLastly, if you want to remove pls from your system, use the following command.
$ pipx uninstall plsWith pip
pip is a conventional method of installing and managing packages in Python. However, there is one drawback that it installs a lot of namespaces that will be left behind if the package is removed.
If you do not have any issues with that, then use the following command to install pls using the pip command.
$ pip install --user plsUse the following command to update the pls to its latest version.
$ pip install --user --upgrade plsUse the following command to uninstall pls from your system.
$ pip uninstall plsVerifying
After the installation is complete, use the following command to verify the package is discoverable in your path.
$ pls --version
$ pls -v
If the package is not found, then reboot or log out of your system to reflect the changes.
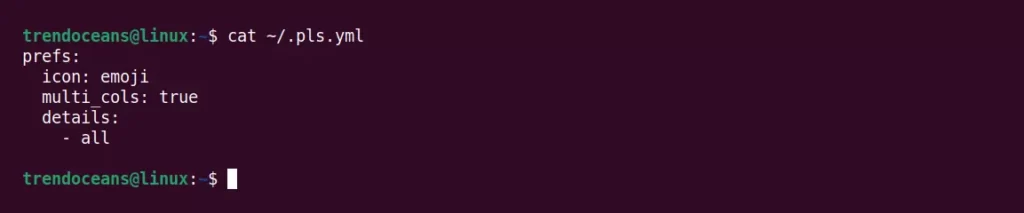
Configuration and Settings
To make it more friendly, you can create a local configuration file in your home directory with the name .pls.yml, as shown below.
$ touch ~/.pls.ymlThen add your preferences settings within the configuration file for changes.
Icons
By default, the pls output will show you an undefined character set that can be easily changed to nerd, emoji or none. For example, to show emoji next to the file and directory, add the following snippet inside the .pls.yml file.
prefs:
  icon: emoji
Save and close the file, reload the terminal for the changes to reflect, and then run the pls command. You will get the following output.

Alternatively, you can use the CLI flag pls -i emoji to display icons without configuration change.
Multi-cols
Generally, the pls command shows the output in a single column, although you can change it into a multi-column by making a small configuration change. Edit the configuration file with the following snippet, save and close.
prefs:
  multi_cols: true
Below is the output of the above command.

Alternatively, you can use the CLI flag pls --multi-cols to display multi-column without configuration change.
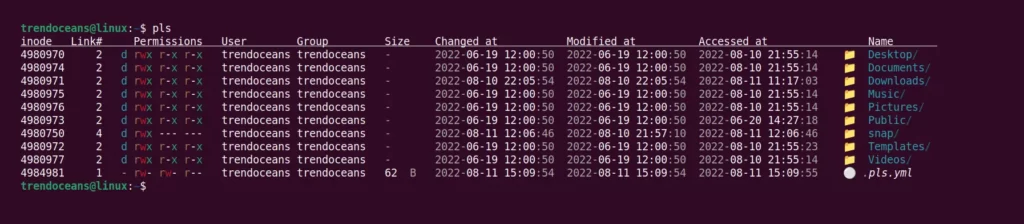
List of Information
The standard output of the ls and pls commands is to list the content of the present directory without any extra information. However, you can provide additional flags to view the content information that can be done in the ls and pls commands.
Add the below snippet in the configuration file to list the content with an inode, links, type, perms, user, group, size, btime, ctime, mtime, atime, and git key.
prefs:
  details:
    - all
Below is the output of the above command.
Once you have included all the above snippets, your configuration file will look like the below:
However, this is not the end of the modification. By learning all the features from the documentation, you can go far and make more changes. So, we will hold it here and leave the rest of the changes and experiments to you.
If you have any issues or trouble while following the documentation, then feel free to contact us.