Learn how to disable auto-updates and upgrade from unattended-upgrades in Ubuntu 22.04 and later to have more control over system updates.
Unattended Upgrades software helps us auto-update and upgrade system packages in the background without user interaction to keep up to date with the latest features and security patches.
This feature can be a handful to secure your system with the latest security issues, even Ubuntu providing it out of the box with its latest iso.
Unexpected background updates can be irritating for regular Linux users.
At the time of the background update, if you try to install any package or attempt to execute the apt command, you will get a similar error as shown below.
Waiting for cache lock: Could not get lock /var/lib/dpkg/lock-frontend. It is held by process 3082 (unattended- upgrades).
If you try to kill the process or interrupt the process by restarting the machine, it can bring up the error E: Could not get lock /var/lib/dpkg/lock or E: dpkg was interrupted, you must manually run ‘sudo dpkg –configure -a’ to correct the problem errors.
So, let’s learn four different ways to disable auto updates and upgrade from unattended-upgrades in the background for Debian and Ubuntu operating systems.
Method 1: Disabling from Configuration Files
The first and foremost method is disabling the auto-upgrade feature from the unattended-upgrades configuration file located at “/etc/apt/apt.conf.d/50unattended-upgrades” using any of your favorite text editors as shown below.
$ sudo nano "/etc/apt/apt.conf.d/50unattended-upgrades"After executing the above command, you need to focus on two-line shown below.
APT::Periodic::Update-Package-Lists "1";
APT::Periodic::Unattended-Upgrade "1";
By default, auto-update and upgrade; the option is enabled in unattended-upgrades.
You can change the value depending upon your own need.
Update the system repositories without upgrading the packages
If you want to auto-update your system repositories without upgrading the packages, change the values as shown below.
APT::Periodic::Update-Package-Lists "1";
APT::Periodic::Unattended-Upgrade "0";
Disable unattended system repositories and enable unattended upgrading of packages
If you want to upgrade packages with the latest available version in the fetched repositories, change the values as shown below.
APT::Periodic::Update-Package-Lists "0";
APT::Periodic::Unattended-Upgrade "1";Note: This scenario might be less effective as next auto upgrade will stop because latest repositories fetched version is already installed in your system.
Disable both unattended updates and upgrades
To disable both updates and upgrade in your system, change the values as shown below.
APT::Periodic::Update-Package-Lists "0";
APT::Periodic::Unattended-Upgrade "0";
Save the file to make all changes reflected adequately.
Method 2: dpkg-reconfiguring the unattended-upgrades
If you want to stop auto-update and upgrade right after the installation, you can use the “dpkg-reconfigure” command to disable auto-update and upgrade, as shown below.
$ sudo dpkg-reconfigure unattended-upgradesAfter executing the above command zenity dialog box will prompt, click <No> to prevent automatic update and upgrade.
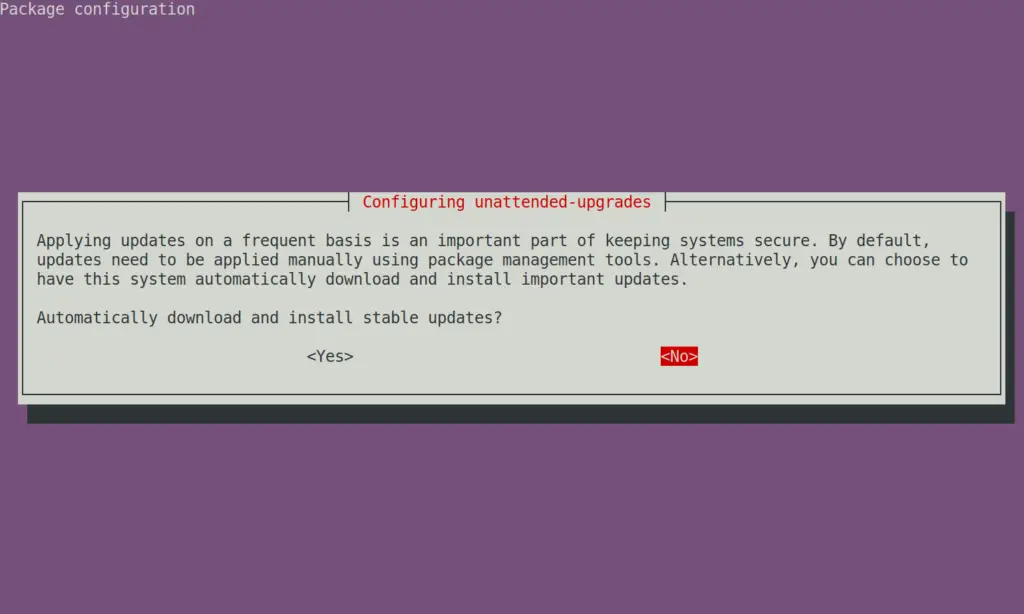
After selecting <No>, press enter to disable auto-update and upgrade on your ubuntu system.
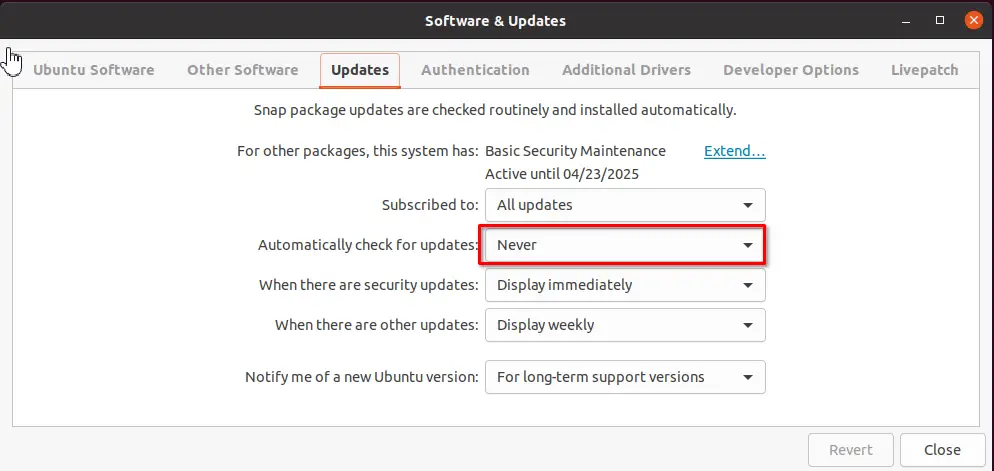
Method 3: Graphical Method to Enable/Disable Auto Update & Upgrade
If you prefer to use the graphical method to disable automatic update and upgrade on Ubuntu operating system.
Then open the “Software & Updates” from the activity search bar and navigate to the “Updates” section.
From here, change “Automatically check for updates” from “daily” to “never,” as shown below.
Method 4: Remove unattended-upgrades Package
If any of the above methods didn’t work for you, remove the unattended upgrades from your system, as shown below.
#Use below command if you just want to remove package binary
$ sudo apt remove unattended-upgrades

#Use below command if you want to remove package binary along with the configuration files
$ sudo apt purge unattended-upgrades
If you are uncertain about the changes, then let me clarify them for you.
This feature is being provided by default for an important reason, security issues.
There are always be some new security flaws captured requiring you to install the latest security patches for your system to prevent any security issues.
Wrap up
That’s all for this article! Here you have learned four different ways to disable or enable auto updates and upgrades on your Ubuntu-based machines.
While following this article, if you are not getting anything, then do let me know in the comment section. I’ll try to help you out ASAP!
Bye…Bye I’ll See you in the next article.
Till then, spread peace and love.
Being on Ubuntu 20.04 server i found the 2 line
APT::Periodic::Update-Package-Lists “1”;
APT::Periodic::Unattended-Upgrade “0”;
in /etc/apt/apt.conf.d/20auto-upgrades instead.
And in Ubuntu 20, using dpkg-reconfigure changes those two lines. So you can manually change them in the 20 file, OR use dpkg to accomplish the same goal.