As you know, the Ubuntu Desktop variant ships with the default GNOME desktop environment for users, so why do we need to install a graphical desktop environment on Ubuntu?
Yes, it is shipped with the GNOME desktop environment to use, but it is not always like that. If you have installed the Ubuntu server or Debian minimal, then you won’t find the regular desktop setup to use your favourite application graphically.
You will just find a black screen with white text, and from that, you have to manage your system.
Or maybe you have removed the GNOME or Ubuntu desktop package to test out other desktop environments like KDE, XFCE, or any other desktop, but later you decided to get the default desktop environment which is bundled with Ubuntu.
Whatever reason you may have, I’m sure you will find the solution here to get a desktop environment on your terminal-based environment.
Install Graphical Desktop Environment on Ubuntu server 22.04
If you have decided to install a graphical desktop environment on Ubuntu Server 22.04, then you should think about memory consumption because the server edition can run efficiently with 512MB of RAM, but it is not the same case with the desktop environment because it requires a minimum of 2GB of RAM.
If you are running an Ubuntu server to just host your files in public, then I don’t recommend you do that because it’s clearly a waste of resources. However, if you want to access your system remotely through a GUI tool, then you should think about Webmin or Cockpit, which is the better alternative to installing a desktop environment, and importantly, it will use less hardware resources.
Anyway, before proceeding ahead, first take a backup of your system so if anything gets wrong, you can roll back to your previous state without having to completely reinstall your system.
Do not try to replicate the below steps on the production server. It may break your server when you try to uninstall the desktop environment.
Let’s get your Ubuntu server fully capable of being used as a normal desktop environment. To explain to you, I have installed Ubuntu Server 22.04 (Jammy Jellyfish) on my VirtualBox.
First of all, you need to get into your terminal screen and upgrade the package so you can get the latest version of the utilities or libraries.
To update and upgrade, run the below code:
$ sudo apt update && sudo apt upgradeIf you remember, while installing the Ubuntu Desktop installer, it asked you which type of installation you wanted to continue, “Normal Installation” or “Minimal Installation”.
The same option you will find here and the only advantage of using Minimal Installation is that it will take less space by not installing an extra application that comes with Normal Installation like office tools, etc.
It’s up to you whether you want to install the full-fledged desktop version or just a minimal version, but I’ll share with you the command of both.
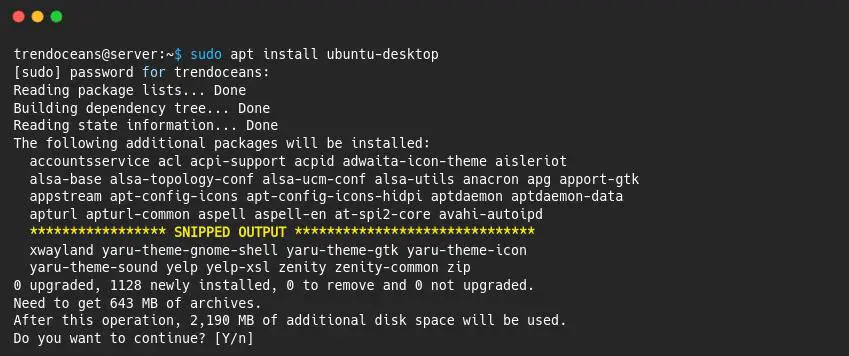
$ sudo apt install ubuntu-desktop
OR
$ sudo apt install ubuntu-desktop-minimal
Let me install a full-fledged Ubuntu desktop on the Ubuntu server.
Once the installation is complete, reboot your server.
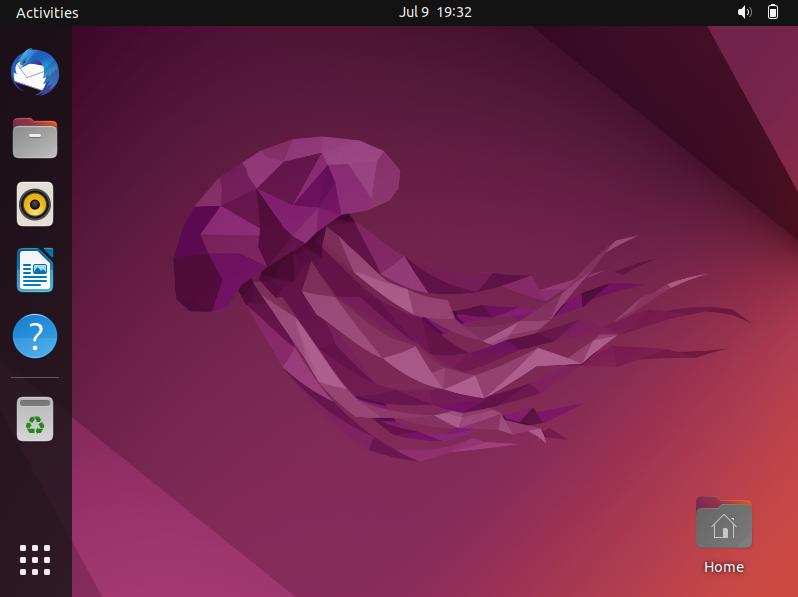
And you will find the command line interface changed to a GUI, which is identical to the Ubuntu desktop variant. The only difference is that it was initially installed by using the Ubuntu server package.
Uninstall Ubuntu desktop
After doing the experiment, let me remove the Ubuntu desktop environment from my Ubuntu server. This might break your system. If you have something important, then keep a backup of it.

We will try not to execute harsh commands, which can cause dependency issues for the other programs.
To remove the Ubuntu desktop from your server, run the following command as per your installed preference:
$ sudo apt autoremove ubuntu-desktop
OR
$ sudo apt autoremove ubuntu-desktop-minimal
After that, remove the GNOME display manager by running the below code:
$ sudo apt remove gdm3And once it is all done, reboot your system to use your Ubuntu server from tty.
Install the Graphical Desktop Environment on a Minimal version of Debian 11
While installing Debian 11, you may be asked to choose which desktop version you want to use, but at that time you may have selected “web server”, and later you realise that you want to use the GUI version of Debian.
For the first time, exactly the same thing happened to me, but I fixed it by executing the tasksel command, which installs the desktop environment on CLI-based Debian, and interestingly, the process is very simple.
You just need to choose which desktop environment you want to install. After that, you just need to wait for the process to be completed.
Let me boot my Debian-based web server, which I want to convert into a full-fledged desktop environment.
Once you boot into your system, you will find the tasksel preinstalled, so I don’t think you will be required to run the below command. If it is not present, then don’t hesitate to invoke the below code.
$ sudo apt install taskselI do have the taskel installed, so let me execute another command.
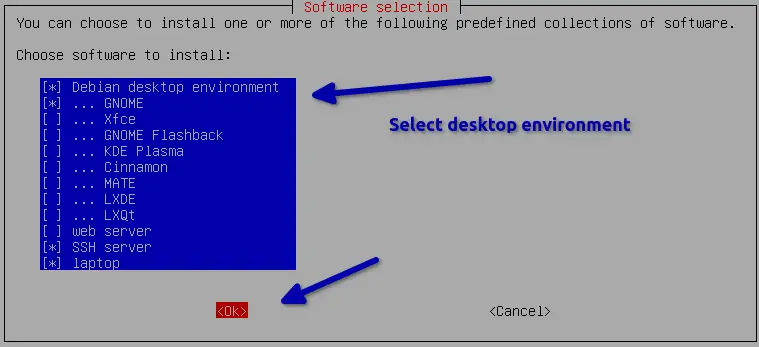
$ sudo taskselAfter executing the above command, you will be asked to choose which desktop environment you want to install. Select the desktop environment as per your choice by using arrows and the space key.
I’m going to install the default Debian desktop environment, which comes with GNOME. You can refer to the below image for your reference.
Once the above command is executed successfully, reboot your system to get into graphical mode.
After some time, you may be tempted to choose another desktop environment. If so, then you can again execute the tasksel command and select the desktop environment that you want to use.
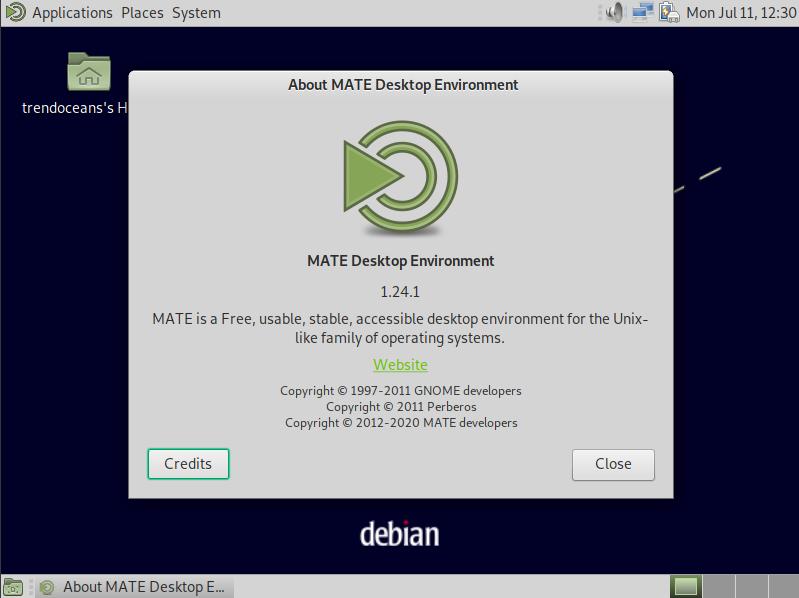
So let me try to install the MATE desktop environment on my Debian 11.
Uninstall MATE or GNOME desktop environment
If you don’t want to use any desktop environment and want to revert all changes, then you need to uninstall the desktop environment by running the command as per the installed desktop environment:
$ sudo apt autoremove gnome*
OR
$ sudo apt autoremove mate-*
You can execute the above command even if you had multiple desktop environments installed on your system and now want to remove one of them to free up some space.
Don’t forget to restart your system to see the changes.
Install the Graphical Desktop Environment after removing KDE Plasma, GNOME, XFCE, etc
Most likely, you may have removed the Ubuntu desktop environment from your system while installing desktop environments like KDE Plasma or XFCE.
If you uninstalled KDE Plasma from your system without any desktop environment, then your system will get into CLI mode, which may not be friendly to you.
So, to reinstall the Ubuntu desktop on your system, just invoke any one of the commands on your terminal to install a desktop environment.
$ sudo apt install ubuntu-desktop                       # Full fledge Desktop
OR
$ sudo apt install ubuntu-desktop-minimal               # Minimal set of application
Once the above command is successfully executed, reboot your system to get into graphical mode, and then you can continue to remove KDE Plasma from your system.
Wrap up
That’s all to install a graphical interface on the Ubuntu server and the minimal version of Debian 11. Apart from that, you have also learned how to uninstall and reinstall the desktop environment.
If I missed something to add or help you, do let us know in the comment section.