OOPS! When I play some videos on my Ubuntu computer, the video gets played, but I can’t hear anything from the speakers.
If you’re facing this problem, then you’re probably missing some important codec, which is required for decoding the audio or video file.
Without the codec, it’s not possible for the system to decode the audio or video file, and due to that, we face the problem of playback.
As you can see here, I’m facing a similar kind of issue when I try to play MKV videos on an Ubuntu system. I get the error “Codec not supported: VLC could not decode the format “h264” (H264-MPEG-4 AVC (part 10)).
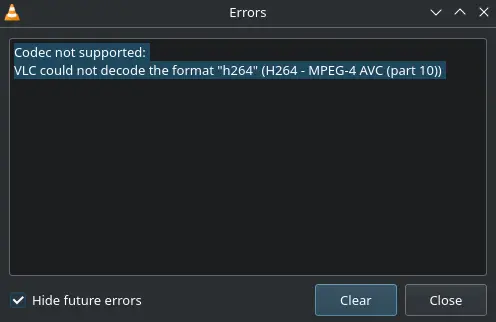
Due to that error, my system doesn’t even play the video, and this error is not just limited to VLC or just systems.
In some cases, it also occurred on streaming and education sites like EdX and Udemy, where specific codes are required for the proper playback of certain media files.
So, let’s learn how to fix this error by installing all the necessary media codecs on your system, like H.264, H.265 (HEVC), VP9, FLAC, AAC, DTS, and so on.
How to Install Codecs on Ubuntu
At the time of installation, the Ubuntu installer asks you whether you want to install the third party codec.
If you checked those options, then the chances are low that you will have this problem. However, you can now simply solve this problem by installing the necessary package.
📝 Quick Action
To resolve a missing codec, you can use the following steps to resolve audio and video playback issues on your Ubuntu-based distributions:
🚀 Solution
- Add a multiverse repository, then update the system.
$ sudo add-apt-repository multiverse
$ sudo apt update- According to your Ubuntu-based flavors, execute any one of the commands on your system to install missing audio and video codecs.
$ sudo apt install ubuntu-restricted-extras
$ sudo apt install mint-meta-codecs
$ sudo apt install xubuntu-restricted-extras
$ sudo apt install kubuntu-restricted-extras
$ sudo apt install lubuntu-restricted-extras
1
How to Install All the Necessary Codecs
One of the simplest ways to install all the necessary codecs at once is to install the ubuntu-restricted-extras package, which contains all the necessary codecs that are usually required.
To install the ubuntu-restricted-extras package, you need to enable support for multiverse on your system.
If you are not sure what a multiverse thing is, then I would recommend you to read this later.
$ sudo add-apt-repository multiverseAfter executing the above line, now build the system cache by typing the below code:
$ sudo apt updateFinally, after doing this much, you can now install ubuntu-restricted-extras on your Ubuntu system to get all the necessary codecs for playing various media formats.
$ sudo apt install ubuntu-restricted-extrasIf you are using Ubuntu-based distributions like Linux Mint, Kubuntu, Lubuntu, and Xubuntu, then you have to use one of the commands as per your installation.
- Linux Mint:
$ sudo apt install mint-meta-codecs - Kubuntu:
$ sudo apt install kubuntu-restricted-extras - Lubuntu:
$ sudo apt install lubuntu-restricted-extras - Xbuntu:
$ sudo apt install xubuntu-restricted-extras
Once you run the command, it will show you what all the libraries are going to install for the corresponding codec, so without any second thought, type ‘y’.

After that, it will ask you to accept the Microsoft EULA agreement for ttf-mscorefonts-installer, so you have to press the TAB ↹ button to move the selector to < Ok>, then press the ↵ Enter button.
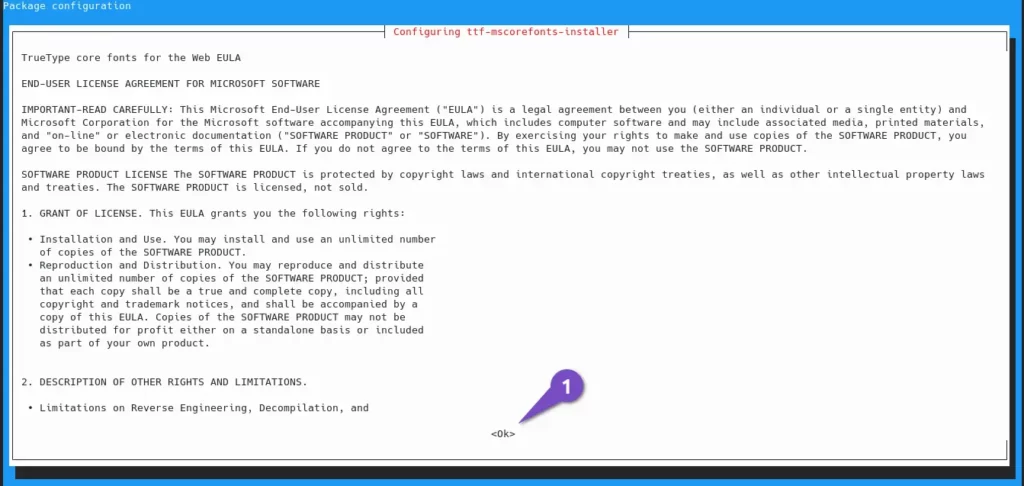
Once again, you need to perform the same step to accept the EULA license term.

The next step is to wait, so just wait for some time to complete the installation.
After the installation is over, it’s your turn to restart the application to see the changes 🙂
2
How to Install a Limited Codecs
If you’re thinking not to accept the license and also want just a limited set of codecs to install, then you can manually list the necessary packages.
To do so, you can manually list the package name like shown below:
- gstreamer1.0-plugins-bad
- gstreamer1.0-plugins-ugly
- gstreamer1.0-plugins-good
- libavcodec-extra
- gstreamer1.0-libav
- chromium-codecs-ffmpeg-extra
As you can read there are multiple package of gstreamer are there whith very weird name attach to it like ugly, good, and bad but don’t worry it won’t harm your system.
It just a naming convention to know more about this you read that from here.
Now, you just have to execute the following command on your Ubuntu system version 20.04 and later:
$ sudo apt install -y gstreamer1.0-plugins-bad gstreamer1.0-plugins-ugly\
 gstreamer1.0-plugins-good libavcodec-extra gstreamer1.0-libav\
 chromium-codecs-ffmpeg-extra
If you are still tangled with an old version of Ubuntu 18.04 or older, you can use the below code:
$ sudo apt install gstreamer1.0-plugins-bad gstreamer1.0-plugins-ugly\
 libavcodec-extra gstreamer1.0-libav gstreamer1.0-fluendo-mp3\
 chromium-codecs-ffmpeg-extra
Once the installation is complete, you can try to play the media on your system to see the changes.
Wrap up
That’s all for this article, where I have shown you how to fix the problem of missing codecs by installing necessary codecs like H.264, H.265, AAC, and many more.
If you are still having issues with playback, do let me know in the comment section.
Also, don’t forget to bookmark the site to read more articles related to troubleshooting steps.
See you in the next article…BYE..BYE