After a long time, I got the chance to scribble in paint software, and the experience brought me back to my childhood, when I used to scribble on Microsoft Paint. However, I am still terrible at digitally drawing.
Who doesn’t have a memory when it comes to painting? Every painting has a memory, especially if it was created by you at some point in your life.
So let’s download the software and make the memory, but you don’t need to use MS Paint anymore, and even though MS Paint isn’t included in the Linux distribution, we have an alternative for you that is superior to the Microsoft version and has a lot of features that you won’t be able to resist trying out.
Features of Pinta Drawing tool
Pinta: Painting Made Simple Drawing Tool gets a yearly update from the community, so you can always find something new to see and try out. Some of the common features are listed here:
- Support for multiple operating systems (Linux, Windows, and Mac OS X)
- Drawing tools like freehand, lines, rectangles, ellipses, and more
- 35+ adjustment and effects to tweak images
- Easily go back to previous state or layer using advanced history
- Add-ins capability (i.e., the ability to create a custom brush)
- Multiple layer supports which you won’t find easily in simple bitmap editor
- Set your personal workspace
- Support for multiple languages
- WeBP supports
I could go on and on about the features, but I don’t want you to spend too much time just reading about the features because you also need to have Pinta installed on your system.
How to Download Pinta on Linux Distributions
One can very easily install Pinta on any Linux distribution and start doodling on the screen as long as their system is enabled with Flatpak and Snap support, and if your system doesn’t have either package manager, then you can follow our guide to check the steps.
Of course, you can install Pinta from the official repository, but you won’t find the most recent version there.
Install Pinta using Flatpak
I personally prefer Flatpak over Snap, and even so, I suggest you do the same, and to start installation, bring the terminal up using the shortcut that you have assigned to the terminal.
When your terminal is ready to take commands, type the following command and hit enter to begin the installation process. Once the flatpak has located the file, it will prompt you to press “Y” to begin the installation.
$ flatpak install flathub com.github.PintaProject.PintaAnd once the installation is complete, you can find the Pinta icon in the application manager, which you can use to launch Pinta, or else you can also run the below-described command.
$ flatpak run com.github.PintaProject.PintaInstall Pinta using Snap
Alternatively, you can use the snap package manager to download Pinta on your Linux system, which can be beneficial for Ubuntu-based users because they don’t need to install Snap, so they can just fire down the below command to start the installation of Pinta 2.1.
$ sudo snap install pintaOnce Pinta is installed, you can run it from the application manager.
How to Download Pinta on Microsoft Windows
If you’re considering switching from Microsoft Paint to Pinta, then you’ve made the right choice. Pinta offers a wide range of features that MS Paint simply doesn’t have.
Pinta installation on a Windows system is simple, but not as simple as what you learned above for Linux-based distributions.
Step 1: Download Pinta
I hope you’re using Windows right now, so just click the button below to get the most recent version of Pinta.
Step 2: Install Pinta on Window
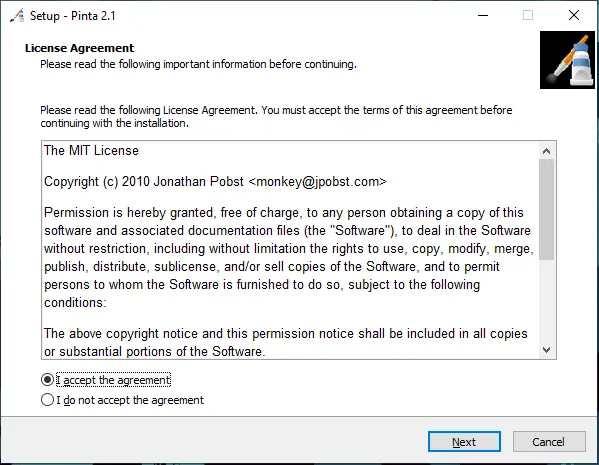
After you’ve downloaded the file, go to the folder where it’s stored and double-click “Pinta.exe” to run the setup file as an administrator.
Next, you’ll be prompted to choose how you want to install; simply click “Next” and proceed as you normally would with any other programme.
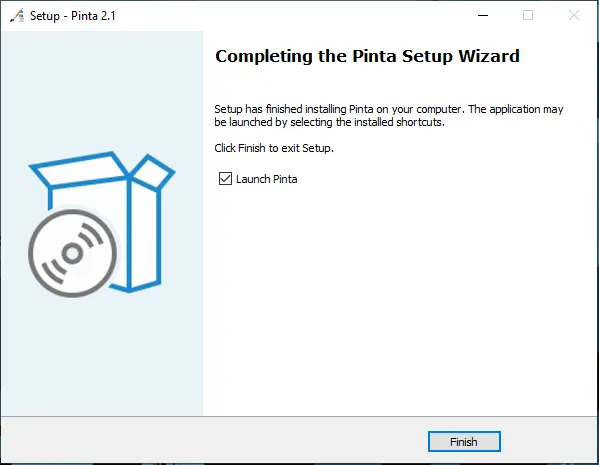
Step 3: Launch application
Once the installation is over, you can start the installation from the start menu and experience Pinta, and I’m sure after using it for a moment you will find the difference between MS Paint and Pinta.
Wrap up
That’s all it takes to install Pinta on the Linux and Windows platforms, and now you can do your own exploration. If you get stuck while you’re exploring, the official documents have a lot of information that might help you out.
Anyway, if there is something I need to consider, please use the space below to provide any additional information or feedback.
Till then, put your feet up and relax. As always, the next article will be up shortly.