Losing passwords may create serious issues by completely locking down your database access.
Recently, I installed MySQL on my system and tried to change the password to improve security. While performing the steps, unintentionally, I misplaced my MySQL database password and lost access.
So, whenever I try to log in, I get the error on-screen “ERROR 1045 (28000): Access denied for user ‘root’@’localhost’ (using password: YES)”. I was trying my luck by entering possible passwords, but nothing worked.
In the end, there’s only one option left, and that is to “reset MySQL root password”. After that, I can change my password and regain access to the root account.
If a similar incident occurs to you and you want to reset your MySQL password, then this article will be more than enough.
Reset the MySQL root password
In five simple steps, you will be able to gain access to your MySQL account. Just follow the steps as per the sequence. If something is missed, it won’t work, and you’ll end up with an unkind error.
Step 1. Confirm MySQL version
The reset method is slightly different in all kinds of MySQL versions (5.6, 5.7, and 8.0). So it’s better to know which MySQL version is installed on your system.
To get to the MySQL version, run the below command:
$ mysql --versionAs per the output, I have MySQL version 8.0.

Step 2. Stop MySQL
After the confirmation of the version, you need to restart your MySQL in safe mode. Before that, you need to stop MySQL, which is already running on your system.
To stop MySQL, you can execute the init.d or systemd command on your terminal screen:
$ sudo /etc/init.d/mysql stop
        OR
$ sudo systemctl stop mysql.service
The behavior of the above command

Step 3. Create a new directory in /var/run/mysqld
This step is important. Don’t miss it.
To create a new directory in “/var/run/mysqld”, run the following command, which will change the ownership of mysqld directory.
$ sudo mkdir /var/run/mysqld && sudo chown mysql /var/run/mysqldIf you want to confirm that the file is created and the ownership has changed to “mysql”, use the ls command command:
$ ls -ld /var/run/mysqld/
Step 4: Start and log in to MySQL in safe mode with –skip-grant-table
Once you have completed the above step, you are now left to start MySQL in safe mode with –skip-grant-table as the background process.
If you are thinking about what is --skip-grant-table? It is basically used to start MySQL without a grant table, which contains information about users and the privileges they hold.
To start MySQL in safe mode, run the following command in a background process:
$ sudo mysqld_safe --skip-grant-tables&Once the terminal is waiting for input, press “Enter”.

--skip-grant-tableFor any reason, if you are getting the below error, then make sure to kill the MySQL service and try once again to invoke the above command.
ERROR 2002 (HY000): Can't connect to local MySQL server through socket '/var/run/mysqld/mysqld.sock' (2)To kill all MySQL running processes, type:
$ sudo killall -u mysqlAfter that, pass the following command to get logged into the MySQL console:
$ sudo mysql -u root mysql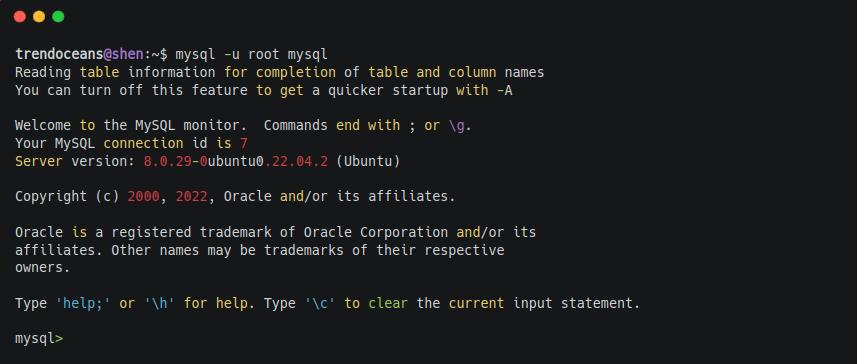
Step 5: Reset root password on MySQL 8.0
Finally, you’re at the MySQL console, which you’ve been desperately looking for, and your job isn’t done yet. You need to run a few more commands which will reset the root password.
To replace authentication_string with null, pass the below statement into the MySQL console.
mysql> UPDATE mysql.user SET authentication_string=null WHERE User='root';
mysql> FLUSH PRIVILEGES;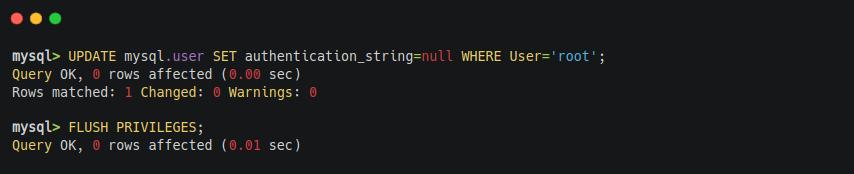
After resetting the password, you can run the below statement to set a new password and reload the changes to the grant table by executing “FLUSH PRIVILEGES”:
mysql> ALTER USER 'root'@'localhost' IDENTIFIED WITH caching_sha2_password BY 'new_password';
mysql> FLUSH PRIVILEGES;
The output of the above command:

Last, run the “exit” command to get out of the MySQL safe mode.
mysql> exit;Once you complete the above step, you can move to the next section to re-login with the new password that you have created above.
Relogin MySQL
Before logging in, let’s kill the MySQL process and restart the MySQL service by running the following command:
$ sudo killall -u mysql
$ sudo systemctl start mysql.service 
This will be the last command that you need to invoke to get logged into your MySQL. Just paste the below command and enter your password to get a console.
$ mysql -u root -p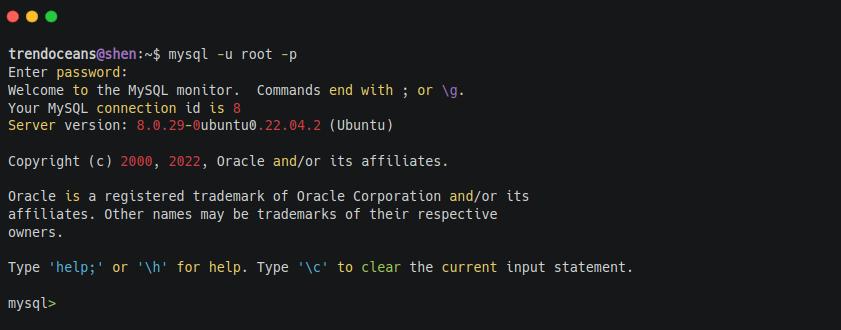
Wrap up
That’s all to reset the password of MySQL 8.0 in the Ubuntu desktop environment, and you have also got to know how to fix “ERROR 1045 (28000): Access denied for user ‘root’@’localhost’ (using password: YES)”.
Please do let me know in the comment section if anything gets wrong while performing.
This has been amazing
After having a whole day trying to solve error 1045 this post has helped me to work it out very fast and effeciently
Thanks ☺️