It only takes a few easy steps to modify the DNS settings on a Linux or Windows machine to get the most secure and fastest response times when using the internet.
When you decide to change your computer’s DNS address, you should first determine which nameservers you want to use by finding a reliable service provider such as Cloudflare, Google Public DNS, Quad9, OpenDNS, etc.
But you don’t need to take much pain for this because we have already listed some of the top DNS servers you can use on your Linux, Windows, and Android devices, so you just need to go through this article and check the best DNS according to your region.
Once you’ve chosen your preferred DNS service provider, you can move on to the next step, which is to set up your computer or other device to use the new nameservers.
Changing DNS Server in Linux
To change your DNS settings in Linux, you have several options, such as using the NetworkManager application, editing the /etc/resolv.conf file, or using command-line utilities such as nmcli and nmtui.
Using Terminal to Change DNS in Linux
I’ll show you first how to change the DNS setting for the current boot or session, and then I’ll show you how to persist changes so that they persist after a reboot.
- Only for testing purposes: Temporary DNS configuration change
- Recommended: Permanent DNS configuration change
If you are sure about choosing the specific DNS address, then I would suggest you read “Permanent Change DNS Configuration” over the “Temporary Change DNS Configuration” section to make the change permanent so you won’t have to configure it each time you start your computer or session.
Also Read: How to Test DNS Speed using Two Popular Tools on Windows and Linux
Only for testing purposes: Temporary DNS configuration change
Temporary DNS configuration changes are only used to test DNS response and capability. If you really like the response, then you can make the setting permanent.
Step 1: The first thing you need to do is open /etc/resolv.conf/, which is the configuration file that contains the IP address of the DNS server used to translate domain names into numerical IP addresses.
To make the change, open a terminal window and type the following command, which will open the /etc/resolv.conf file in the nano editor, where you will mention the DNS address.
$ sudo nano /etc/resolv.confStep 2: Once the file is open, scroll down to “nameserver,” and above that, add the following line, as shown below, and replace it with the desired DNS address.
For example, I’ve selected Quad9 DNS, which has a DNS address of 9.9.9.9, so I’ll type nameserver 9.9.9.9.
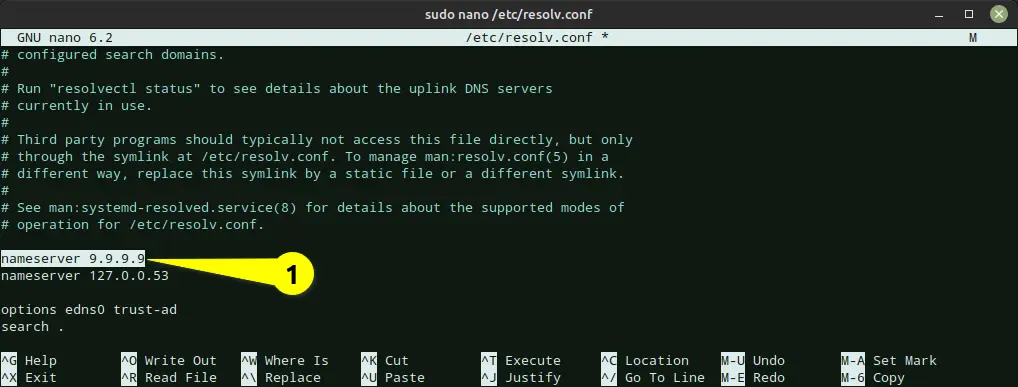
Step 3: After making the change, please save the file so the new settings can take effect, and after that you can use dig to confirm if your networking service is successfully connected to Quad9 DNS or any other.
As I said, this method will be temporarily active until the next reboot or network change, so in order to make the settings permanent, you will need to make some changes to your access point, which you will learn in the next section.
Recommended: Permanent DNS configuration change
To make the above DNS setting permanent, you need to use the nmcli command, which is very useful for connecting to a wifi network when you are stuck with a tty interface.
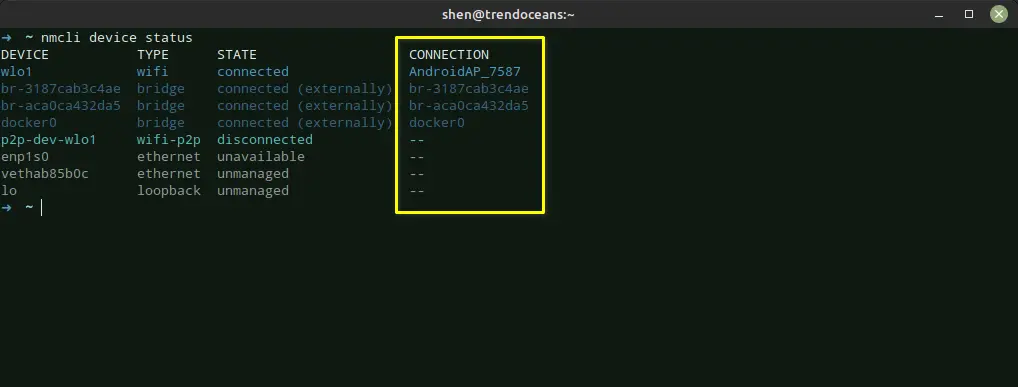
Step 1: Open your terminal window and type the following command to find the network interface or network access point for which you want to set the DNS address:
$ nmcli device status Look at the “CONNECTION” column in the output of the command to find the connection for which you want to change the DNS settings.
I have selected “AndroidAP_787,” which is now connected with wifi.
Step 02: Once you have selected the access point or network profile, let’s modify the DNS by passing the following command, which will change the DNS of the corresponding network.
To configure the DNS setting on the desired connection, you need to use the command “nmcli connection modify ipv4.dns,” followed by the IP address of the DNS server that you want to configure.
Set IPv4 DNS: If you want to set the IPv4 DNS address version, then run the below command, replacing “AndroidAP_7587” with the actual connection name and IP address of the DNS server that you want to configure.
$ nmcli connection modify "AndroidAP_7587" ipv4.dns "1.1.1.1"You can also use the below command to give both the primary and secondary DNS addresses of a certain DNS provider all at once:
$ nmcli connection modify "AndroidAP_7587" ipv4.dns "1.1.1.1 1.0.0.1"Or else, you can specify multiple DNS providers at once by making use of the below command:
$ nmcli connection modify "AndroidAP_7587" ipv4.dns "1.1.1.1 8.8.8.8"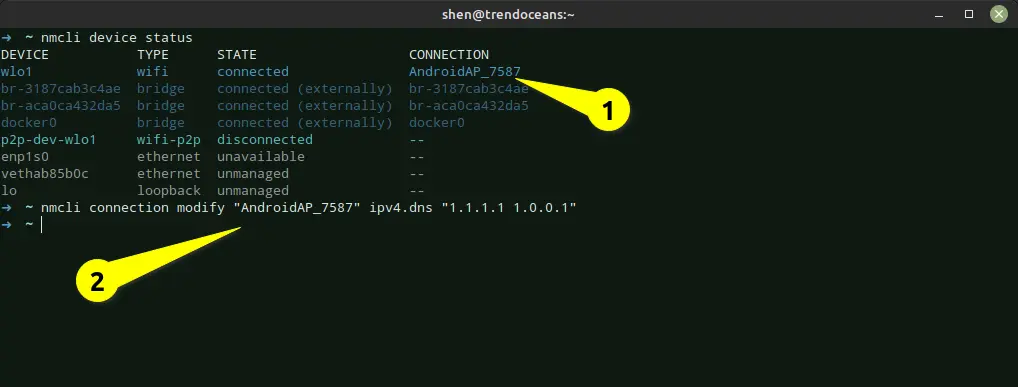
Set IPv6 DNS: If you want to use the IPv6 version of DNS, run the following command with the correct access point and DNS server address:
$ nmcli connection modify "AndroidAP_7587" ipv6.dns "2606:4700:4700::1111"
$ nmcli connection modify "AndroidAP_7587" ipv6.dns "2606:4700:4700::1111 2606:4700:4700::1001"
Step 03: After making changes to the network, run the following command to restart the network interface to reflect the changes:
$ nmcli connection down "AndroidAP_7587"
$ nmcli connection up "AndroidAP_7587"
After running the above command, the IPv4 DNS address for the AndroidAP_787 connection is now set.

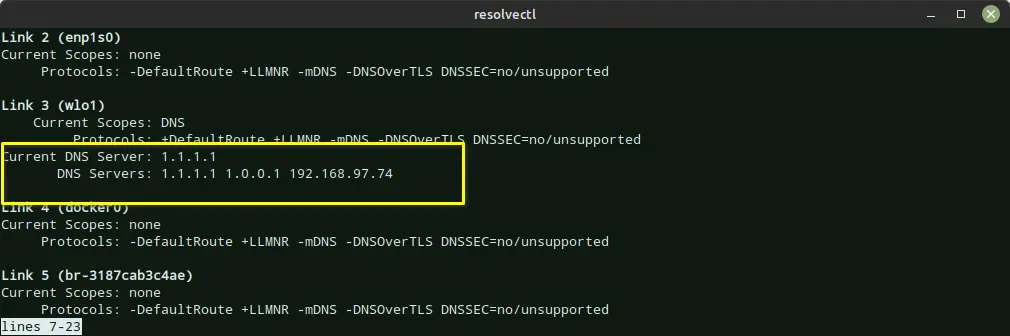
Once you are done with the above step, execute the resolvectl command, which will show you the new DNS settings for the network interface as shown below.
That’s it! Now you can browse the internet with the new DNS settings.
Using the GUI to Change DNS in Linux
In addition to the command-line method, you can change DNS settings in your Linux system using the graphical user interface, which is very helpful for those who are not comfortable working with the command line.
For this, you can use system settings, which is also a very convenient method to change the DNS. Let’s open the system settings by pressing the “Super” key or dash button.
After that, look for network settings, choose the network interface, and select the access point by clicking on the “gear” icon like shown below.
On the new window that appears, select the IPv4 or IPv6 tab and fill in the DNS address fields with the appropriate information, as shown below.
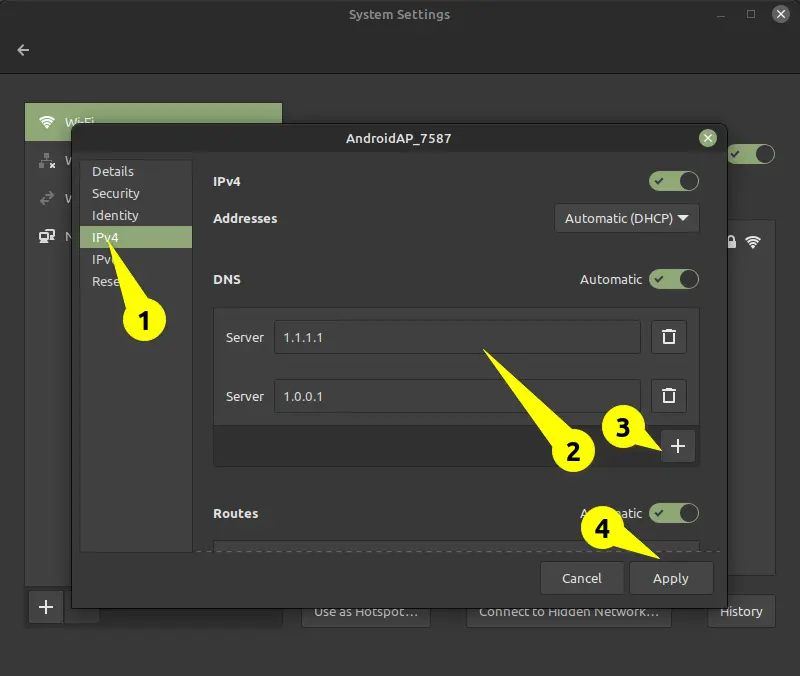
If you want to add multiple DNS addresses, then you need to click on the plus (+) icon and specify the addresses.
After providing the appropriate DNS address information, click on “Apply” to save your changes. Then, to reflect the new changes, toggle the connection off and then back on again.
Changing DNS Server in Windows
Window users can also change their DNS addresses very easily by following the same steps as listed.
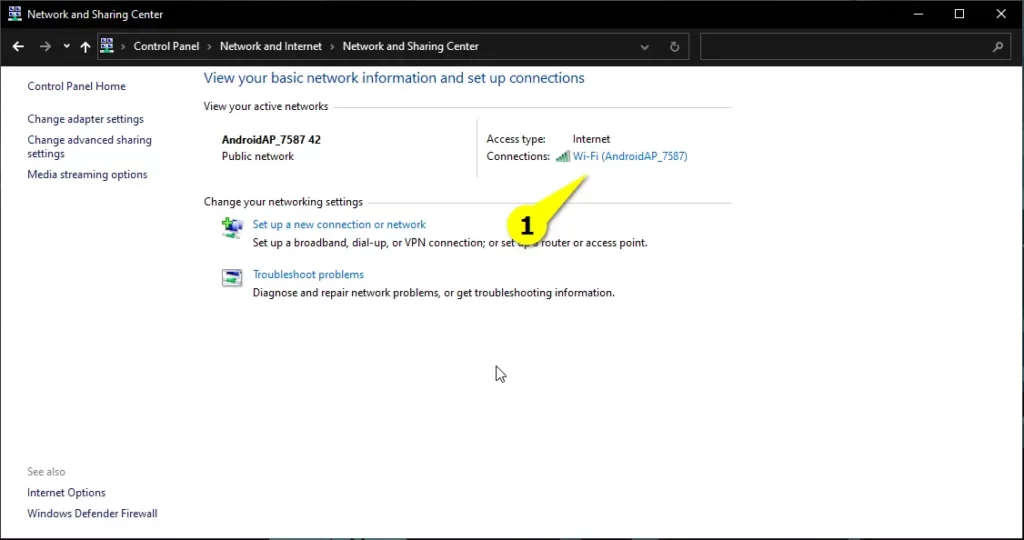
First of all, you need to press Window + R and type “control,” and after that, look for “Network and Internet,” and under that, click on “Network and Sharing Center.”
Once you reach here, you will find the screen as shown below. Simply click on “Access point,” which will open the WiFi status window.
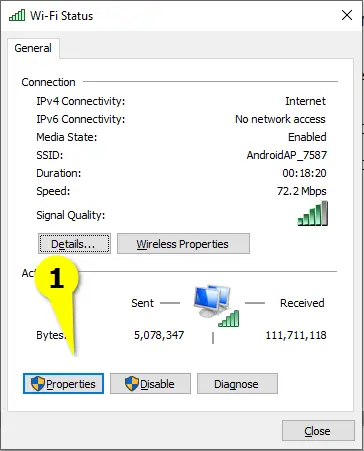
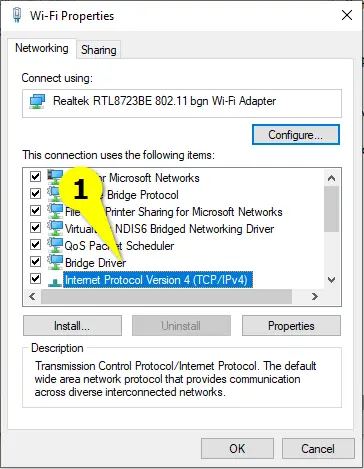
Here you need to click on Properties and make a double click on “Internet Protocol 4 (TCP/IPv4).”
Now you will find the option where you need to specify the DNS address that you chose, so click on “Use the following DNS server address” and fill in the details like shown below.
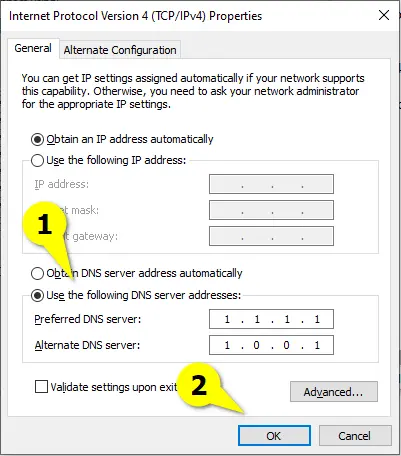
Once you have specified the DNS address, please click “OK” to save the changes. After that, your system will use the specified DNS address to resolve the domain address.
Wrap up
That’s all for now.
You’ve learned how to change DNS in Linux both temporarily and permanently, as well as how to apply the same setting on a Windows operating system.
If you have any questions or comments, please feel free to leave them in the comments section below. Until then, put your feet up and relax. As always, the next article will be up shortly.