For secure and better-control web access in NGINX, you can allow and restrict certain IP address, ranges, subdomains, & URLs in the NGINX configuration.
The NGINX web server provides you with a range of configurations to secure your web server, web application, etc.
Including the control of user access based on the IP address.
You can easily allow/whitelist IP addresses and disallow/restrict/blacklist IP addresses in NGINX based on the IP address, IP range, subdomain, and URL from the configuration file.
In this guide, you will learn how to allow or restrict a particular IP address or the range of IP addresses, subdomains, and URLs in the NGINX web server.
Reason to Allow/Restrict Access by IP Address
There may be multiple reasons for allowing and restricting access by IP address.
And one of the reasons that is currently running through my mind is that like, if you are planning to create an API access point for developers, you can allow a specific IP or range of IPs to have access to the API point.
Other usages might be restricting access to the admin URL or blacklisting a range of IPs to prevent web application attacks such as DDOS.
How to Allow/Restrict Access by IP Address in NGINX
Allowing or restricting user access to the web application requires you to specify IP addresses in the allow and deny directives.
The allow directive permits access to a specified IP address, network, or UNIX socket, and the deny directive will disallow access to the specified IP address, network, or UNIX socket.
Both directives can be configured in the NGINX configuration file based on the distribution. In my case, I’m using the latest releases of the Ubuntu distribution and Fedora as alternatives.
 Open the NGINX configuration file
If you are using the default NGINX configuration without the virtual host, then run the following command into your terminal app:
$ sudo nano /etc/nginx/nginx.confIf you have a separate configuration file or your distribution locates the configuration in /etc/nginx/sites-enabled/default, then open its configuration with the following command:
$ sudo nano /etc/nginx/sites-enabled/defaultAlso Read: How To Change the Nginx Web Document Location in Linux
Step 2: Allowing or Disallowing IP Address
There are multiple ways to allow or disallow access to the web application based on IP address, as shown below.
- Allowing or disallowing IP addresses in NGINX for domain
- Allowing or disallowing IP addresses in NGINX for subdomains
- Allowing or disallowing IP Range in NGINX
- Allowing or disallowing IP address in NGINX for URL
- Allowing or disallowing Multiple IPs in NGINX
For that, note the IP address you need to allow and deny, and define it in the NGINX directives. Below are the possible examples you might require while modifying the configuration file.
allow192.168.108.252; # Only Allow 192.168.108.252 IP Address deny192.168.108.153; # Only Deny 192.168.108.153 IP Address ################################################################## allow all; # Allow All IP Address deny all; # Deny All IP Address ################################################################## allow192.168.108.0/24; # Allow IPs range from 192.168.108.0 to 192.168.108.255 deny192.168.108.0/24; # Deny IPs range from 192.168.108.0 to 192.168.108.255
The above directives will be used to control user access based on the IP address or range of IP addresses defined in the NGINX configuration file.
Also Read: 3 Ways to Find Out Your IP address in Linux
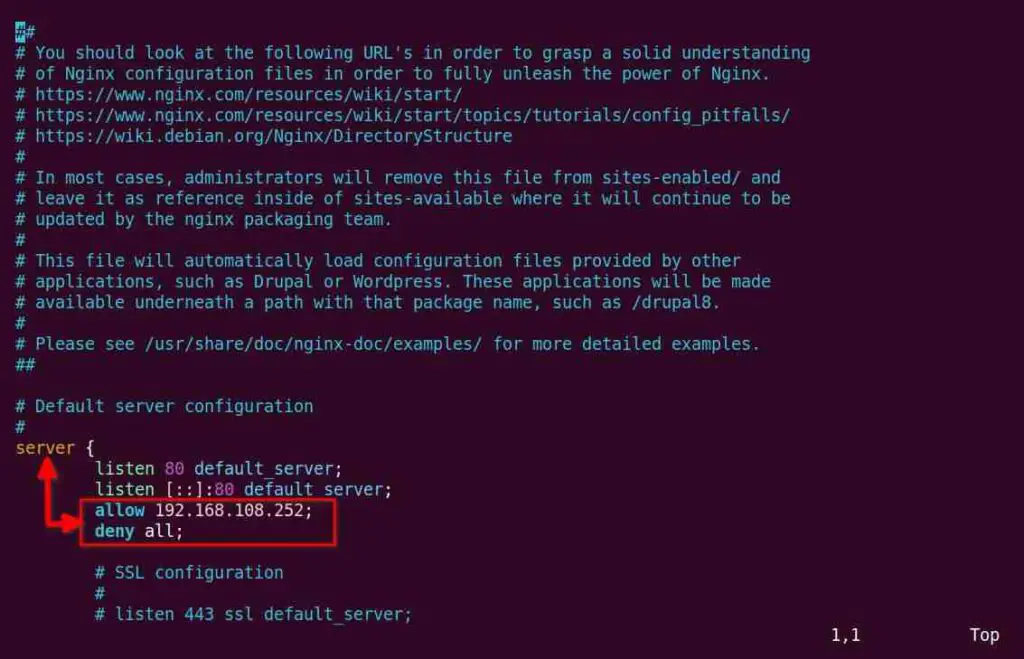
Allowing or Disallowing IP Addresses in NGINX for the domain
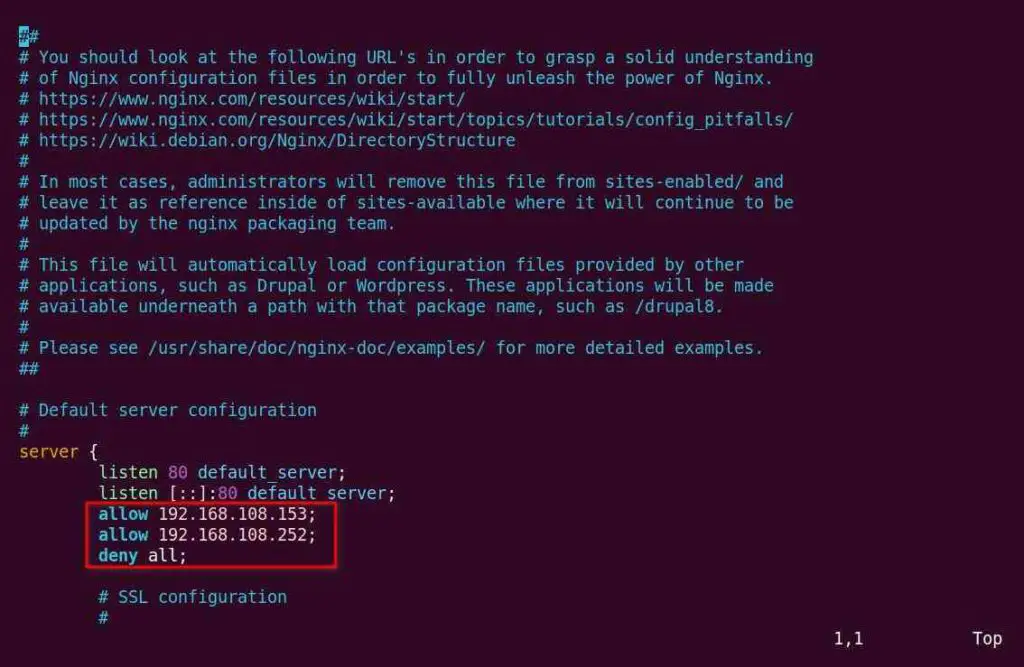
Now we will allow access to the 192.168.108.252 IP address and deny all requests from all IP addresses for our entire domain, using the below directive.
allow 192.168.108.252;
deny all;
Place the above directives in the middle of the server block in the NGINX configuration file, as shown below.

If you want to allow all IP addresses and disallow 192.168.108.252, then add the below directives in the NGINX configuration file.
allow all;
deny 192.168.108.252;
Finally, you can reload the NGINX web server to apply the changes.
Allowing or Disallowing IP Addresses in NGINX for subdomains
Things get quite different when you have two subdomains for your site.
For example, blog.example.com and shop.example.com with their configuration files at /etc/nginx/sites-enabled/blog.conf and /etc/nginx/sites-enabled/shop.conf and want to allow access to the 192.168.108.252 IP address and deny all requests from all IP addresses for your blog.example.com subdomain.
For that, you need to open the blog.conf configuration file and place the below directives within the server block.
allow 192.168.108.252;
deny all;
Below is the output of the above changes.
If you want to apply changes to both subdomains, edit the blog.conf and shop.conf configuration files for both subdomains and add the directives mentioned earlier.
Finally, you can reload the NGINX web server to apply the changes.
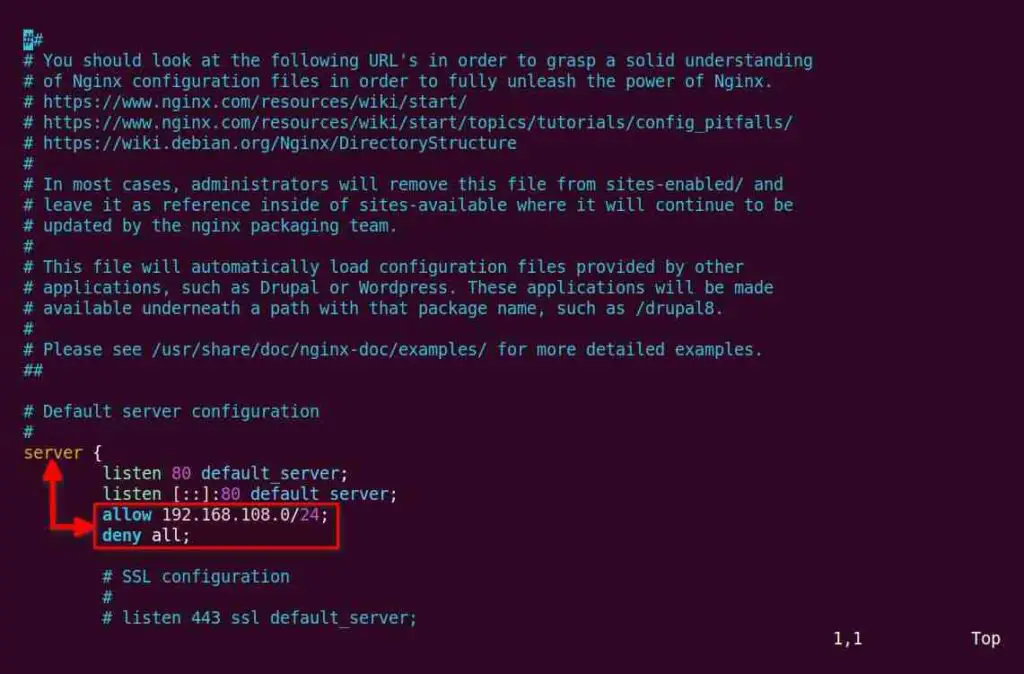
Allowing or Disallowing IP Range in NGINX
If you want to allow an IP range from 192.168.108.0 to 192.168.108.255 and deny all other IP addresses, then you can use the CIDR format for the IP range.
You can check the IP to CIDR tools to find the CIDR format of a specific range of IP addresses.
Once you know the CIDR format for your IP range, in my case, it will be 192.168.108.0/24 to allow IPs from 192.168.108.0 to 192.168.108.255 and deny all other IP addresses, that you can define it in the directive, as shown below.
allow 192.168.108.0/24;
deny all;
Add the above directives within the server block in the NGINX configuration file, as shown below.
If you want to deny the range of IP addresses from 192.168.108.0 to 192.168.108.255 and allow all others, use the below directives.
allow all;
deny 192.168.108.0/24;
Finally, you can reload the NGINX web server to apply the changes.
Allowing or Disallowing IP Address in NGINX for URL
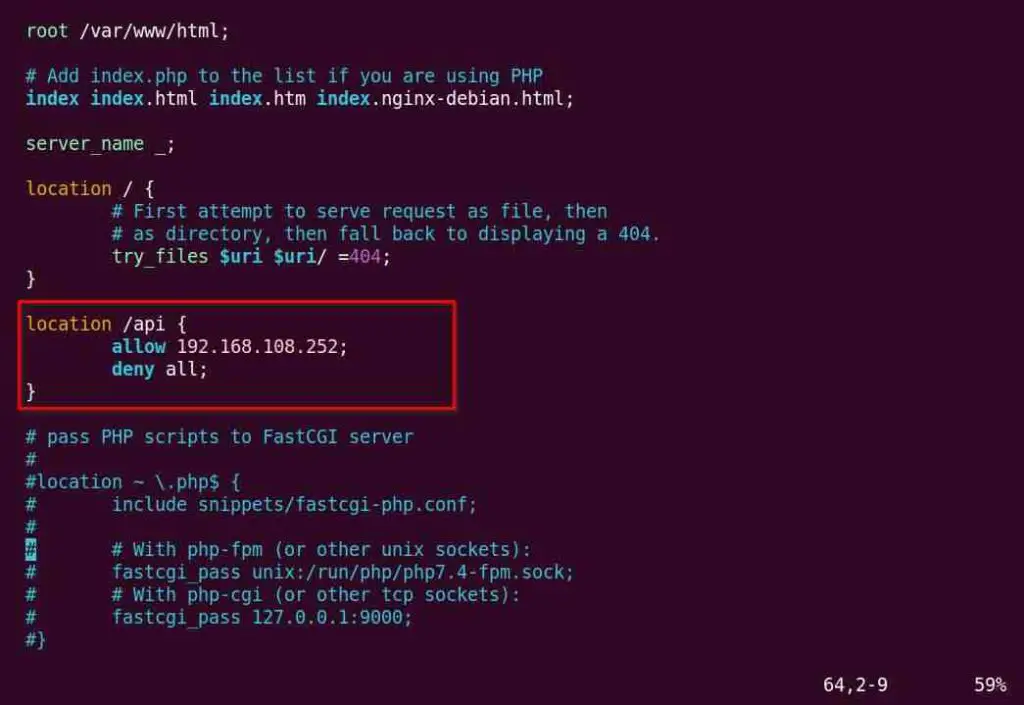
If you have an example.com/api URL in your site for development and want to only allow access to the specific IP address.
For example, if I want to allow access to the 192.168.108.252 IP address and deny all requests from all IP addresses for the /api URL, then you can create a new location for the /api URL and add the location block in the NGINX configuration file.
location /api {
    allow 192.168.108.252;
    deny all;
}
Below is the output of the above changes.
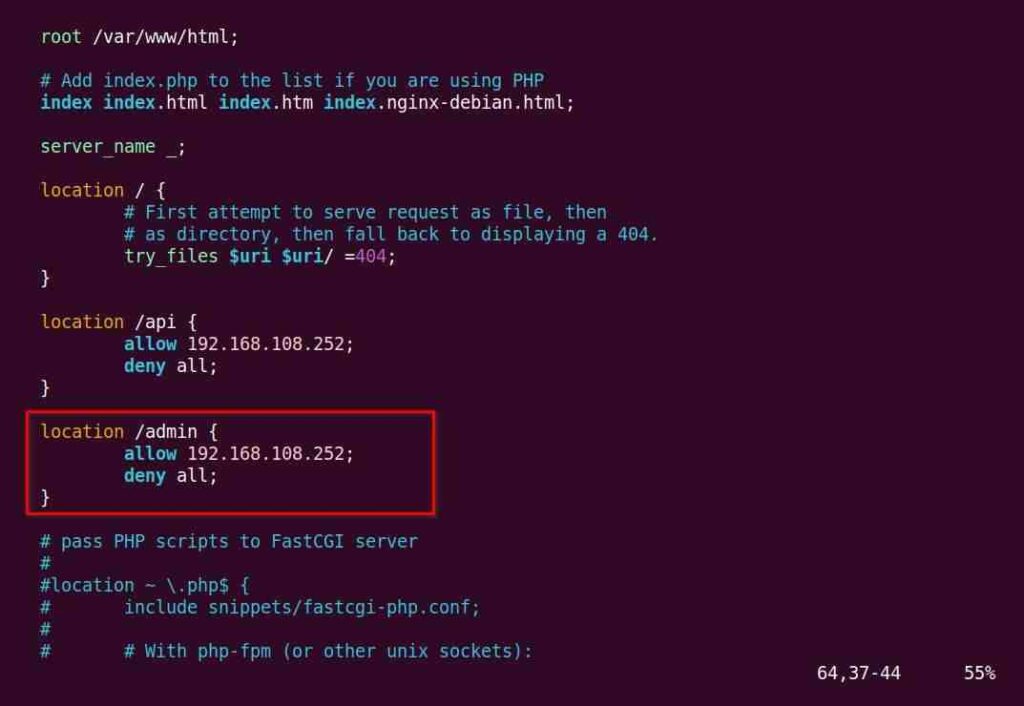
The above changes will restrict access to the /api URL instead of the entire website. Another example is if you have an /admin URL that normal users do not need to enter.
You can create a new location for the /admin URL and add the location block in the NGINX configuration file.
location /admin {
    allow 192.168.108.252;
    deny all;
}
Below is the output of the above changes.
Finally, you can reload the NGINX web server to apply the changes.
Allowing or Disallowing Multiple IPs in NGINX
If you want to allow access to multiple IP addresses and deny access to all other addresses, then you can specify both IP addresses in two separate allow directives, as shown below.
allow192.168.108.153; allow192.168.108.252; deny all;
It will only allow access to 192.168.108.153 and 192.168.108.252 and deny access to the rest of the IP addresses. Now, add it to the server block or location block for a specific URL, as shown below.
Finally, you can reload the NGINX web server to apply the changes.
Step 3: Restart NGINX and Check the Log
Run the following command to verify the configuration is updated without errors:
$ sudo nginx -tIf there are no errors, then run the following command to reload the NGINX server:
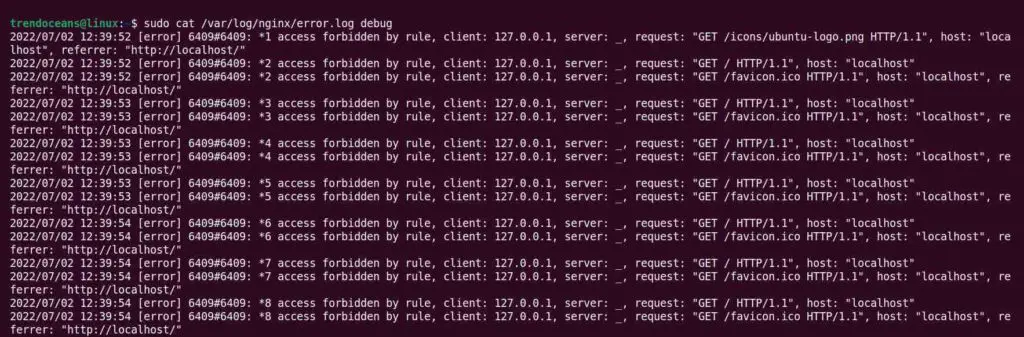
$ sudo systemctl reload nginxYou can check the /var/log/nginx/error.log file to find the entries of the inbound and outbound connections to see if the restriction and permission are working correctly, as shown below.
$ sudo cat /var/log/nginx/error.log debugBelow is the output of the above command.
That’s all for this guide, where I explained how to take better control of your web application access by allowing and denying certain IP address, ranges, and subdomains in NGINX.
If you have any questions regarding the topic, feel free to comment.
Do check: Dynamic Denylisting of IP Addresses
Funny, that the links are the same color as the background color (purple).