A modern web application is a constant target of attackers with attacks like DDOS. However, you can mitigate this type of attack by limiting the number of requests on your server if you are using NGINX as a web server.
Including a few other parameters like limiting the rate of requests and restricting the HTTP bandwidth can also improve the security of your server from such attacks.
However, today the focus will be on how to limit the number of connections (or requests) in NGINX.
Limiting the Number of Connections in NGINX
Open your NGINX configuration file using your choice of text editor.
$ sudo vim /etc/nginx/nginx.confIf you are using a separate virtual host for your site, then specify the location of that site configuration file, which in most cases is located at /etc/nginx/sites-enabled/example.conf.
Then inside the configuration file, you need to define the shared memory zone using the limit_conn_zone directive. It requires two parameters as input: key (client IPs) and zone.
- Using $binary_remote_addr as Key: variable’s size is always 4 bytes for IPv4 addresses or 16 bytes for IPv6 addresses. The stored state always occupies 32 or 64 bytes on 32-bit platforms and 64 bytes on 64-bit platforms. One megabyte zone can keep about 32 thousand 32-byte states or about 16 thousand 64-byte states. If the zone storage is exhausted, the server will return an error to all further requests.
- Zone: the worker processes will use this zone to share counters for key values.
Below is the code snippet of the discussed limit_conn_zone directive with its key and zone.
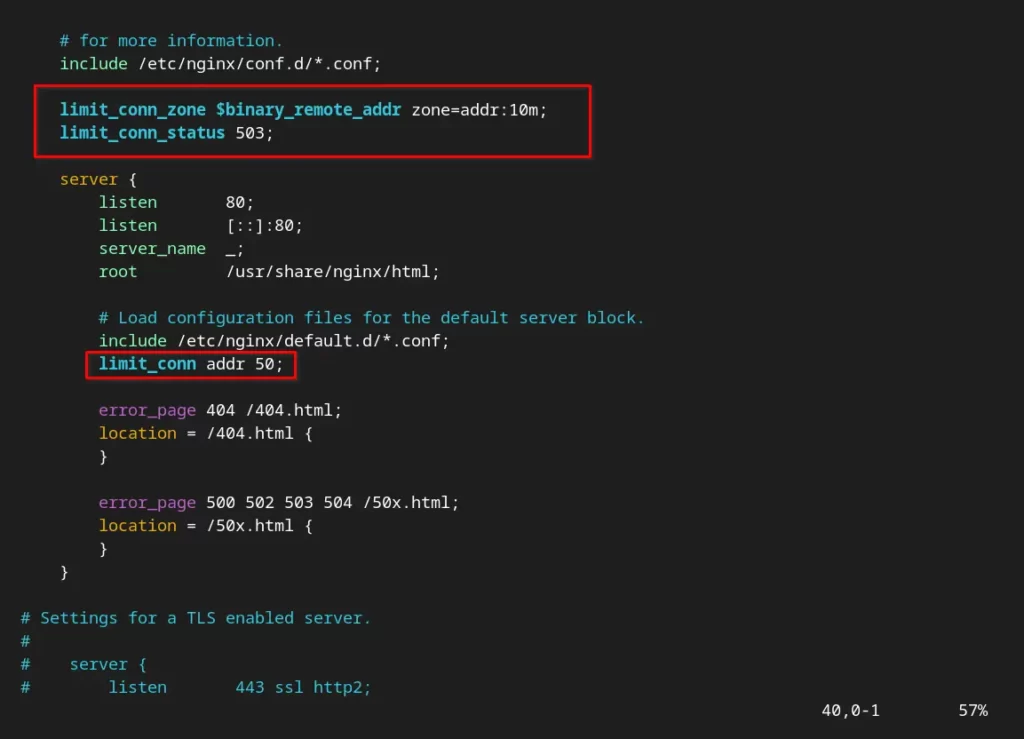
limit_conn_zone $binary_remote_addr zone=addr:10m;To handle the rejected or returned response requests, you need to use the limit_conn_status directive, which takes the HTTP status code as a parameter. It is valid within the location {}, server {}, and http {} contexts.
limit_conn_status 503;Lastly, you need to specify the limit_conn directive that takes the shared memory zone (ex: addr) as the first parameter, and the number of allowed connections per key as the second parameter. It is valid within the location {}, server {}, and http {} contexts.
limit_conn addr 50;After applying all the changes mentioned above, your NGINX configuration file looks like the one below.
Save/close the file and execute the following command to check if the NGINX configuration file is not showing any errors.
$ sudo nginx -tIf there is no error, then reload the NGINX service to update the changes.
$ sudo systemctl reload nginxWrap Up
I hope you understand how it works. For your knowledge, in this guide, we learn to limit the number of connections on an IP address basis because the $binary_remote_addr variable is used as a key.
Another way to limit the number of connections for a given server is by using the $server_name variable. If you are using a subdomain, then you can limit the number of connections by using the limit_conn limitbyservers 1000; directive, which will limit the number of connections to 1000.
There is also a downside. You should know that when limiting connections based on the client’s IP can restrict all the users sharing the same network behind the NAT devices.
In this type of scenario, you can limit the user based on the session cookie.
Below are some useful links for you.
- How to allow/restrict access by IP address
- How to create and configure a 404 Error Page
- How to change the Nginx Web Document Location
- How to change the Nginx 80 Port in Linux.
- How to Increase NGINX Worker Connections Limit in Linux
That’s all for now. If you have any queries or questions, then do let us know in the comment section.