One of the most used utilities in Linux is SSH.
Every user is aware of the importance of SSH for interacting with remote systems through the local shell, so why not use the SSH utility when you are stuck and trying to fix your broken system?
Yes, you can enable SSH in rescue mode, which will give you a bit more convenience to fix problems compared to accessing your system through a console, which can do more things like allow you to run fsck/e2fsck commands to check file consistency, access and backup your data, fix any misconfiguration which ends up your system in rescue mode, and many more functionalities that can be unlocked once you log into your remote server.
Therefore, we have come up with another article for you where you will learn how to enable and start an SSH connection in rescue mode. I have tested this guide on AlmaLinux and RockyLinux, which is why I believe this guide will work on most RHEL-based distributions.
Enable SSH service in Rescue mode in RHEL-based distros
There are two ways through which you can enable SSH in rescue mode. One of the easiest ways is to add inst.sshd=1 to the boot instructions, and another way is to manually copy the sshd_config.anaconda file into sshd_config.
Method 1: Enable SSH in rescue mode by enabling the service from the installer menu
Method 2: Enable SSH in rescue mode from the rescue shell
It’s up to you which method you want to prefer, but I would suggest you go with the first option. If, for some reason, this is not working, then think about another option.
To follow this guide, you should download the boot ISO or minimal ISO of the respective distributions. For your convenience, I’m sharing with you a link through which you can download the ISO images for AlmaLinux, RockyLinux, and Fedora.
Method 1: Enable SSH in rescue mode by enabling the service from the installer menu
I believe you have downloaded the ISO file and made a bootable USB drive through Rufus, BalenaEtcher, or any other bootable software, and if you are following this guide on VirtualBox, then don’t forget to attach the ISO image to your virtual machine.
Step 1: Add instructions to enable the SSH service
Once everything is setup, attach your bootable thumb drive to your system and follow the below guide. Most likely, the system will autodetect a bootable USB drive. If not, please get into the boot menu and select the bootable pendrive from the boot system.
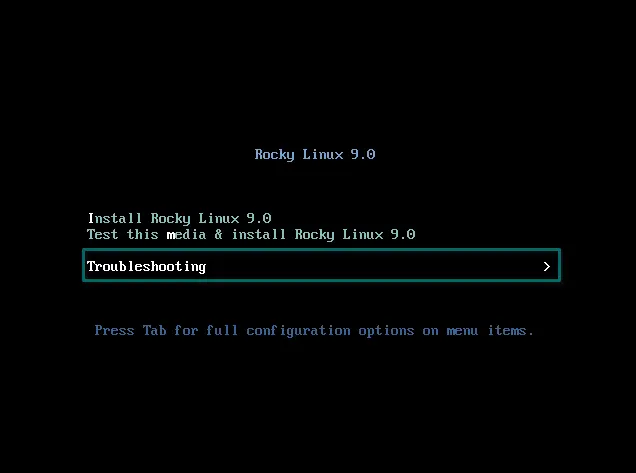
On the very first screen, you will find an option like the below image, so simply select “Troubleshooting” and press enter.
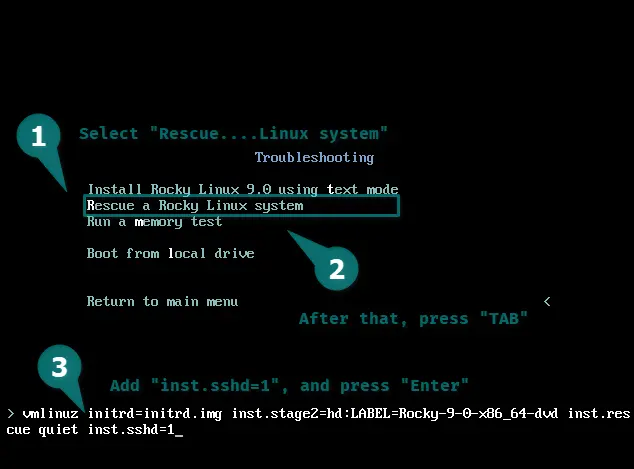
You need to follow the same sequence as shown in the below image. Use the navigational key to select “Rescue a Rocky Linux or AlmaLinux system” and press the “Tab” button to add instructions for enabling SSH service.
Add the following line of text after “quiet” by giving space, “inst.sshd=1” and press “Enter”.
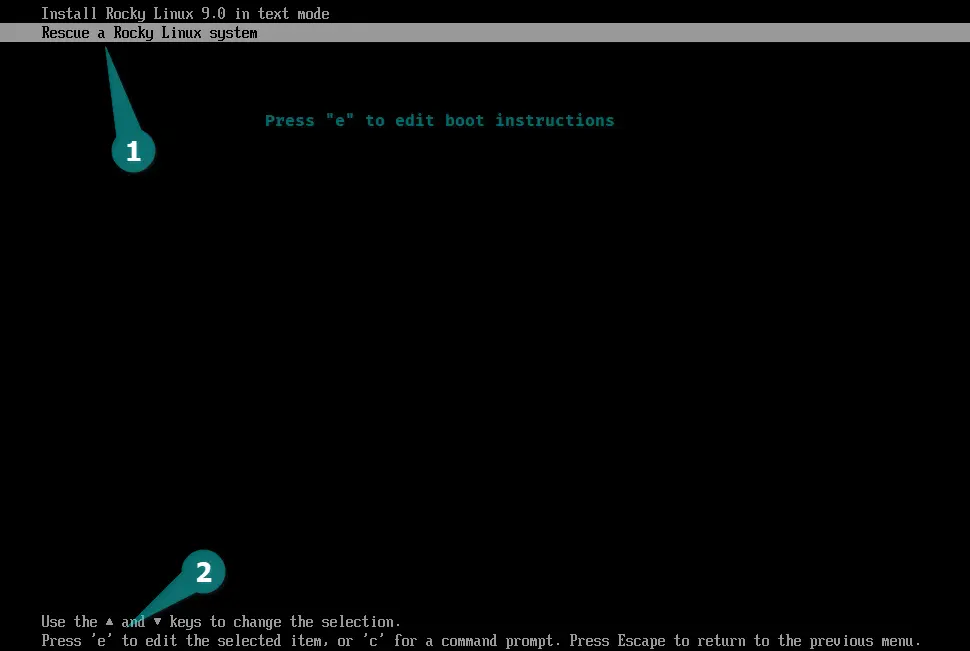
The steps will be different if your system is using UEFI firmware instead of BIOS. In that case, you need to follow the below steps in the given sequence.

Choose “Rescue a Rocky Linux system”, and press “e” to edit boot instructions.
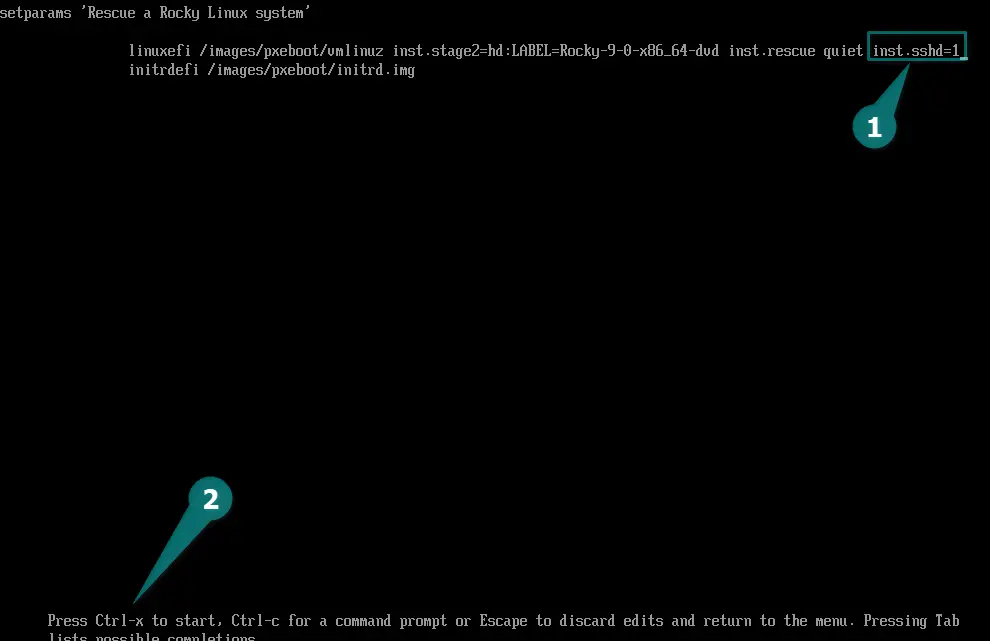
Next, append inst.sshd=1, and start the system by pressing Ctrl-x.
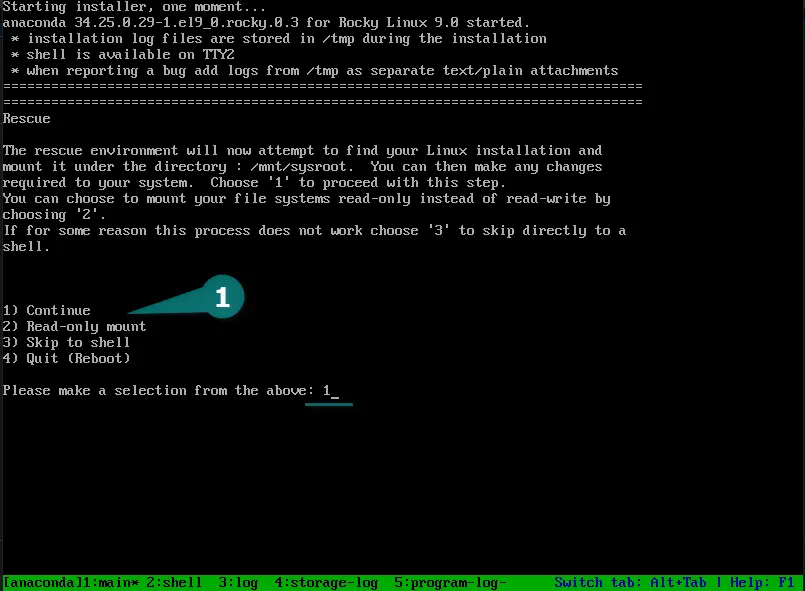
After a couple of minutes, you will find the options like in the below image, so simply press “1” to continue with mounting the root system, or you can either choose 1 or 3.
Step 2: Configure Network to accept remote connection
Once you get shell access, it means you are very close to accessing your system through SSH, but before that, you need to check whether the system has auto-assigned the IP address to connect within the network.
Most likely, if you have connected your system with a LAN cable, then the system will get the IP address, but if you are using a Wi-Fi connection to connect to a network, then you will need to do some extra work to get connected to a network.
So first, check the IP address by running the ip a command or nmcli.
bash-5.1# ip a
1: lo: <LOOPBACK,UP,LOWER_UP> mtu 65536 qdisc noqueue state UNKNOWN group default qlen 1000
    link/loopback 00:00:00:00:00:00 brd 00:00:00:00:00:00
    inet 127.0.0.1/8 scope host lo
       valid_lft forever preferred_lft forever
    inet6 ::1/128 scope host
       valid_lft forever preferred_lft forever
2: enp0s3: <BROADCAST,MULTICAST,UP,LOWER_UP> mtu 1500 qdisc fq_codel state UP group default qlen 1000
    link/ether 08:00:27:cb:c2:f3 brd ff:ff:ff:ff:ff:ff
    inet 192.168.1.10/24 brd 192.168.1.255 scope global dynamic noprefixroute enp0s3
       valid_lft 83201sec preferred_lft 83201sec
    inet6 2481:4900:1e33:94b2:f2b1:219a:5ec6:831d/64 scope global dynamic noprefixroute
       valid_lft 86258sec preferred_lft 86258sec
    inet6 fe49::5c98:5893:292f:637e/64 scope link noprefixroute
       valid_lft forever preferred_lft forever
According to the above output, my rescue host has an IP address of 192.168.1.10, which means I do not need to do anything further to connect to the internet.
But for those who want to connect their system through wifi, they need to run a couple of commands to connect to the wifi network.
# nmcli device wifi connect							// Check wifi name
# nmcli device wifi connect [ACCESS-POINT-NAME] password [ENTER-PASSWORD]	// Connect with wifi
Once the network connection is made, check your machine’s IP address and keep it handy for the next section.
# ip aStep 3: Connect rescue machine through SSH
Now you can connect to your rescue machine via SSH from your remote system by invoking the below command, and of course, replace the below IP address with the actual one.
$ ssh [email protected]Type “yes” to continue.
The authenticity of host '192.168.1.10 (192.168.1.10)' can't be established.
ECDSA key fingerprint is SHA256:N6528Vnha+pMHpOSGpGCsSHV6/14HQo1dIbtcxEoHmw.
Are you sure you want to continue connecting (yes/no/[fingerprint])?
That’s all you need to do to enable SSH in rescue mode, but if, for some reason, this method doesn’t work in your case, check the next available method.
Method 2: Enable SSH in rescue mode from the rescue shell
Alternatively, you can enable the SSH service by replacing the content of /etc/ssh/sshd_config with /etc/ssh/sshd_config.anaconda, then start the sshd service to accept incoming connections from the remote host.
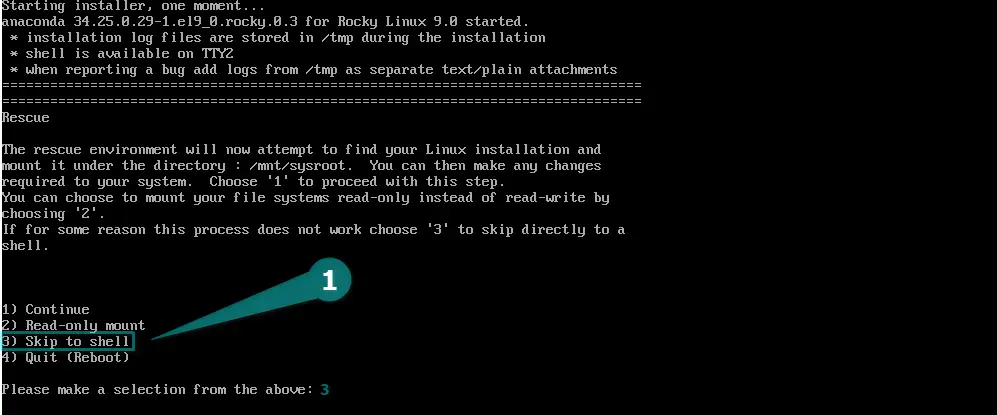
The steps are pretty simple. First, you need to boot your system into rescue mode using a bootable drive, and when you get options like the image below, select “Skip to shell”.
After that, make sure your system is connected to the network by invoking the ip a command. If you are connecting your system through a wireless network card, then check the above steps to establish a connection on your Linux machine.
# ip a
Once you have established the connection, copy the content of /etc/ssh/sshd_config.anaconda to /etc/ssh/sshd_config by running the below command.
# cp /etc/ssh/sshd_config.anaconda /etc/ssh/sshd_configThe last step is to enable the SSH service by running the below command.
# systemctl start sshdAfter that, you can connect to your system with ssh from your remote connection without any problem. If you are facing any difficulty in establishing an SSH connection, then comment down. We will be glad to give you a hand.
For example, let me connect to a remote computer that is currently in rescue mode, and to access it remotely, run the following command.
$ ssh [email protected]
Quite easy, isn’t it?
Wrap up
That’s all for this article, in which you have learned how to enable an SSH service in rescue mode. After connecting to your remote server, you can fix your problem, make a backup of the file, and generate an SOS report for further investigation.
If this article helped you, do not forget to appreciate the material in any way.