One fine day my friend(Jesper) and I were discussing on certain topic suddenly. Jesper asked me, “Is it possible to connect ADB using Mobile Hotspot?” I know how to connect adb using WIFI when we are in the same network, but in the case of a mobile hotspot, what to do and how to do it?
Once, I tried to connect my android device through ADB using a Mobile hotspot. However, I was not get connected because of a missing TCP/IP address. As you know, when we pass the command “adb connect [ip-address]” to connect wirelessly required IP address, and here I’m stuck.
After hearing this I guided him how to connect device in a step by step manner.
Do you also have the same problem or maybe different and looking for a solution? Your search end here, In this article, we will see how to connect an android phone over a mobile hotspot using the adb connect command.
Prerequisite
- USB cable for 1st attempt & after reboot
- ADB pre Installed
- Of course, Android phone
Step 1: Connect Laptop and Mobile using Hotspot & Download
Before moving ahead, first, connect your laptop using a mobile hotspot. After that, In your android phone, open Google Play Store and search for Termux ![]() or follow the below button to redirect to google play store.
or follow the below button to redirect to google play store.
Why are we downloading termux? The simple answer to get the IP address of your mobile wifi network interface. By default, android phones do not show a hotspot IP address.
Even you can know the IP address without Installing Termux to know that step comment us.
Step 2: Get IP Address from termux
Once you have downloaded termux from Play Store open it and pass the ip addr command to get the IP address of your Android mobile network interface.
ip addr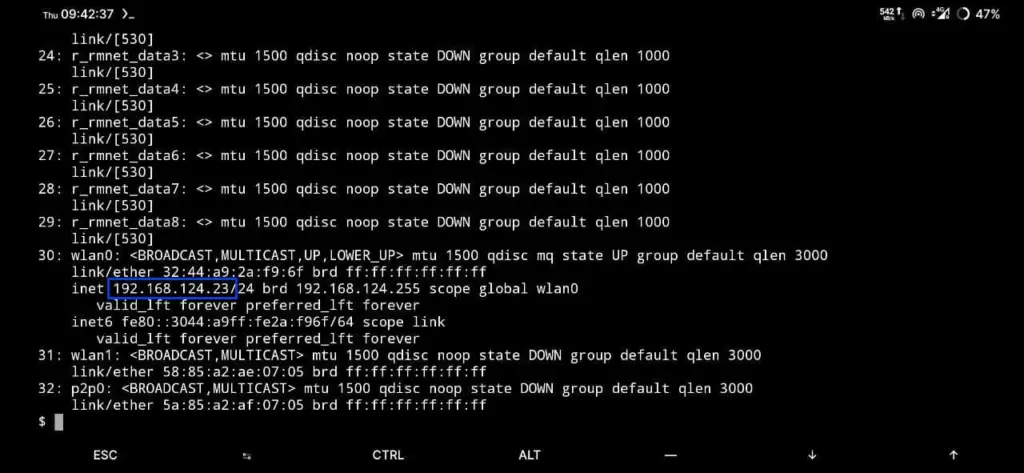
Scroll down to find an IP address; most of the time, you will able to find an IP address under the wlan0 or wlan1 network interface. before that, make sure to turn on the Mobile hotspot; otherwise, you will not find the IP address of the Network Interface.
Step 3: Open Windows PowerShell or Bash Terminal
After getting the IP address, we can easily connect adb wirelessly with a couple of commands. For the first time user need to connect mobile through a USB cable and perform the rest step.
Step 3.a: First step is start tcpip on port 5555
adb tcpip 5555

Output
restarting in TCP mode port: 5555
Step 3.b: Remove USB cable and pass the following command
adb kill-server && adb connect 192.168.124.23

Output
* daemon not running; starting now at tcp:5037
* daemon started successfully
connected to 192.168.124.23:5555
The next time, you don’t require to connect a USB cable and type much command until and unless the phone gets rebooted.
To connect the phone wirelessly using a hotspot, first find the IP address and pass the below command, and you’re ready to use your device without any Cable.
adb connect 192.168.124.23

Output
connected to 192.168.124.23:5555
Wrapping Up
That’s all to connect ADB over Mobile or Portable Hotspot to Install and Debug Android Studio Application.
Read this to :- How to set or change the temporary hostname in Linux
If you are stuck somewhere, please feel free to comment down and If you like the article or somewhere I missed something, please let me know to make this article more amazing.