I’m Obvious you already tried to configure /etc/network/interfaces in Debian based system. You have used nmtui or modified network configuration file in a RedHat-based system to make IP address static, and I’m sure you able to make IP address static.
But the real thing starts from here. When you try to ping or access “somewebsite.com”, you’re not able to reach, and the terminal will print ping: somewebsite.com: Temporary failure in name resolution.
Augh, What wrong happened? I understand you’re frustrated that the reason I decided to write an article.
Prerequisites
Frankly speaking, we don’t need much from your end, and I believe you may already have sudo privileges to modify network configuration files. Apart from that System should be connected with Mobile Hotspot.
Why the problem Occurred?
The problem is common If you don’t know the Default Gateway. If you try to put some random gateway as per your choice, an internet connection will not get established, but the system will be configured as a static IP.
How to Find Default Gateway
To continue with our guide first step is to know the Default gateway. If you miss this step, then barely I can help you, and that’s the main reason you not able to get an internet connection once you are done with the configuration part.
Before passing the below command, if you have already made configuration changes in /etc/network/interfaces or using nmtui, please revert the changes and make network DHCP. Otherwise, you will obtain the wrong Gateway.
Open a terminal and pass the below command to fetch Default Gateway:
$ sudo ip r

default via 192.168.107.2 dev ens33 onlink
192.168.107.0/24 dev ens33 proto kernel scope link src 192.168.107.33
The above step print a default IP Gateway which is 192.168.107.33 and note it down.
There is a separate way to configure Network in Debian and RedHat System because of that. We have two different approaches:
- Configuration on Debian-Based System
- Configuration on RedHat Based System (Centos, Rocky-Linux & Alma)
Choose the above options according to your Installed Distributions.
Make Static IP on Debian-Based System
Step 1 :- Modify /etc/network/interfaces
Once you know the Default IP Gateway, you can proceed with the below steps else, scroll up to find the default gateway.
Again go back to the terminal and pass the below command to modify the interface file:
$ sudo nano /etc/network/interfacesMy VMware machine is connected with the NAT system, or you can say Ethernet, and now I’ll make some modifications to it.
Before Modifications
# This file describes the network interfaces available on your system
# and how to activate them. For more information, see interfaces(5).

source /etc/network/interfaces.d/*

# The loopback network interface
auto lo
iface lo inet loopback

# The primary network interface
allow-hotplug ens33
iface ens33 inet dhcp
After Modifcations
# This file describes the network interfaces available on your system
# and how to activate them. For more information, see interfaces(5).

source /etc/network/interfaces.d/*

# The loopback network interface
auto lo
iface lo inet loopback

# The primary network interface
allow-hotplug ens33
# DHCP TO STATIC
iface ens33 inet static
# ADDRESS RANGE BETWEEN DEFAULT GATEWAY
        address 192.168.107.33/24
# DEFAULT GATEWAY FETCH USING ip r
        gateway 192.168.107.2
I’ll explain to you what we did first choose the interface. After that, change DHCP to static and type the IP address between a range of your default gateway.
Step 2:- Ifdown and Ifup interfaces
Once you are done with the above step, we need to Down & Up network interfaces for that note the interface name. In my circumstance, it is ens33 and type the below command:
$ ifdown ens33
$ ifup ens33
Step 3:- Check IP & Ping trendoceans to check connectivity
Utmost we have completed the steps, To check the IP address and connectivity pass the following commands:
$ ip a

2: ens33: <BROADCAST,MULTICAST,UP,LOWER_UP> mtu 1500 qdisc pfifo_fast state UP group default qlen 1000
    link/ether 00:0c:29:6e:20:33 brd ff:ff:ff:ff:ff:ff
    inet 192.168.107.33/24 brd 192.168.107.255 scope global ens33
       valid_lft forever preferred_lft forever
    inet6 fe80::20c:29ff:fe6e:2033/64 scope link
       valid_lft forever preferred_lft forever
The above output clearly shows the system is configured as static and now we will check for the connectivity using the ping command:
$ ping trendoceans.com

PING trendoceans.com (172.67.162.254) 56(84) bytes of data.
64 bytes from 172.67.162.254 (172.67.162.254): icmp_seq=1 ttl=128 time=317 ms
64 bytes from 172.67.162.254 (172.67.162.254): icmp_seq=2 ttl=128 time=338 ms
^C
--- trendoceans.com ping statistics ---
3 packets transmitted, 2 received, 33.3333% packet loss, time 21ms
rtt min/avg/max/mdev = 317.151/327.531/337.911/10.380 ms
Make Static IP on RHEL-Based System (Centos, Rocky-Linux )
Before continuing with this step, I advise you to read How to fetch Default gateway If you have missed above.
Of Course, you can use other ways to configure Network on, but I strongly advise you to go with nmtui, and It has all the options that we require right now.
Step 1: Configure Network using nmtui
Start a terminal window and copy-paste a below command:
$ sudo nmtuiOnce you pass the above command will show you multiple screen window, and I’ll walk you through each step.
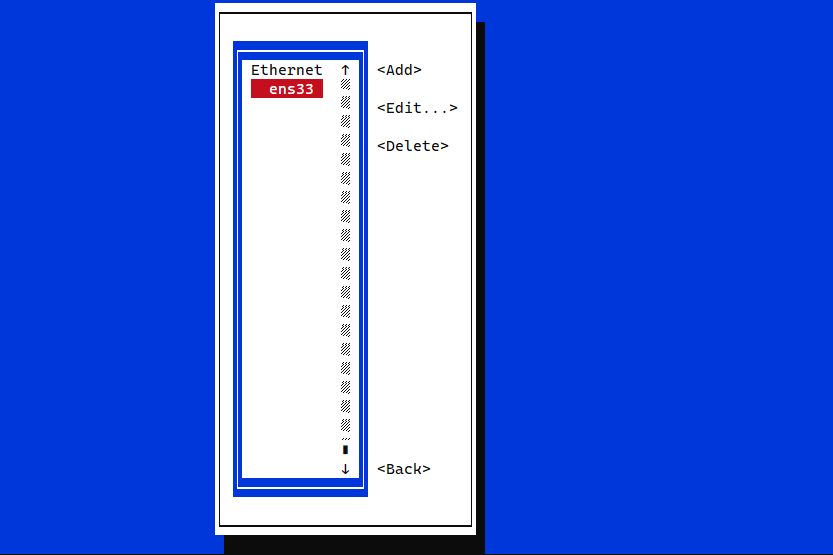
In the first screen, select “Edit a connection” to select press Enter, and for moving, you can use arrow keys.

In my system, only ethernet(ens33) options are available If your system has other Interfaces feel free to choose it.
You can move up & down using respective arrow keys.
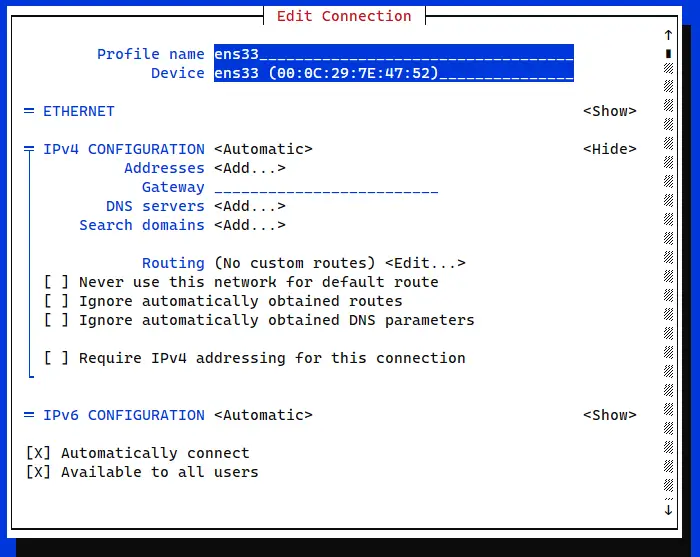
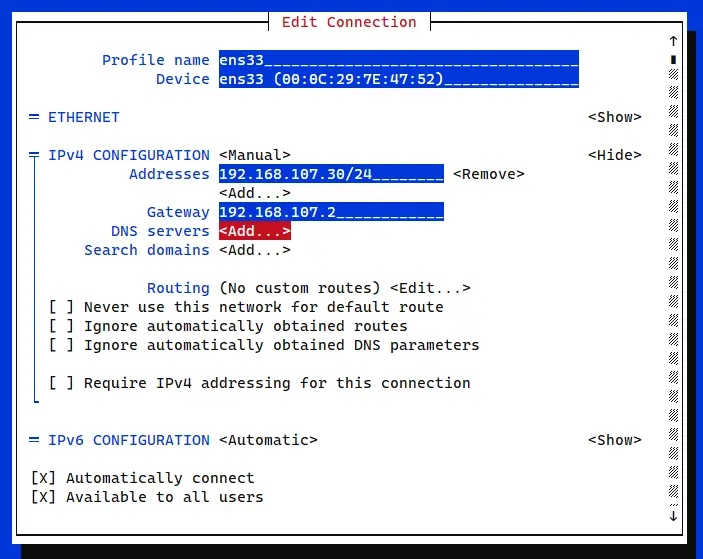
- Go to the IPv4 CONFIGURATION and change to “Manual”.
- Put the IP Address that you want to assign for your system according to Default Gateway.
- Pass the Default Gateway that you have noted earlier.
After making changes to a configuration file, scroll down using the down arrow key and save the latest changes. Any reason you are not able to save the file? Check whether nmtui has started as sudo?
Step 2:- Deactivate and Activate Connection
Once you are done with the above step, You need to Deactivate and Activate a connection to reflect changes.
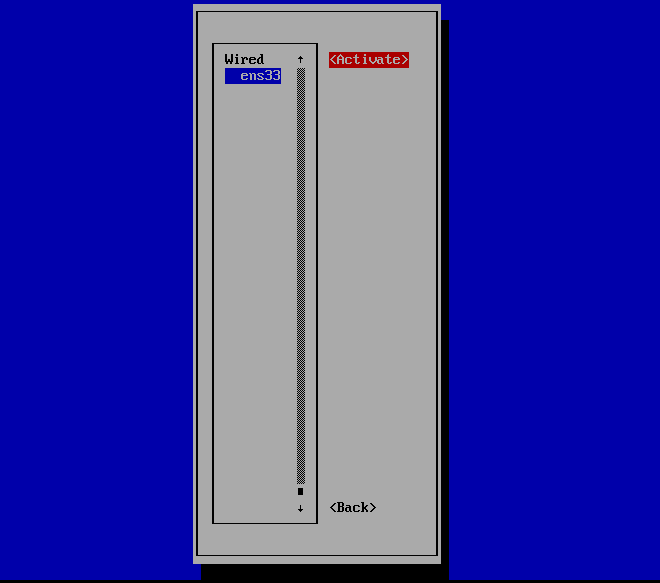
For that Select Activate a connection and press Enter key.
Choose the right Interface and using right arrow key click on “Deactivate” to Down network.
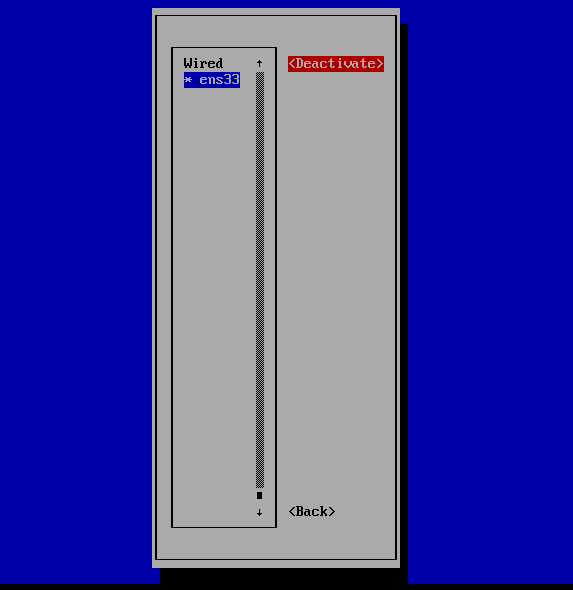
Again click on Activate to turn on Network Interface.
Step 3:- Check IP & Ping trendoceans to check connectivity
You can verify the changes by checking your IP address and getting ping to a specific webpage. Let perform this too by passing few commands:
$ ip a

2: ens33: <BROADCAST,MULTICAST,UP,LOWER_UP> mtu 1500 qdisc fq_codel state UP group default qlen 1000
    link/ether 00:0c:29:7e:47:52 brd ff:ff:ff:ff:ff:ff
    inet 192.168.107.30/24 brd 192.168.107.255 scope global noprefixroute ens33
       valid_lft forever preferred_lft forever
    inet6 fe80::dd9d:7f33:5ab9:1246/64 scope link noprefixroute
       valid_lft forever preferred_lft forever
$ ping trendoceans.com
PING trendoceans.com (172.67.162.254) 56(84) bytes of data.
64 bytes from 172.67.162.254 (172.67.162.254): icmp_seq=1 ttl=128 time=465 ms
64 bytes from 172.67.162.254 (172.67.162.254): icmp_seq=2 ttl=128 time=345 ms
64 bytes from 172.67.162.254 (172.67.162.254): icmp_seq=3 ttl=128 time=423 ms
^C
--- trendoceans.com ping statistics ---
3 packets transmitted, 3 received, 0% packet loss, time 2006ms
rtt min/avg/max/mdev = 344.503/411.088/465.374/50.111 msWrap up
That’s all to configure static IP addresses when you want to connect with your Mobile Hotspot and other networks, too and Don’t forget to get the Default Gateway address.
Read this :- DMIDecode Command Guide with Examples
We have tried this method on Virtual Environment with Debian and Centos Stream Distributions, and I believe the above method will work on all machines.
If you want to say Hi to me or want to suggest something feel free to contact me.