Having some issues with PulseAudio, then install and replace it with PipeWire on your Debian machine.
A couple of days back, I received an email from one of my readers, and he asked me to help him because he was not able to install PipeWire on his Debian distribution by following the steps which were specifically written for Ubuntu and Ubuntu-based distributions and not for Debian.
Defienlty, his installation is bound to fail because the installation steps are slightly different in both distributions.
However, if you are also facing some problems during installation or you want to ditch PulseAudio and experience PipeWire, then your favourite search engine has redirected you to the right place where you will learn how to install PipeWire on Debian along with steps to revert.
So, without wasting your time, open your terminal and execute the command as per the given sequence.
Install or Enable PipeWire on Debian 11/12
According to the official documentation, you will find that PipeWire is installed on your system, especially on Debian 10, 11, and 12, but it will not be in an active state to be used on your system.
So, in order to make PipeWire the default audio service, you will need to make some changes to your system, which will enable and replace the PulseAudio server with PipeWire.
Before that, let me confirm whether PipeWire is installed or not.
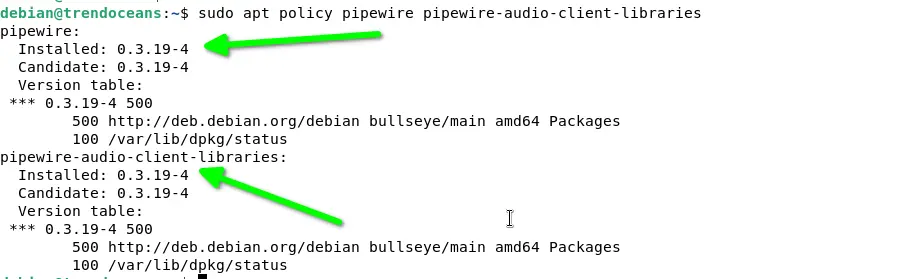
To check that, you can use the apt policy command, which will show you the required applications and dependencies that are already installed, as in the below-attached image.
Also read: How to use APT Package Manager with Examples
Prior to that, execute the below code:
$ sudo apt policy pipewire pipewire-audio-client-librariesThe behaviour of the above command
For any reason, if the above utilities are not present on your system, then do copy and paste the below code into your terminal window to start the installation.
$ sudo apt install pipewire pipewire-audio-client-libraries Replace PulseAudio with a PipeWire server on Debian
Once you are aware of the required applications and libraries being installed on your system, then you are bound to replace PulseAudio with PipeWire by invoking the following commands:
Step 01: Create an empty file
So first of all, create an empty file in /etc/pipewire/media-session.d using the below command:
$ sudo touch /etc/pipewire/media-session.d/with-pulseaudioStep 02: Create a pipewire-pulse service
After that, create a pipewire-pulse service by copying the example files from /usr/share/doc/pipewire/examples/systemd/user/pipewire-pulse.* has two different files, pipewire-pulse.service and pipewire-pulse.socket, to /etc/systemd/user/ to manage them using the systemctl command.
$ sudo cp /usr/share/doc/pipewire/examples/systemd/user/pipewire-pulse.* /etc/systemd/user/Step 03: Reload the daemon file
Once the above step is performed successfully, execute the below command, which will reload the new service that we have just created.
$ systemctl --user daemon-reload Step 04: Disable PulseAudio service
After that, execute the below code to disable the currently running PulseAudio service.
$ systemctl --user --now disable pulseaudio.service pulseaudio.socketThe behaviour of the above command

Step 05: Enable and Start the PipeWire Service:
Once you have disabled the PulseAudio server, execute the below code, which enables and starts the pipewire-pulse service.
$ systemctl --user --now enable pipewire pipewire-pulseThe behaviour of the above command

Verify Changes
After following the above steps, your system is now fully configured to switch from PipeWire to PulseAudio, but how do I know whether my system is using PulseAudio or PipeWire?
It is pretty simple to execute the pactl info command, which will list out the server name.
$ pactl info
Persist Changes even after Reboot
As of now, your system is currently using PipeWire, but once you restart your computer, it will automatically change the current audio server to PulseAudio.
which means you have to manually enable PipeWire every time you restart your computer; that is not acceptable at all for anyone.
To prevent this kind of situation, you can mask the pulseaudio.service which will disable the PulseAudio service to use by default.
To make these changes permanent, execute the below code:
$ systemctl --user mask pulseaudioAfter executing the above command, restart your system to implement the new changes.
$ sudo rebootReplace PipeWire with PulseAudio Server on Debian
Currently, PipeWire is not reliable to use as the default audio service, and even the official guide does not suggest you use PipeWire as the default audio service, which may give you unexpected results.
As per Simon McVittie, “This is not a supported scenario for Debian 11 and is considered experimental.”
It may break certain applications, lack certain functionality, or not work at all.
If you too face any kind of audio issue while using it, then you can follow the below steps, which will disable the PipeWire and enable the PulseAudio back.
Step 01: Unmask PulseAudio
If you have masked the PulseAudio server in the above step, then don’t forget to unmask it first. Otherwise, subsequent commands will throw an error.
$ systemctl --user unmask pulseaudioStep 02: Disable PipeWire
After that, you can execute the below code to stop PipeWire.
$ systemctl --user --now disable pipewire pipewire-pulseStep 03: Enable PulseAudio
Lastly, run the final command, which will enable the PulseAudio service to be used as normal.
$ systemctl --user --now enable pulseaudio.service pulseaudio.socketThe behaviour of the above command

Step 04: Check Status
Once the above command is successfully executed, execute the pactl info command to check the audio server.
If the output displays “pulseaudio” as a server name, then your work is complete here.

And for any reason, if you get an error like “Connection failure: Connection refused pa_context_connect() failed: Connection refused”, then, first of all, try to restart your system, and even if that doesn’t get fixed, then you can comment down your query below.
Wrap up
That’s all for this guide, where I showed you how to enable the PipeWire audio system on a Debian 11/12 based system by disabling the default PulseAudio.
I hope you were able to perform the following step, but if for any reason you were not able to do so, then leave a comment in the section below.
With this text, let me end here and meet you in the next article.
Thank you, Gagan! I have found these instructions as well as your pipewire instructions for Ubuntu-based distros very helpful.
Best wishes,
Kevin
At “Verify Changes” i got the “Connection failure: Connection refused pa_context_connect() failed: Connection refused”
i rebooted and pactl info still said only pulseaudio server. Then i disabled pulseaudio service and socket again, enabled pipewire and pipewire-pulse again. still same connection failure, i then did the mask pulseaudio then rebooted.
Now pactl said pipewire server. and pactl list sinks short confirmed deafult sink was using pipewire.
Thank you, but step 02 finds no files. Sth must have changed with Trixie, the current testing.
Let me see