When you are cut off from your loved ones for an extended period of time, how do you think you will feel? I mean, it’s bad, right? To solve this problem, WhatsApp made a feature called “WhatsApp proxy,” which lets you talk to your loved ones even if the government blocks or disrupts the connection.
The text you just read is correct. With this new addition, WhatsApp hopes to make it easier than ever for you to stay in touch with your friends and family using the messaging service.
Take a look at this snippet I pulled straight from WhatsApp’s blog; it should make it clear why they’re so keen on implementing this change.
Our wish for 2023 is that these internet shutdowns never occur. Disruptions like we’ve seen in Iran for months on end deny people’s human rights and cut people off from receiving urgent help. Though in case these shutdowns continue, we hope this solution helps people wherever there is a need for secure and reliable communication
So, let’s look at how you can use the new WhatsApp feature on your Android or iPhone, as well as how to set up WhatsApp proxy on Linux-based systems.
How to Setup WhatsApp Proxy on a Personal Computer
Docker makes it easy to set up a WhatsApp proxy. All you need is a computer running Docker and a static public IP address to communicate from the outside of the network, or you can implement the following setup using the cloud service, which unfortunately I’m not going to cover up:
I’m just demonstrating how to set up WhatsApp’s proxy locally so you can test the feature with RethinkDNS to prevent direct WhatsApp connections and use the proxy server to send and receive messages.
Step 1: Install Docker and Docker Compose
You can quickly and easily activate the proxy service on your local system by following the instructions as they are presented. It’s time to fire up the terminal and install two necessary packages by typing in a few commands:
Ubuntu/Debian-based distributions
$ sudo apt update && sudo apt upgrade
$ sudo apt install docker.io
CentOS, Fedora, and RHEL-based distributions
$ sudo yum update -y
$ sudo yum install docker
Then, you must run the following commands to start the service, which will start on its own when the operating system is restarted and keep running without the need for manual intervention.
$ sudo systemctl enable docker
$ sudo systemctl start docker
Once you’ve installed Docker, all that’s left to do is install docker-compose, which you can do by running the following command:
# Download the pkg
sudo curl -L https://github.com/docker/compose/releases/latest/download/docker-compose-$(uname -s)-$(uname -m) -o /usr/bin/docker-compose
# Enable execution of the script
sudo chmod +x /usr/bin/docker-compose
If everything goes as planned, the docker --version and docker-compose --version commands will produce the following results:

That’s all it takes to download Docker and Docker compose on your system, and if you are facing any issue during installation, then you should check out the dedicated article on this topic by checking the following article: How to Install Docker Compose on Ubuntu 20.04 LTS and How to Install Docker on Ubuntu 20.04 LTS.
Step 2: Clone WhatsApp Proxy
The next thing to do is to get your hands on the actual file that will facilitate your proxy-based WhatsApp connection. Run the following command to obtain the proxy file:
$ git clone https://github.com/WhatsApp/proxy.gitOnce the file has been cloned, you can move on to the next step, which is where things really start to heat up; however, before you can do that, you need to set the current path to the location of your project.
$ cd proxy/Step 3: Start the WhatsApp Proxy Service
To start the WhatsApp proxy, you can either run it directly through Docker or use Docker-Compose, but I recommend using Docker Compose when you really want to use the WhatsApp proxy because it has the ability to self-destruct and regenerate the container if anything goes wrong, and everything is automated, so you don’t have to put too much strain on your shoulders.
On some Linux distributions, you can use either docker-compose or docker compose to run the docker compose command. If the below command throws an error, run any of this command.
With the below command, you can set up your proxy server and have it automatically start up whenever you need it. You’ll see “Starting a8de5cb28f3e_whatsapp_proxy… done” once it’s finished.
$ docker-compose -f /path/to/this/repo/docker-compose.yml up -dUsing the preceding command, we get the following results:

Once you receive the confirmation message, you are ready to test the feature on your smartphone. However, before you do so, you must first obtain the IP address of the machine on which the proxy is running by using the command below.
$ ip -br addrIf you have enabled this service on a cloud based service, then note the public IP of the instance.
Also Read: Display Public IP Address using Command-Line in Linux
To Access WhatsApp’s Proxy Settings, Follow These Steps
You can test your proxy’s functionality once everything has been installed and configured. To do so, you just need to know the IP address of the machine where the proxy is installed and running.
As an added step, I’ll demonstrate how to prevent a connection to Whatsapp by employing Rethink DNS, which should give us an idea of how things are going to pan out.
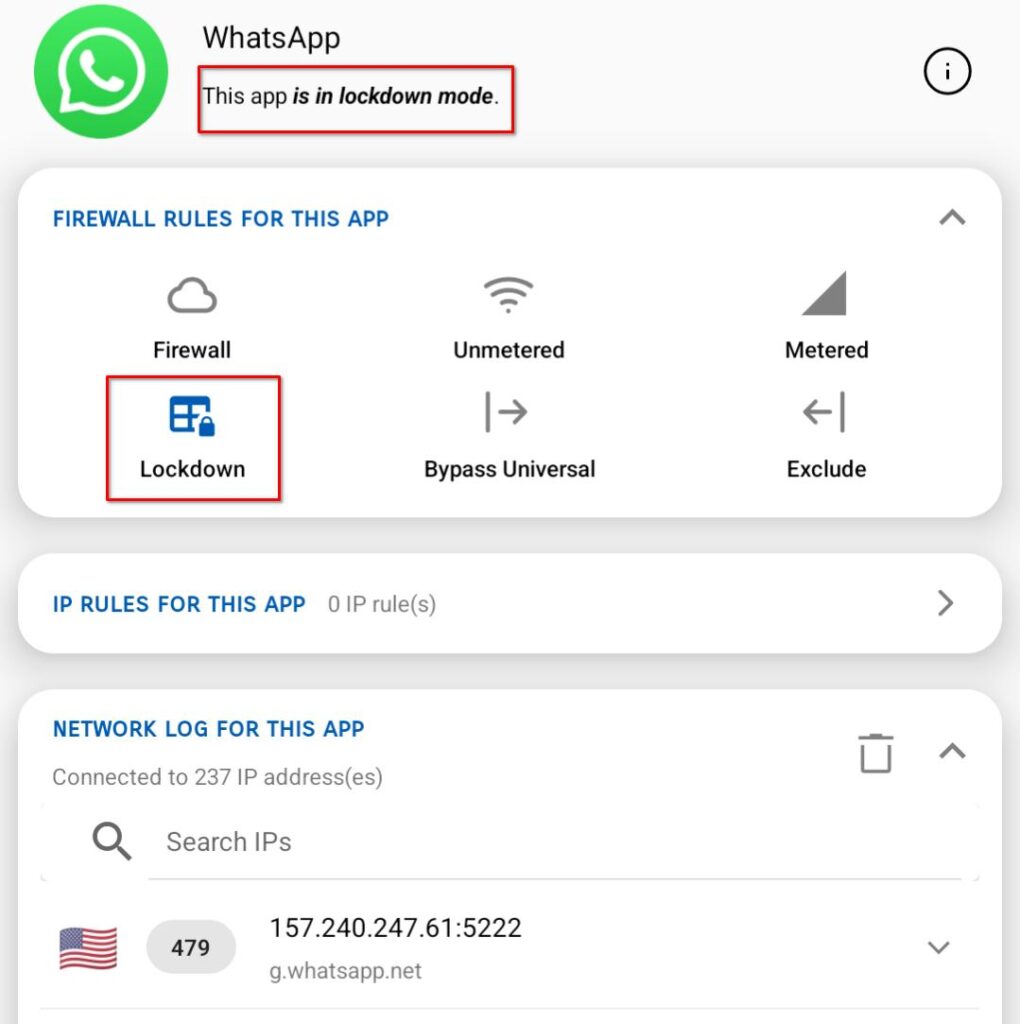
So let’s start first with disrupting the connection to WhatsApp by getting into the Rethink: DNS app under the “App section” to put the WhatsApp in the lockdown mode after applying this setting WhatsApp will not be able to receive or send messages.
And once it is done, let’s get into WhatsApp settings to enable a proxy server on your mobile phone to send and receive messages. So please follow the steps as I guide you.
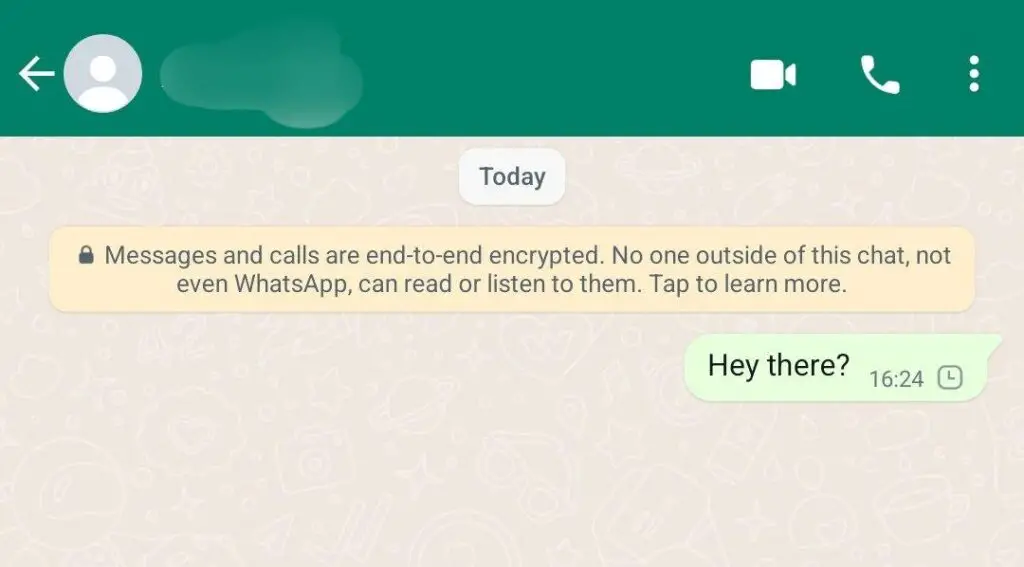
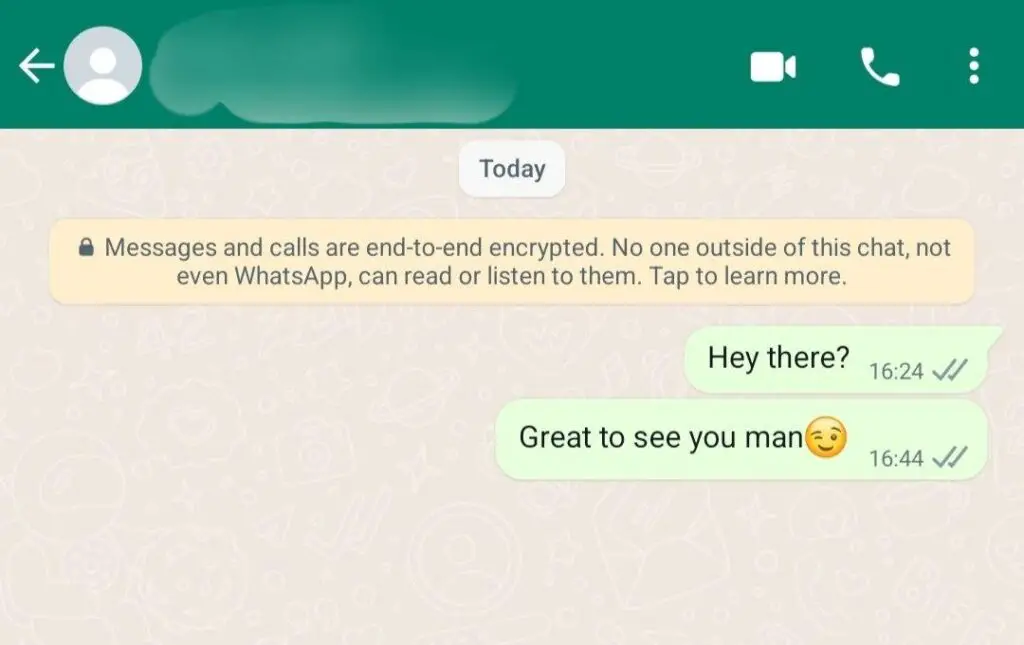
Before that, I would like to show you a screenshot of one of my chats from WhatsApp after enabling lockdown mode in RethinkDNS, which is not allowing WhatsApp to access the network despite the fact that the Internet is enabled.
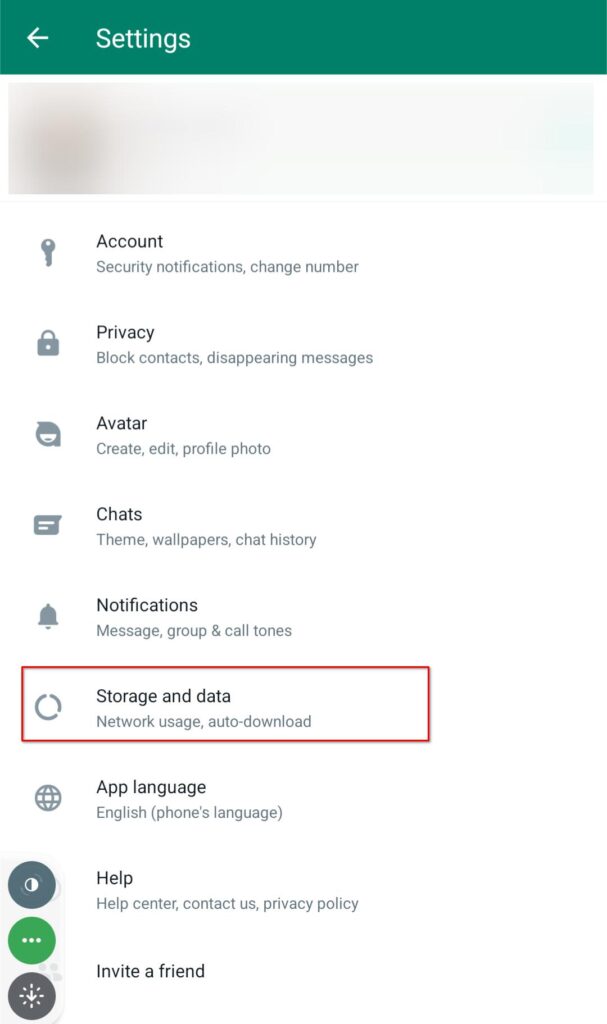
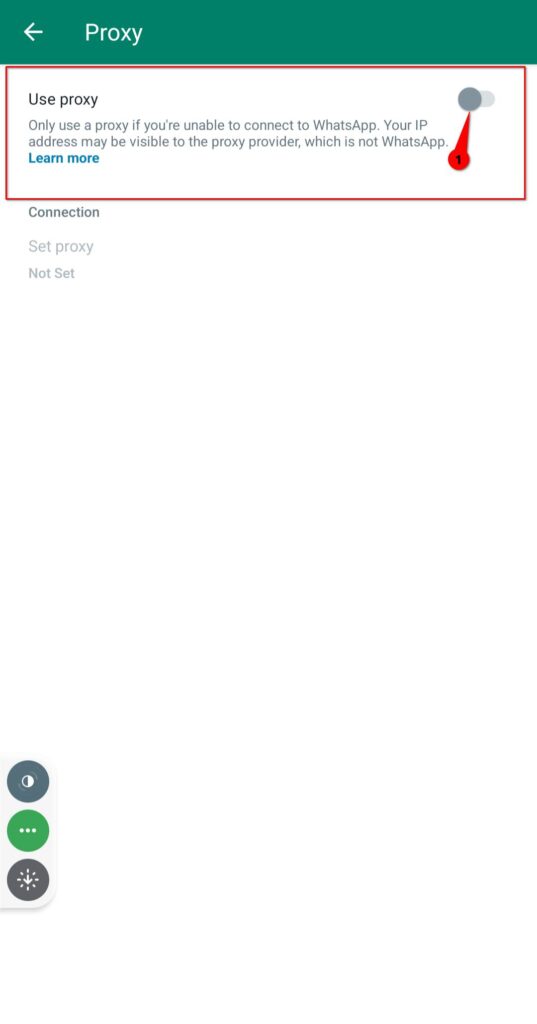
Step 1: Launch the WhatsApp application and go to the three dots that you will find on the top right corner of the app, and select the last option, “Settings.”
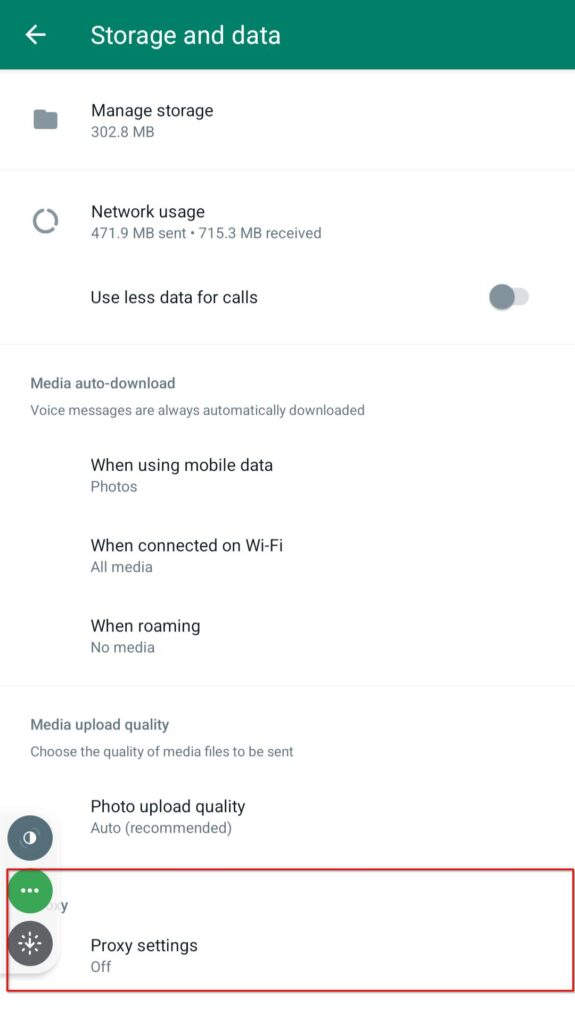
Step 2: Under “Settings,” go to “Storage and data.” After that, go to the “Proxy” section, and click on “Proxy Settings.”
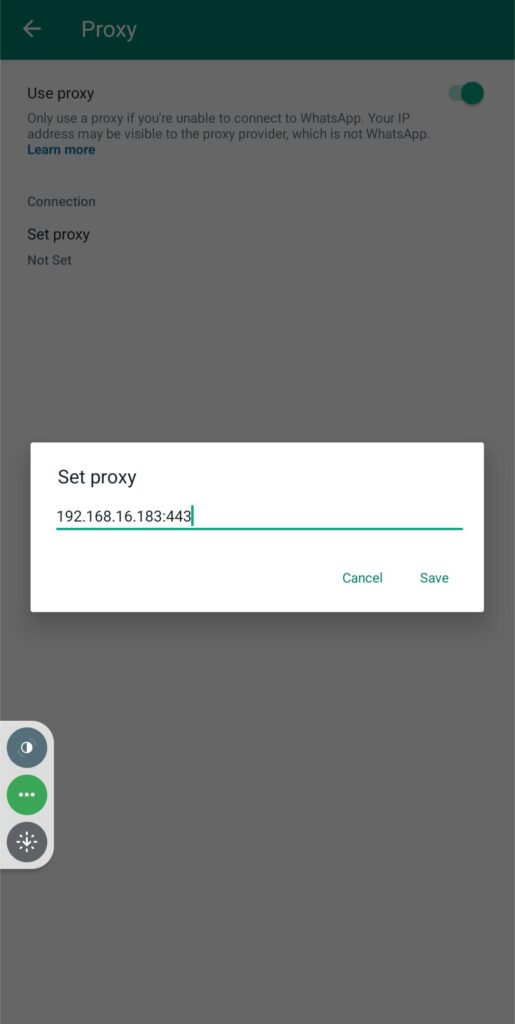
Step 3: Make sure to flip the switch to turn on “Use proxy,” and then click on “Set proxy” to enter the IP address of the proxy machine.
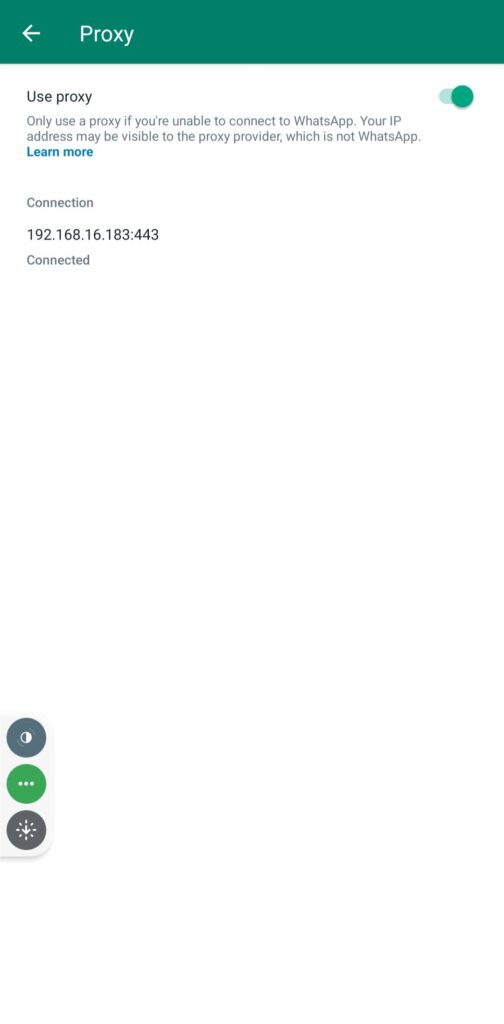
Once the connection is established, you will find the connecting message changing to “Connected,” as shown in the below image.
Once WhatsApp is connected to the proxy server, you can send the message to the WhatsApp user very easily. While testing, I found that WhatsApp calling features like voice and video are not working, and you can not send or receive images or gifs when you are connected to a proxy.
I’m not sure about the result because I manually broke the connection with a specific application; if anyone used the proxy server, please confirm.
Oh, I almost forgot to show you the result after enabling the proxy server on my Android phone. Pardon me for that. Once I enabled the proxy setting, the queue message was sent immediately, and it worked perfectly.
Wrap up
That’s all it takes to configure WhatsApp Proxy on a Linux system, which you can easily replicate on your own. If you are facing any difficulty with the setup, then you can reach me by dropping a message in the comment section.
This new feature is sure to benefit millions of people around the world, and it’s encouraging to see the implementation of technology that can help restore access to essential communication.
Anyway, if there is something I need to consider, please use the space below to provide any additional information or feedback.
It’s encouraging to hear about their progress toward a more secure internet, but I still don’t trust them.