Atuin is a powerful replacement for your existing conventional history command with an SQLite database, which will record extra context for your executed commands like log exit code, CWD, hostname, session, command duration, etc.
In addition to that, you will also get the power to sync your history between all of your machines with end-to-end encryption. By default, Atuin provides its own server for synchronisation. However, you can deploy your own server and configure it with Atuin.
Atuin Tool Features
Below is a list of well-known features.
- Backup and Sync history records with multiple devices in a fully encrypted environment.
- The same history records will be listed across all terminals, sessions, and machines.
- Shell history (commands executed by you) data is stored in the SQLite database.
- Records log exit code, CWD, hostname, session, command duration, etc.
- Calculate statistics like “most used command”, “command ran”, and “unique commands ran”.
- Your old history file is not replaced or deleted.
- Quick-jump to previous items with Alt+<num>.
- Switch to filter mode via the Ctrl+r keyboard shortcut, and search through the current session, directory, host, and globally.
- Deploy your own server and configure it with Atuin.
- Available for all distributions along with the bash, zsh, and fish configurations.
- It can be installed via Brew, Cargo, or MacPorts, or you can build it from the source.
How to Install and Configure the Atuin Tool on Linux
The installation part requires three steps. The first is installing the package. The second step is configuring your current shell with Atuin. Lastly, if you want to sync your history across multiple devices, then you need to register it with Atuin or with your own server.
Also Read: Linux History Command with Advance Examples
Step 1: Installing the Atuin Tool on your Linux System
There are multiple ways to install it on your system, depending on the type of distribution you are using. For example, Debian and its derivative systems have a custom shell script that will automate the installation process.
Arch users can install it via the Pacman package manager, and other users can go with the Cargo or Homebrew package manager.
For Debian, Ubuntu, Pop!_OS, etc. (using shell script)
Open your terminal using the Ctrl+Alt+t or Ctrl+Shift+t keyboard shortcut and execute the following command to install it on your Debian and its derivatives system.
$ bash <(curl https://raw.githubusercontent.com/ellie/atuin/main/install.sh)For Arch, Manjaro, etc. (using Pacman package manager)
Users using the Arch or its derivatives system can easily install it with the distribution’s default Pacman package manager by issuing the following command.
$ pacman -Sy atuinUsing the homebrew
If you read our article on the installation and configuration of brew in Linux, then you can easily install it using the following command.
$ brew install atuinUsing the cargo
If your system is installed and configured with Rust and the Cargo package manager, then execute the following command.
$ cargo install atuinStep 2: Configuring your current shell with Atuin
Once you’ve followed any of the above-mentioned methods (except for the shell script which automatically does this job), then it’s required to configure your current shell with Atuin to make it work properly.
For Bash Shell
First, you need to set up some hooks by installing bash-preexec.
$ curl https://raw.githubusercontent.com/rcaloras/bash-preexec/master/bash-preexec.sh -o ~/.bash-preexec.sh
$ echo '[[ -f ~/.bash-preexec.sh ]] && source ~/.bash-preexec.sh' >> ~/.bashrc
Then set up your bash configuration file (~/.bashrc) with Atuin.
$ echo 'eval "$(atuin init bash)"' >> ~/.bashrcFor Zsh Shell
Execute the following command to add it to your Zsh configuration file (~/.zshrc).
$ echo 'eval "$(atuin init zsh)"' >> ~/.zshrcOr if you were using the Zsh plugin manager, then execute the following command.
$ zinit load ellie/atuinFor Fish Shell
Add the following command to your is-interactive block in your ~/.config/fish/config.fish file.
atuin init fish | sourceStep 3: Configuring with Atuin or Your Own Server [Optional]
If you want to sync your history across multiple devices, then you need to configure your Atuin with an Atuin server or your own (if you have deployed).
Suggestion: pls: Modern Alternative for the ls command in Linux
It will sync your history automatically (unless the configuration file is not changed) with end-to-end encryption.
Register
For the first time, you need to register for a sync account by using the following command.
$ atuin registerWhile executing, it will ask you to provide a username, email, and password for your account.

Once your account is created, you need to take note of your encryption keys (required while logging into another machine) by using the following command.
$ atuin keyBelow is the output of the above command.

Never share this with anyone!
Login
If you want to log in to the new machine and already have all the information like username, encryption key, and password, then execute the following command to sync your history with the new machine.
Note: If you have already logged in with another account, then logout using the
atuin logoutcommand and follow the next step.
$ atuin loginIt will ask you to provide information like a username, encryption key, and password.

Atuin Tool Usage
The usage of this tool is pretty simple and straightforward. Below are some examples that you can check to learn more about their functionality.
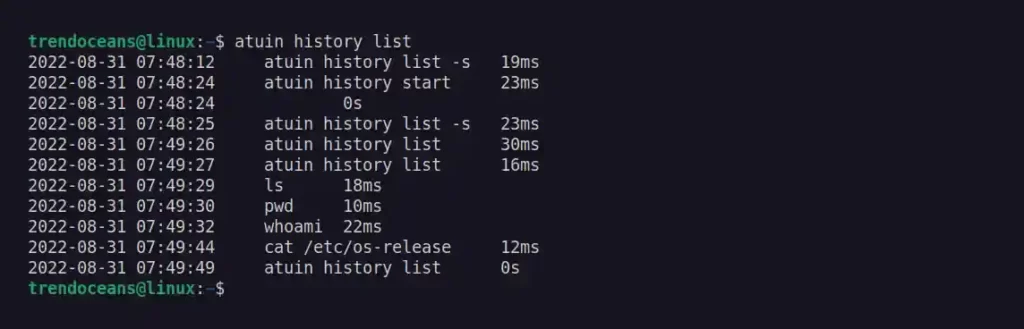
Ex 1: List History
To list the history records with execution date, time, and how much time it took to execute the command.
$ atuin history listBelow is the output of the above command.
Ex 2: Search with Atuin
Execute the following command to open the Atuin interactive search TUI.
$ atuin search -iBelow is the output of the above command.
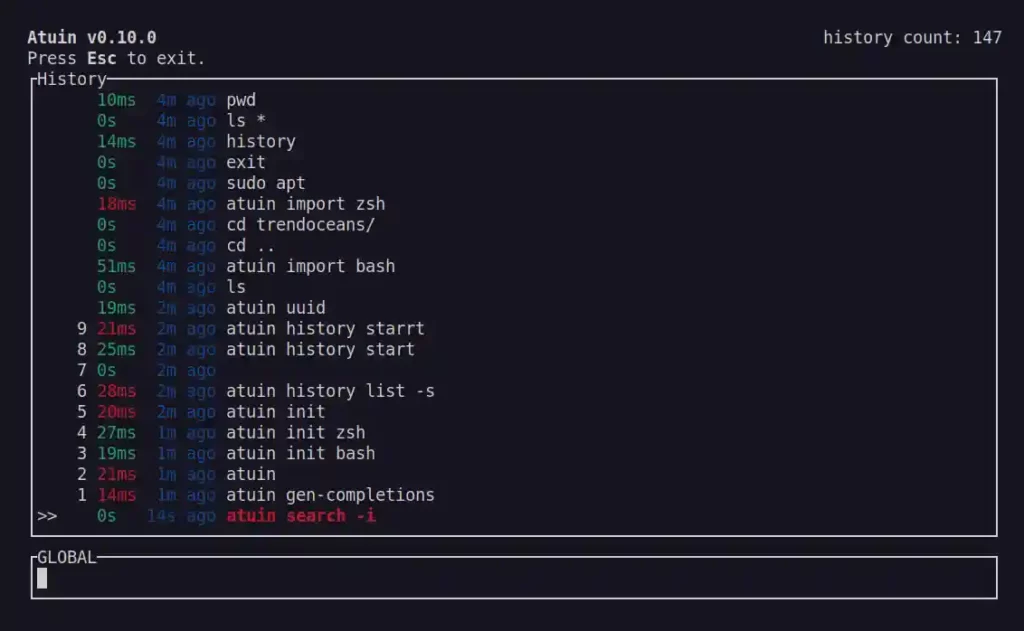
By default, it will search for the typed text globally, but you can switch the filter between host, session, directory, and global by using the Ctrl+r keyboard shortcut.

Ex 3: Search for Command with Successful Exit Code
You can easily search for commands based on their exit code. For example, the below command will list all the ping commands that exited successfully with exit code 0.
$ atuin search --exit 0 pingBelow is the output of the above command.

Ex 4: Search for Command with Successful Exit Code by Date
Execute the following command to search for the ping command that successfully exited before yesterday at 4 pm with exit code 0.
$ atuin search --exit 0 --after "yesterday 4pm" pingBelow is the output of the above command.

Ex 5: Search for Command in the Present Directory that Failed
This one might be useful if you want to know how many compile or other commands have failed. You can perform this search in a specific directory by moving to it, or it will pick the current directory.
Suggestion: Autojump: An Advanced Way to Navigate Long Path Directories in Linux
To perform the search, use the --exclude-exit flag with 0 code to remove all successful command executed output and then use --cwd to specify the directory.
$ atuin search --exclude-exit 0 --cwd .Below is the output of the above command.

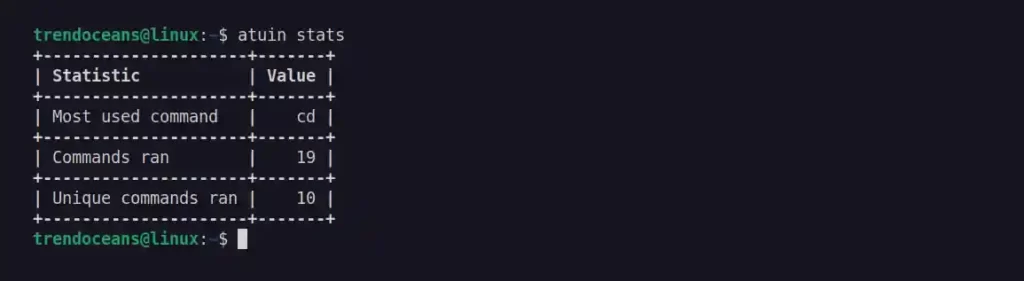
Ex 6: Calculate Statistics for your History
Execute the following to know the most used command, how many times that command ran, and how many unique commands ran.
$ atuin statsBelow is the output of the above command.
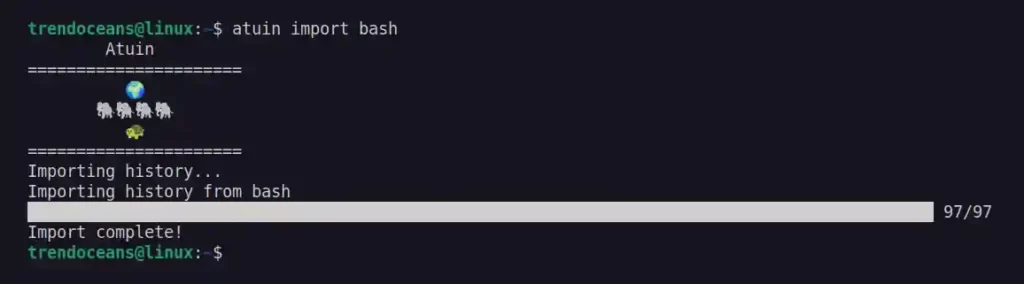
Ex 7: Import History Data from File
In the past, if you were using any other Linux shell-like bash, zsh, zsh-hist-db, fish, or resh, then you could easily import their records by using the following command.
$ atuin import bashBelow is the output of the above command.
If you are unsure, then execute the atuin import auto command to let it automatically detect your shell and import records from it.
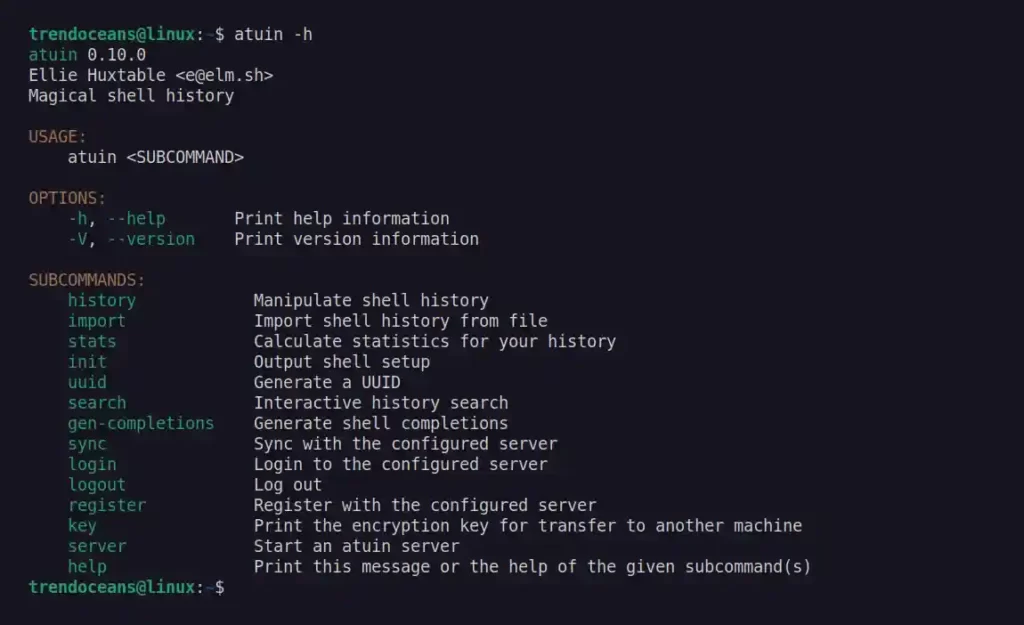
I think that is enough for now. I will let you explore it more by yourself, starting from the help section.
$ atuin -hBelow is the output of the above command.
Wrap Up
While there is no doubt this is an amazing tool with some exceptions like while executing some commands such as atuin history start throw errors, even though I did not find any way to clear history records.
Overall, the intention of this tool is great, and I love the fact that there is a tool that syncs your history across devices. However, if you find this tool helpful or find any bugs or issues, do let us know in the comment section or you can open a Github issue.
Excellent!!
Don’t understand what is “host”, “session”, “directory” and “global” filters (by using the Ctrl+r) though.