Microsoft Visual Studio Code provides a powerful command-line interface for installing extensions, opening files, changing the display language, and diagnostics reports.
Also Read: How to Install Visual Code on Linux using .DEB for Ubuntu & Debian
This tool is preinstalled at the time of VS Code installation on your system and can be operated using the code command.
Opening Files and Directories
You can easily open files, directories, or projects with the help of a code command within the context of a folder. To open a file from a code command. First, open your terminal app, navigate to the project directory, and execute the code ./filename command.
Note: If the file does not exist, VS Code will create a new file with the specified name. Also, if you specify more than one file, VS Code will only open the files in separate tabs.
$ cd mydir/
$ code file.txt
Below is the output of the above command.
To open a directory within the context of a folder. Navigate to the project directory from the terminal app and execute the code . command.
Note: If you specify more than one directory, VS Code will create a Multi-root Workspace including each folder in context area.
$ cd mydir/
$ code .
Below is the output of the above command.
Managing Extensions
The code command provides you with options to list, install, remove, disable, etc., for the extensions. For that, you need to know the extension with the publisher name to use publisher.extension as an argument.
Also Read: How to Install and Run Node Js in Linux
Listing the Installed Extension
Let’s start by listing the installed extension in VS Code using the below command.
$ code --list-extensionsThe output will include enabled or disabled extensions, as shown below.

Use the --show-versions option to output the extension with its version, as shown below.
$ code --list-extensions --show-versionsBelow is the output of the above command.

Installing Extension
To install the extension from the code command, you need to know the extension and its publisher name to provide the full extension name publisher.extension as an argument.
Also Read: How to Create Exe File for Python Program using Pyinstaller
First, visit the Visual Studio Code Marketplace and search for an extension to install, as shown below.
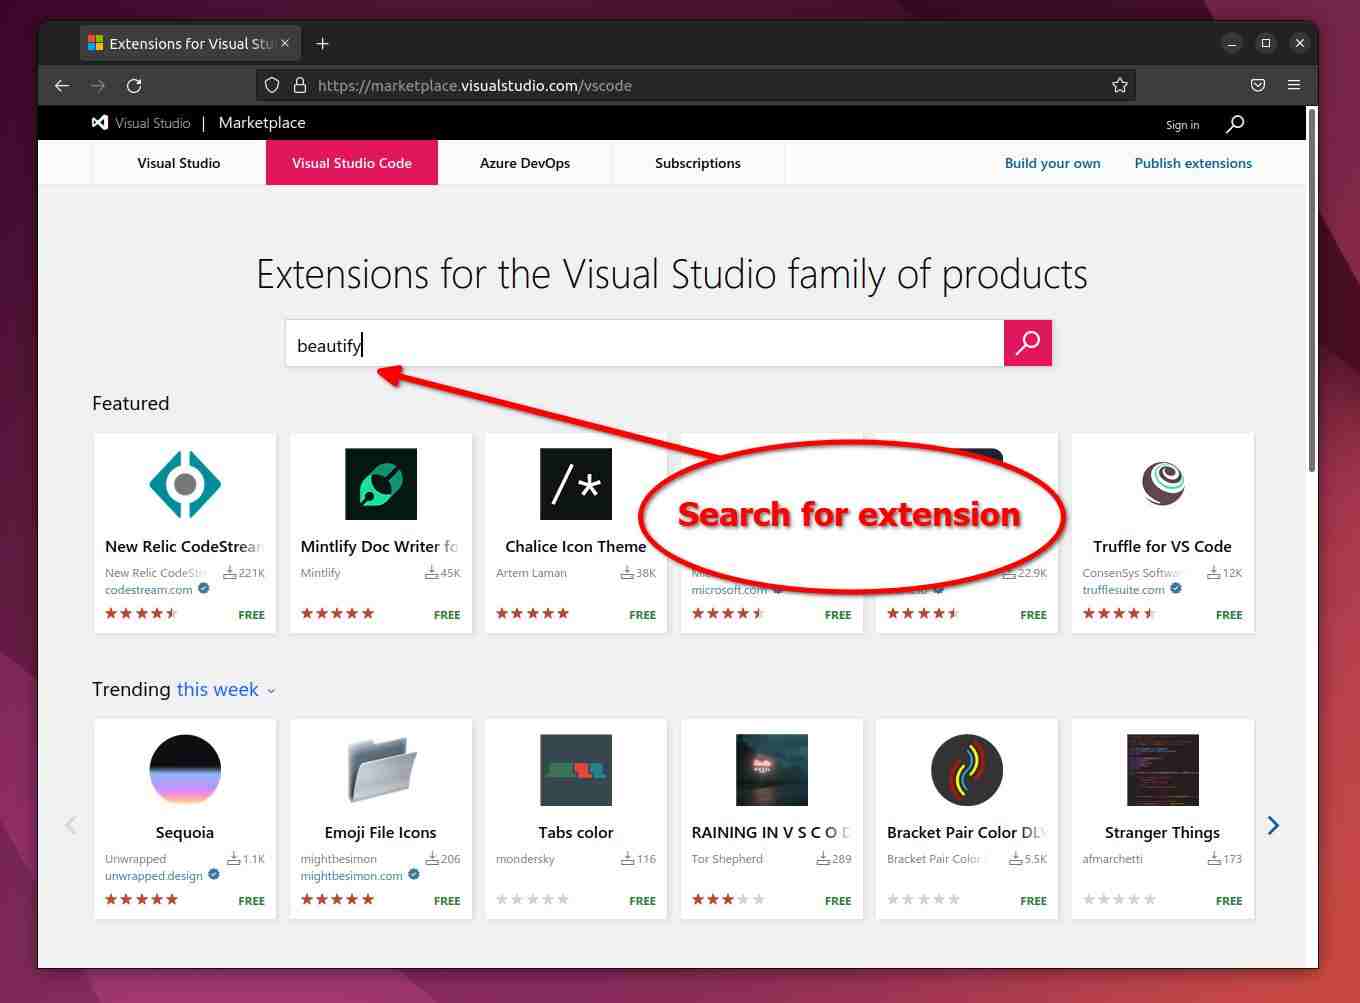
As shown below, click on the extension name that you want to install from the VS Marketplace.
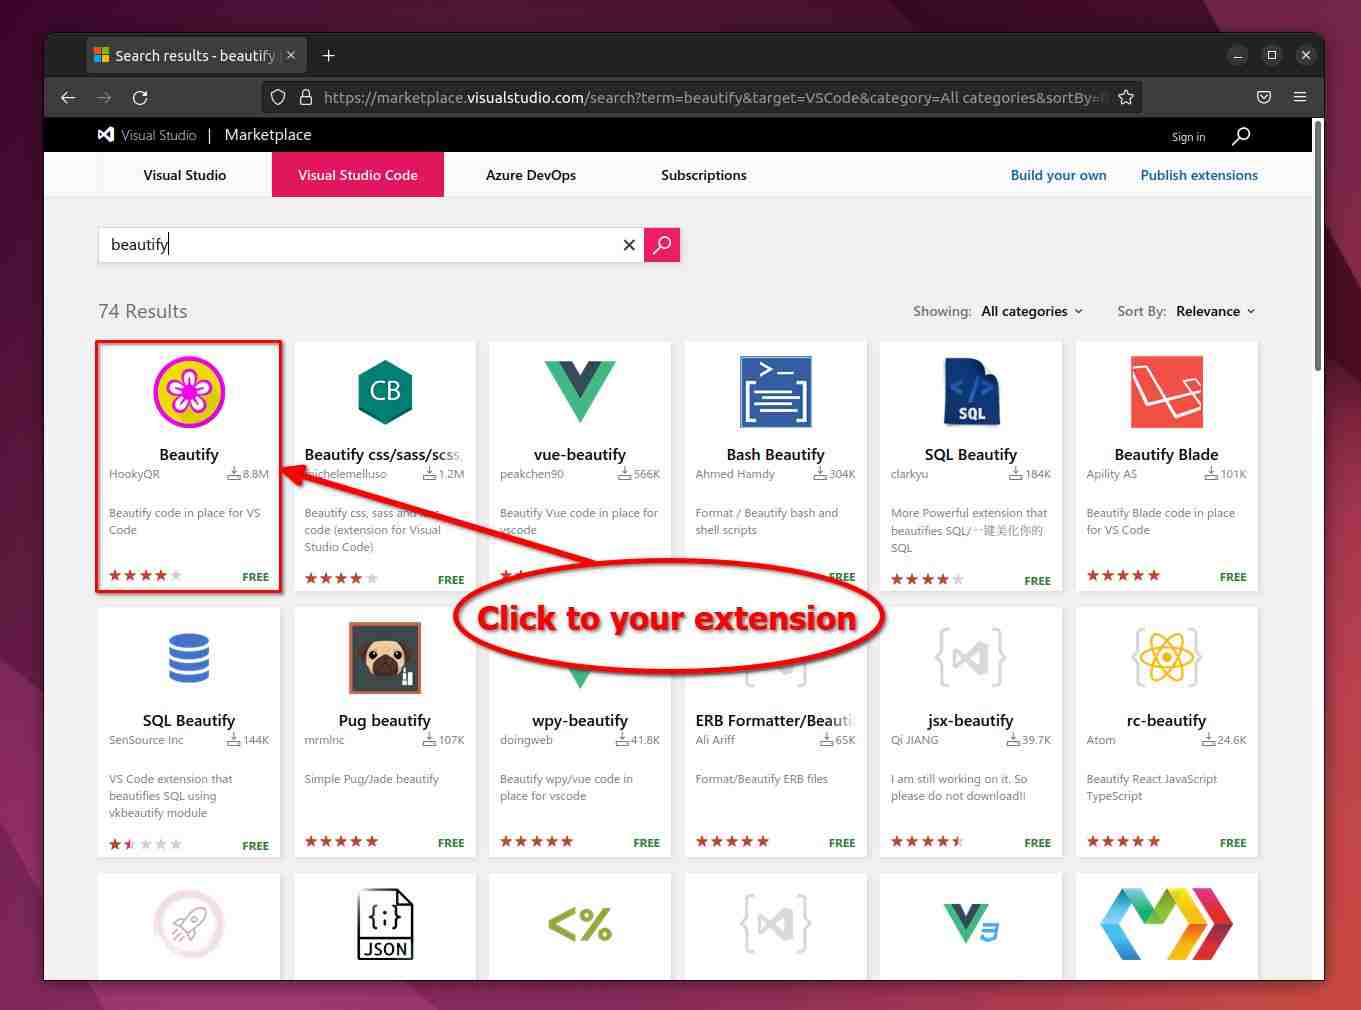
Take note of ItemName from the URL section, as shown below.

The ItemName includes the publisher and extension name in publisher.extension format. Use it as an argument to install the extension using the code command, as shown below.
$ code --install-extension HookyQR.beautifyBelow is the output of the above command.

If you want to download the extension and install it later, as shown below, switch to the Version History tab and download the latest version.
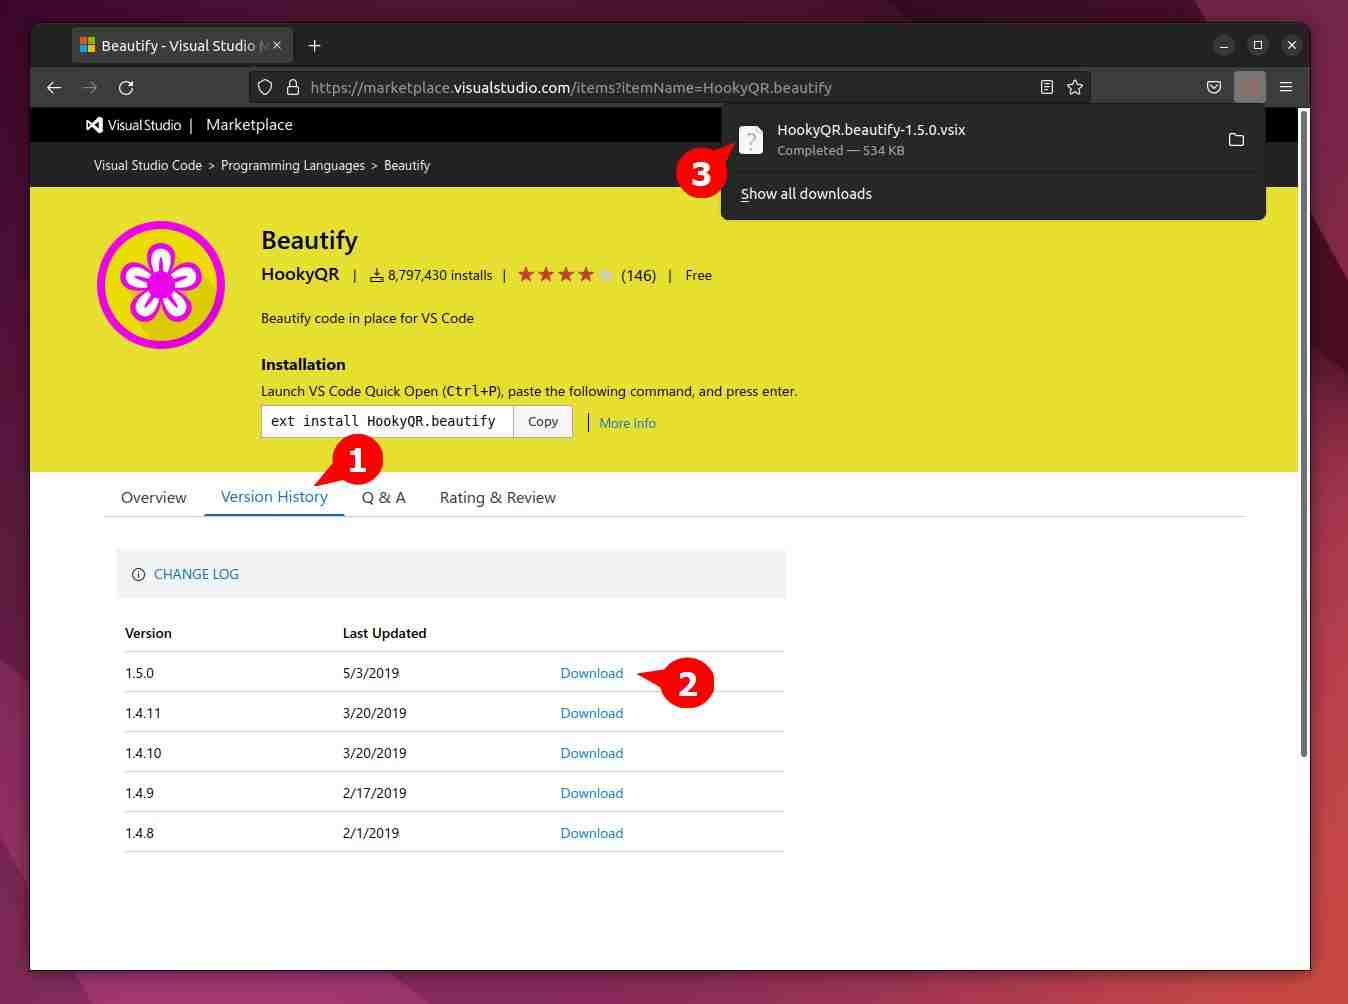
After the file is successfully downloaded, specify the absolute path of the extension with the code --install-extension command, as shown below.
$ code --install-extension /path/to/the/HookyQR.beautify-1.5.0.vsixBelow is the output of the above command.

You can re-execute code --list-extensions to verify the installation is successfully installed.
$ code --list-extensionsBelow is the output of the above command.

Disable Extension
You can easily disable the installed extension using the code command. It will still be visible in the Disabled section of the extension view but will never be activated without manual action.
Note: Enabling option from command-line is not available for disabled extensions, but you can use a VS Code GUI application to enable your disabled extensions.
To disable the extension, specify the extension with the publisher name in publisher.extension format with the --disable-extension option, as shown below.
$ code --disable-extension HookyQR.beautifyBelow is the output of the above command.

To disable all extensions pass the option without argument, as shown below.
$ code --disable-extensionsBelow is the output of the above command.

It will be helpful while diagnosing the cause of VS Code failure. If disabling all extensions will solve the issue, it means any specific or multiple extensions are causing the problem.
Uninstall Extension
If the installed extensions are no longer required, you can free the space by removing them. To uninstall the extension, specify the extension with the publisher name in publisher.extension format with the --uninstall-extensions option as shown below.
$ code --uninstall-extension HookyQR.beautifyBelow is the output of the above command.

Changing the Display Language
Visual Studio Code ships by default with English as the display language, but other languages are available through Marketplace Language Packs.
Also Read: How to Run a Python Script from PHP
Below is the list of accepted language codes.
| Display Language | Locale | Marketplace |
| English (US) | en | Installed |
| Simplified Chinese | zh-cn | Link |
| Traditional Chinese | zh-tw | Link |
| French | fr | Link |
| German | de | Link |
| Italian | it | Link |
| Spanish | es | Link |
| Japanese | ja | Link |
| Korean | ko | Link |
| Russian | ru | Link |
| Portuguese (Brazil) | pt-br | Link |
| Turkish | tr | Link |
| Polish | pl | Link |
| Czech | cs | Link |
Download the language pack you prefer to switch to and install it using the same method followed in the extension installation.
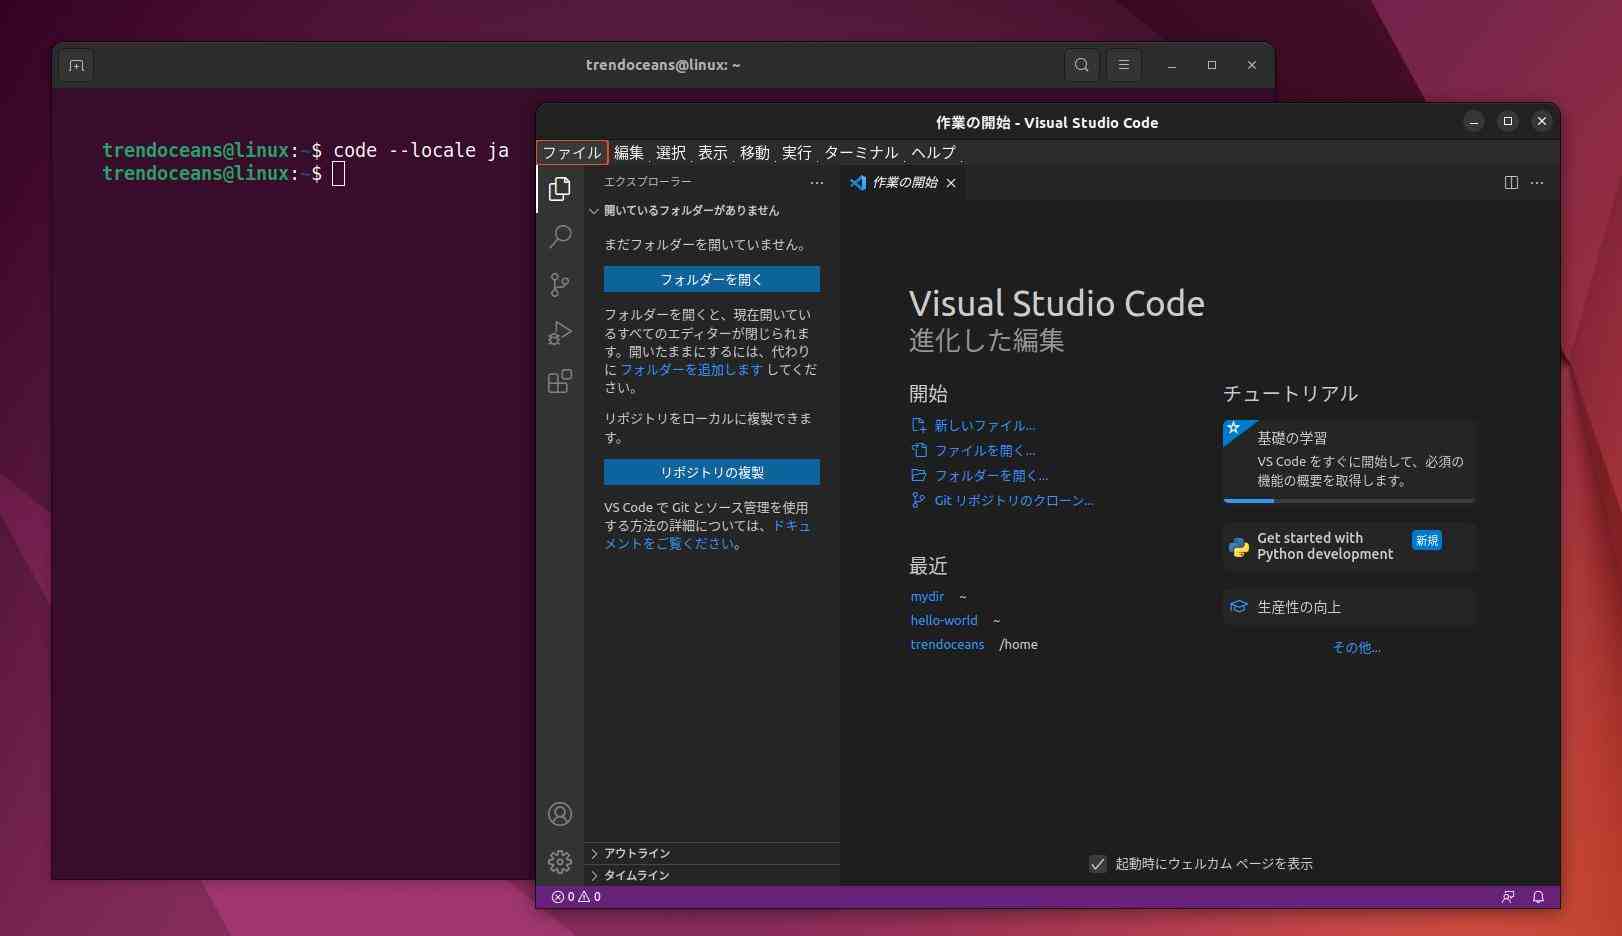
After that, specify the language code with the --locale option as shown below.
$ code --locale jaBelow is the output of the above command.
Also read: Install VSCodium alternative to VS Code
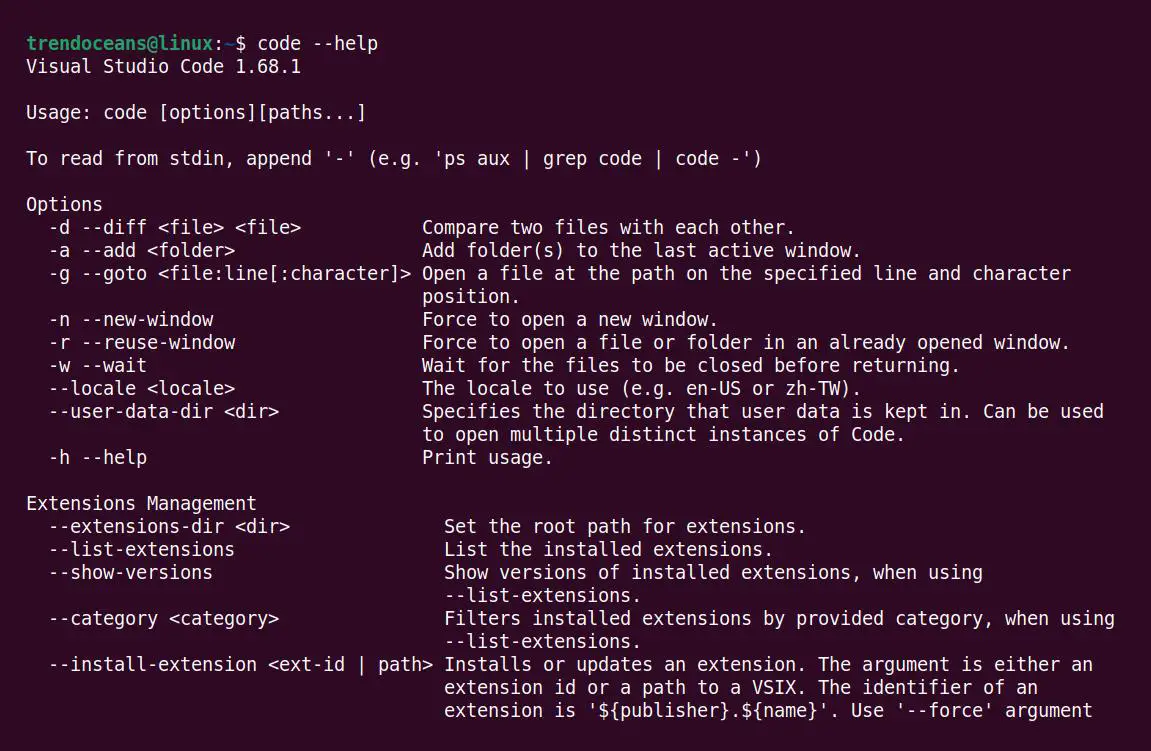
Help
$ code --helpBelow is the output of the above command.
FAQ
Your OS cannot find the VS Code binary code on its path. The VS Code Windows and Linux installations should have installed VS Code on your path. Try uninstalling and reinstalling VS Code.
On macOS, you need to manually run the Shell Command: Install ‘code’ command in PATH command (available through the Command Palette, Ctrl+Shift+P).
VS Code has an integrated terminal where you can run command-line tools from within VS Code.
a. Use the Ctrl+` keyboard shortcut with the backtick character.
b. Use the View > Terminal menu command.
c. From the Command Palette (Ctrl+Shift+P), use the View: Toggle Terminal command.
d. You can create a new terminal via the Terminal menu by selecting Terminal > New Terminal.
Not directly through the command line, but VS Code has a Portable Mode feature that lets you keep settings and data in the same location as your installation, for example, on a USB drive.
If you have more queries regarding this topic, do let us know in the comments section.