You are anxious what happen to your pen drive why it is just showing limited storage (Oh holy!) I have tried to format USB drive still the USB Drive is showing limited storage, and this all happened when I have followed the creating a bootable USB drive to Install Ubuntu on my system.
One of our readers Installed Ubuntu 20.04 on her system using Bootable pen-drive when she tries to use pen drive for normal usage she noticed the pen drive size reduced from the actual space.
She drops me an email and asking for help to restore USB to use as a normal USB drive I helped her on the email itself.
Through this incident, I thought to write an article on How to restore USB after creating a bootable USB.
How the problem looks
Before getting to resolve point, verify the problem is same as mine. When I open a File manager, It shows me Disk size is around 2.8 GB actually the Disk size is 16 GB.
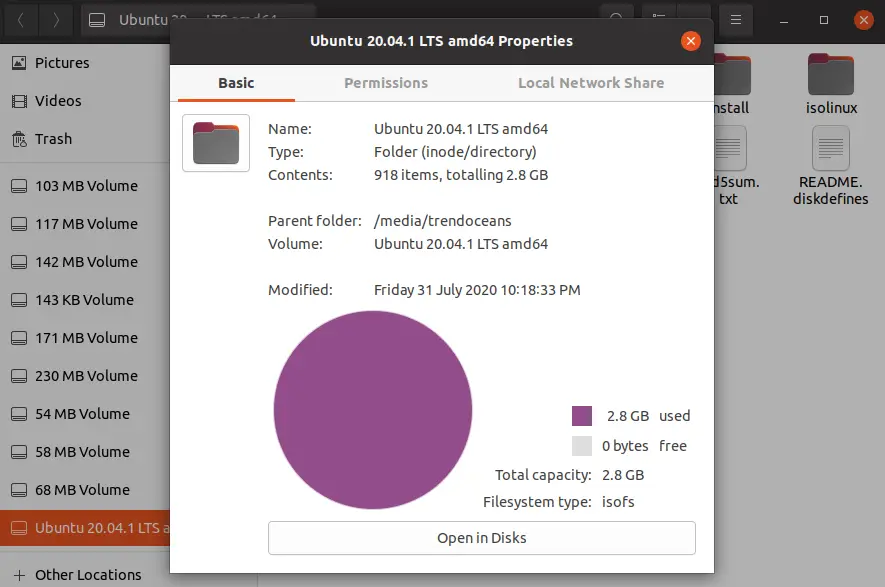
In some case, the user will find the multiple partitions on File Manager, but in my case, it shows the only single partition of 2.8 GB rest of the storage is missing.
When you open Disk Manager or any other Disk Utility to check Disk partition, you will see the various partition in a single USB Disk.
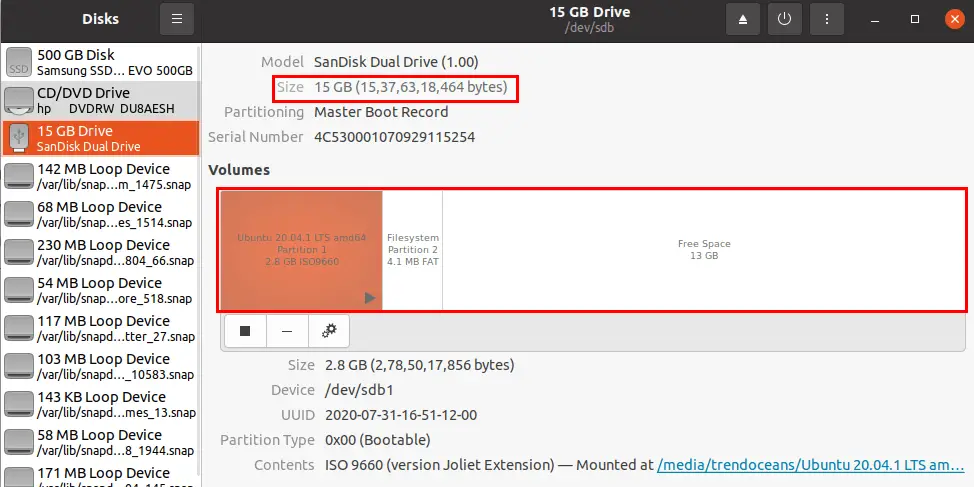
If you see the above image, you will notice that 16 GB Pendrive has multiple partitions rather than single partition in USB.
Usually, Pendrive has a single partition to store all files. When you flashed the ISO image to make Bootable Pendrive, It creates multiple partitions while flashing image. This helps the system to find a bootable drive when the system gets restarted to install Operating Systems.
How to restore Bootable USB Drive for normal usage
After getting the information about the problem, let’s resolve this issue with the couple of commands that’s it.
Step 1: Find Disk Name
First, open your terminal, and I think so you have already attached USB Drive with your systems.
When you open the terminal type the fdisk command to check the Disk name it is very important to know the disk location else you can lose your valuable data.
$ sudo fdisk -lIt will list the number of disks available in your system In case of a snap user will have a large list of loop disk compare to others.
Disk /dev/sdb: 14.33 GiB, 15376318464 bytes, 30031872 sectors
Disk model: Dual Drive
Units: sectors of 1 * 512 = 512 bytes
Sector size (logical/physical): 512 bytes / 512 bytes
I/O size (minimum/optimal): 512 bytes / 512 bytes
Disklabel type: dos
Disk identifier: 0x56f48570

Device     Boot   Start     End Sectors  Size Id Type
/dev/sdb1  *          0 5439487 5439488  2.6G  0 Empty
/dev/sdb2       5017392 5025327    7936  3.9M ef EFI (FAT-12/16/32)
In my case, the location of a device, disk is /dev/sdb with the 16 G.B. of the thumb drive.
Step 2: Format Disk
Once we know the USB disk location, we are ready to format and create a new partition to do this follow the below steps.
When you connect your USB to your system it automatically get mounted on system.
First, we need unmount USB to avoid error type the following command to unmount USB drive:
$ sudo umount /dev/sdbOnce you unmount USB disk type the USB disk location along with fdisk a command to start fdisk utility:
$ sudo fdisk /dev/sdbWhen you pass the above command type, the value which is highlighted in amber colour.
trendoceans@trendoceans-HP-Notebook:~$ sudo fdisk /dev/sdb

Welcome to fdisk (util-linux 2.34).
Changes will remain in memory only, until you decide to write them.
Be careful before using the write command.

Command (m for help): o
Created a new DOS disklabel with disk identifier 0xb61a053d.

Command (m for help): n
Partition type
   p   primary (0 primary, 0 extended, 4 free)
   e   extended (container for logical partitions)
Select (default p): p
Partition number (1-4, default 1): 1
First sector (2048-30031871, default 2048): 2048
Last sector, +/-sectors or +/-size{K,M,G,T,P} (2048-30031871, default 30031871): 30031871

Created a new partition 1 of type 'Linux' and of size 14.3 GiB.

Command (m for help): w
The partition table has been altered.
Syncing disks.
After completing the above process, we will create a new disk partition to select the USB drive.
To create ms-dos partition type the following command with respective disk location:
$ sudo mkfs.msdos -n Trendoceans /dev/sdb1mkfs.msdosThis will format USB into MS-DOS format-nIt is used to provide a name to the USB disk.TrendoceansIt is a USB drive name./dev/sdb1USB Device location
This is the last step to make usable Pendrive pass the following command in your Linux terminal to execute:
$ sudo mount /dev/sdb1 /media/trendoceans/Finally we are ready to use pen-drive for daily use
Wrap-up
That’s all to restore USB device from Bootable USB drive, If you stuck somewhere, please let me know our Team will guide you to resolve the issues.
In the upcoming days, I’ll show you how to restore USB through Gparted so stay tune.
If you know some other ways to revert back and even would you like to share some of your incidents, please feel to share with us.
If you do a lot of installations from USB, it’s worth looking at the GUIDUS (described as Do USB Stuff by GUI) application. Makes it easy to recycle the USB to a new ISO.