Viewing low resolution images on the big screen looks blurry, right? Then it’s time to introduce with Upscayl, which helps you to increase the resolution of the image which is powered by advanced AI models.
Gone are the days when you didn’t have the option to enhance image resolution, but now you have multiple options, from online tools to offline tools for the same.
Now I think it’s the era of content creators, you have to showcase the best content with high quality images and videos, right?
Not only that, even the display resolution of the screen has increased, and people watch content on high resolution screens, so as a creator, you should be mindful of the quality of your content and ensure that it is optimized for high resolution screens to give the best experience to viewers.
So, let me jump into the steps to install and the usage of Upscayl Image to increase the resolution of an image without Adobe Photoshop or GIMP.
Increase the resolution of a blurry image.
As I said, we are using Upscayl, which is a relatively new tool that uses artificial intelligence models to enhance the resolution and quality of images.
Additionally, it’s available on all major platforms, like Windows, Mac, and our beloved Linux distributions, with options like AppImage, deb, and rpm binary files.
Download Upscayl
To download Upscayl, you can click on the below button to get the latest release of Upscayl directly from Github according to your operating system.
For Linux users, there are multiple options available for you, like if you are running Arch Linux, you can get Upscayl directly from the AUR repository.
Here, I’m using Linux Mint, so I can use the .deb binary file or the AppImage, but I’ll go with the AppImage because of the ease of getting started with the program.
Once you get the AppImage file execute the following command to make the AppImage file executable and run the Upscayl:
$ mv ~/Downloads
$ chmod u+x upscayl-2.0.1-linux.AppImage
$ ./upscayl-2.0.1-linux.AppImage
Also Read: How to Create a Desktop Icon for an AppImage Application in Linux
Get Started with Upscayl
Now we finally come to the interesting part, where I’ll show you how well Upscayl can fix low resolution photos to be sharp and clear without compromising any details.
So, let me get a photo of 640×247 resolution to test the capability of Upscayl to enhance the quality of the image.
This is the detail about the sample image, which we are using here:
$ file sample1.jpg

sample1.jpg: JPEG image data, JFIF standard 1.01, resolution (DPI), density 72x72, segment length 16, progressive, precision 8, 640x427, components 3
I think with the above section command, you have already launched Upscayl. If not, then please do so.
Steps to Upscale Image
On the left side of the main interface of Upscayl, you will find the 4 steps, which are as follows:
- Step 1: Upload the photo you want to fix
- Step 2: Select the upscaling type I would advise you to go with General Photo (REAL-ESRGAN)
- Step 3: Now select the output location where you want to save the upscaling image
- Step 4: Finally, click on “UPSCAYL” and wait for the process to complete
Once the process is complete, you can use the slider to see the difference in image.
Here is the image before processing, whose resolution is 640 x 427.

And this is the result after upscaling the image size to 2560 x 1708 from 640 x 427.
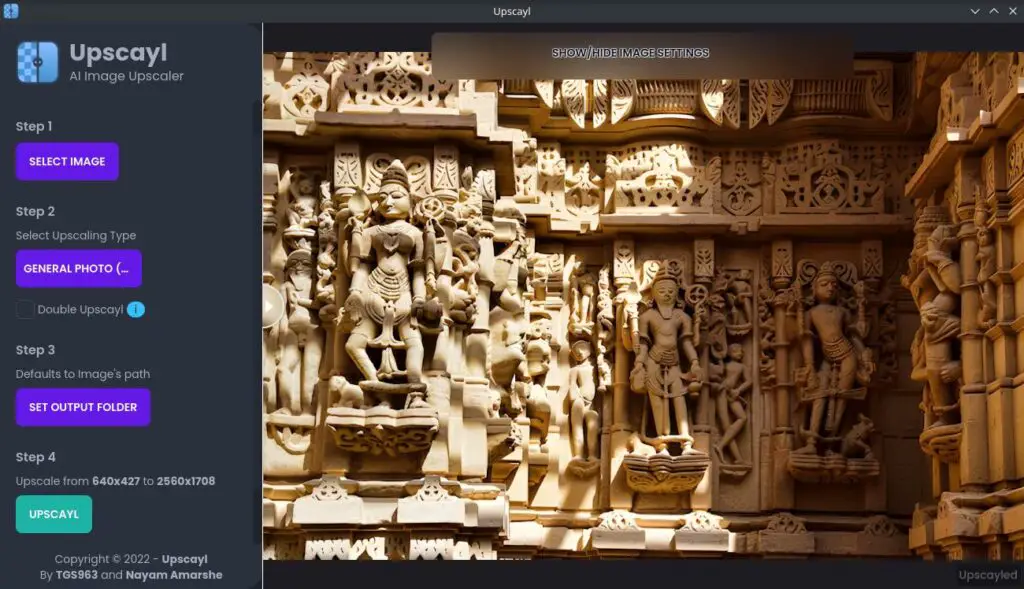
You can clearly see the difference between the two images. The first one looks blurry, but the next one is sharp, and it doesn’t feel like it can be upscaled.
For testing purposes, I even tried to resize the image resolution to 150 x 100 to see how well it could perform, but the result was totally different than I thought.
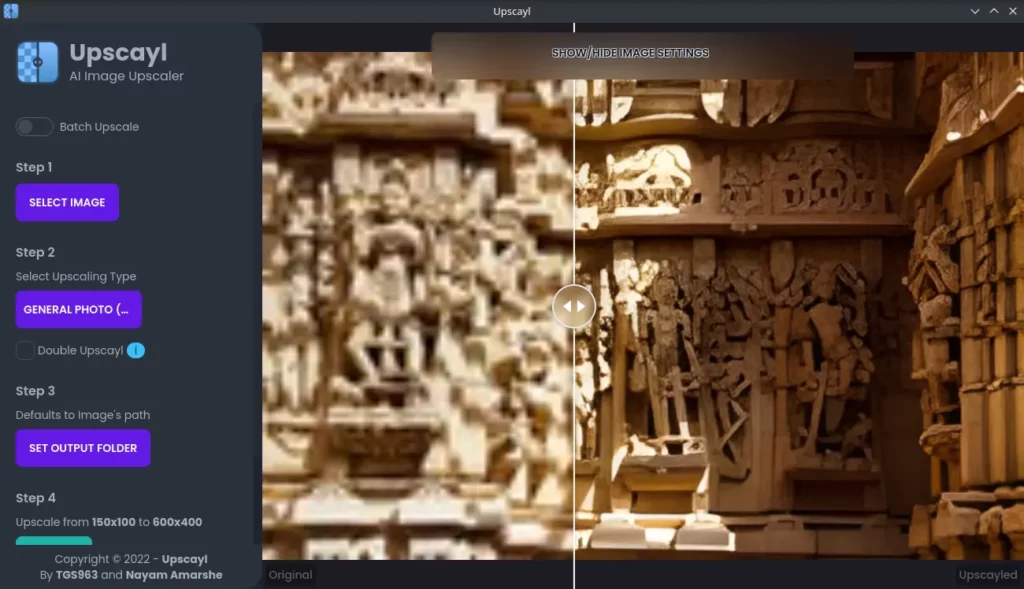
However, it tried its best to upscale, but not as expected.
There are four types of other models available for upscaling: Geneal Photo (REMACRI), Geneal Photo (ULTRAMIX BALANCED), Geneal Photo (ULTRASHARP), and Digital Art.
Feel free to try the model and see the result.
Wrap up
That’s all for this article, where you learned how to use Upscayl to upscale the resolution of an image without losing its quality. It’s a great, handy tool that does not charge and gives you a high quality image in no time.
If you like this article and tool, then please share it with your friends.
Project Source: Upscayl