Last month, we wrote a Complete guided article on How to Install Opensuse Leap 15.2; after that, we have received multiple requests for a Tumbleweed guide.
opensuse Leap and opensuse Tumbleweed Installation are completely identical because both use the YAST2 installer. Once you know how to Install Tumbleweed, you can easily Install openSUSE Leap.
As you know, openSUSE comes with two Version openSUSE Tumbleweed and openSUSE Leap. In this article, we will learn how to install openSUSE Tumbleweed.
Prerequisites
- 2 GHz Dual-core processor or higher
- Minimum 2GB RAM
- 40 GB Free Disk space
- Downloaded openSUSE ISO File
- BalenaEtcher or
ddcommands - USB drive
How to Download OpenSUSE Tumbleweed?
One can download openSUSE Tumbleweed from their Official site. Click on the below button to visit their Official Site.
Once the page gets load you will see multiple options ‘Installation’, ‘JeOS’ (Virtual Technology Image), ‘Live‘.
For installing openSUSE Tumbleweed, click on the Installation tab. Beneath the Installation tab, you will see several options to download for different architecture you can download as per your system architecture.
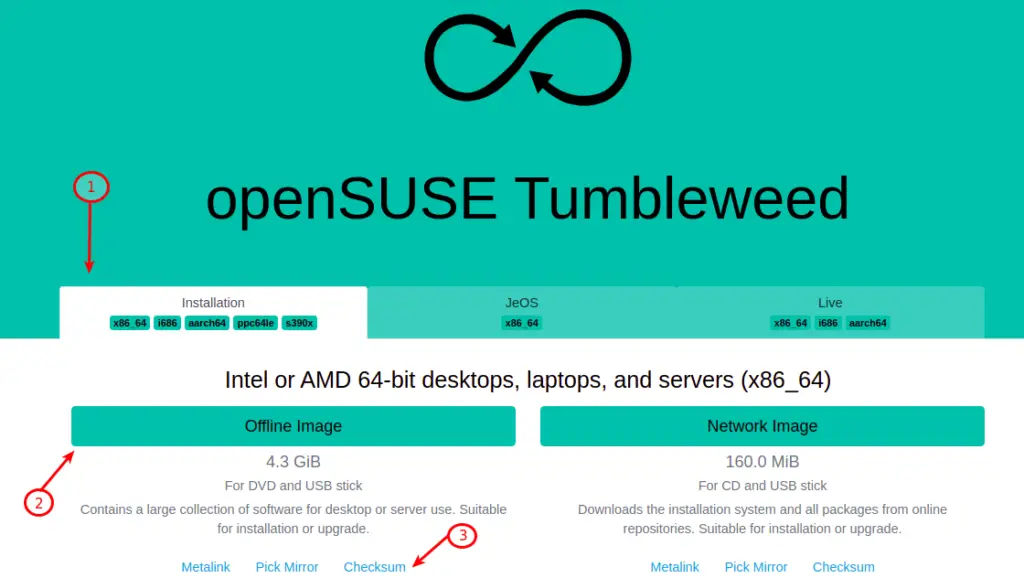
In my case, I’ll download (x86_64) opensuse Offline Image, and I have noticed that we cannot download openSUSE Offline Image from chrome browser while making click on ‘Offline Image’.
So, It advises you to use Firefox Browser or use the wget command to Download openSUSE Tumbleweed. If you are experiencing slow speed while downloading the ISO file, try to download from the available Mirror link.
In the meantime, you should download openSUSE Tumbleweed Checksum to verify file integrity.
How to verify ISO using SHA256 checksum
Once the ISO file is downloaded from the Internet, make sure to check file Integrity. While downloading files may get corrupt due to an unstable network, or Intentionally files may get tampered.
This will assure you that you have downloaded a genuine file from a server without comprising any transgression.
We have already covered How to generate and check checksum using sha256sum in detail, and please make sure to watch or read.
I believe that you have already downloaded ISO and Checksum file, Open the terminal window and follow the subsequent instructions.
To verify ISO Image go to the directory where both the files is stored and pass the below command:
$ sha256sum -c openSUSE-Tumbleweed-DVD-x86_64-Current.iso.sha256After passing the command, wait for few minutes to complete the process, and once the process is completed, you will get the output either ‘OK’ for success or ‘Failed’ for corrupt ISO.
If you were able to get an ‘OK’ message, you could proceed to create a Bootable image using the dd command or Balena Etcher.
For the ‘Failed’ message, you need to download ISO Image again; this may not sound good to you 🙁
How to Create Bootable Drive using DD command
First of all, congratulate you for getting into step 2. Over here, we will create a bootable Image for that. We require a USB drive and Software that create a bootable USB drive.
We have multiple utilities to create bootable drives, but I personally like two applications. In the case of Windows balenaEtcher and for Linux, anytime dd command.
Through this article we will see how to create bootable USB drive using dd command.
Note:- This step will format your USB Drive, so it requests you to make a backup of your USB drive; else, you may lose your valuable data.
Step 1:- Please attach USB drive
First, connect the USB drive and open the terminal screen, and pass lsblk command to check the USB device’s location.
$ lsblkNAME MAJ:MIN RM SIZE RO TYPE MOUNTPOINT
sda 8:0 0 465.8G 0 disk
├─sda1 8:1 0 100M 0 part /boot/efi
├─sda2 8:2 0 16M 0 part
├─sda3 8:3 0 110.9G 0 part
├─sda4 8:4 0 505M 0 part
├─sda5 8:5 0 146.5G 0 part
├─sda6 8:6 0 134.9G 0 part
├─sda7 8:7 0 1G 0 part
├─sda8 8:8 0 35G 0 part /
├─sda9 8:9 0 1G 0 part
└─sda10 8:10 0 36G 0 part
└─rhel-root 253:0 0 36G 0 lvm
sdb 8:16 1 14.3G 0 disk /media/trendoceans/test
sr0 11:0 1 1024M 0 rom From the above output, we know the USB drive location is /dev/sdb, which size is 14.3G and make sure to note the correct drive location; else, you may end up with data loss.
Step 2:- Creating bootable USB DISK
Once you know the USB drive location, we are quite close to creating a bootable drive. To create a bootable drive, pass the below command and don’t forget to change [ISOFILE-LOCATION] and [PARTITION]:
$ sudo dd if=/[ISOFILE-LOCATION] of=/dev/[PARTITION NAME] status=progress Suppose you don’t want to use the dd command or you’re using Windows then you can use balenaEtcher.
That’s the basic you need to accomplish before proceeding to the Installation for openSUSE Tumbleweed.
Installation openSUSE Tumbleweed
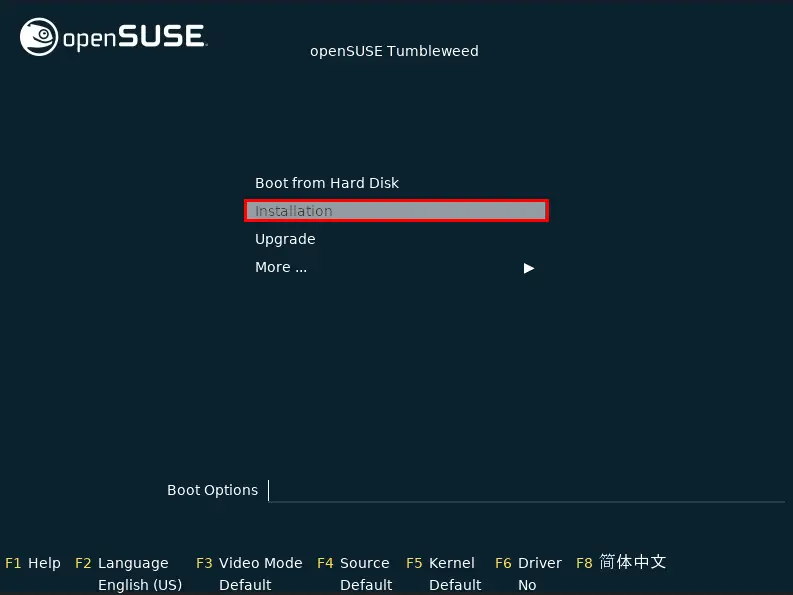
Step 1:- Restart System to access Boot Menu
This is the step where the system will get the boot from USB drive, In some case system automatically gets the boot from USB if you have given preference to Boot from USB else you need to do manually.
How to boot USB drive manually?
Once you have successfully created a bootable drive, don’t remove the USB drive and restart your system.
When the system gets to boot press the ESC or F2 or F9 or F12 to access the boot menu options button may differ as per the manufacturer.
If the above key didn’t work then you need to confirm with the respective brand or else try between ESC to F12.
Once the system gets the boot from the USB drive, you will be able to see multiple boot options from that select the Installation and press the enter key to proceed Installation part.
Step 2:- Language, Keyboard, and License Agreement
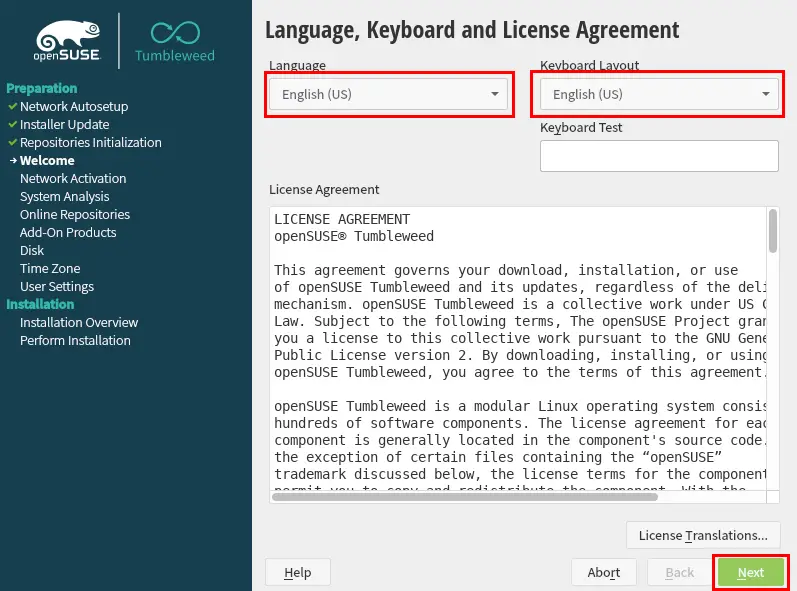
As you know, openSUSE uses YAST2 as Installer, and it is quite user-friendly, and you will be getting multiple screens to configure.
On the first screen, you will learn to configure Language, Keyboard, and License Agreement.
To change the default Language, you should click on the Language drop-down menu and select the relevant language. On the left, you are allowed to choose a different Keyboard layout.
For me default options is good to go so I’ll simply click on Next Button.
Step 3:- Online Repositories
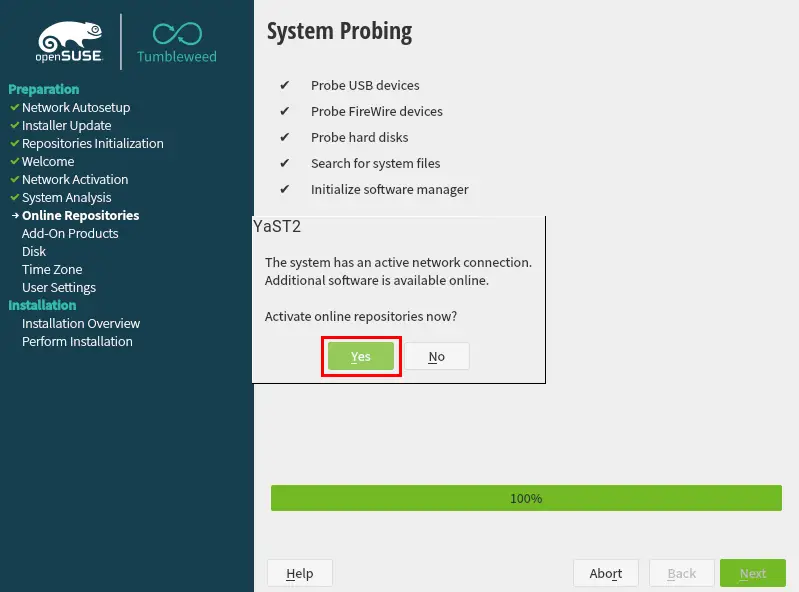
If you already attached an Ethernet cable or Installing openSUSE on a Virtual Machine with an active Internet connection network configuration step will get skipped, and it will ask you, ‘Activate online repositories now?‘
It’s up to you whether you want to activate or not, But I advise you to click on ‘Yes’. This will install additional software, which is necessary while using the system; not only that, it will also get the latest security patches.
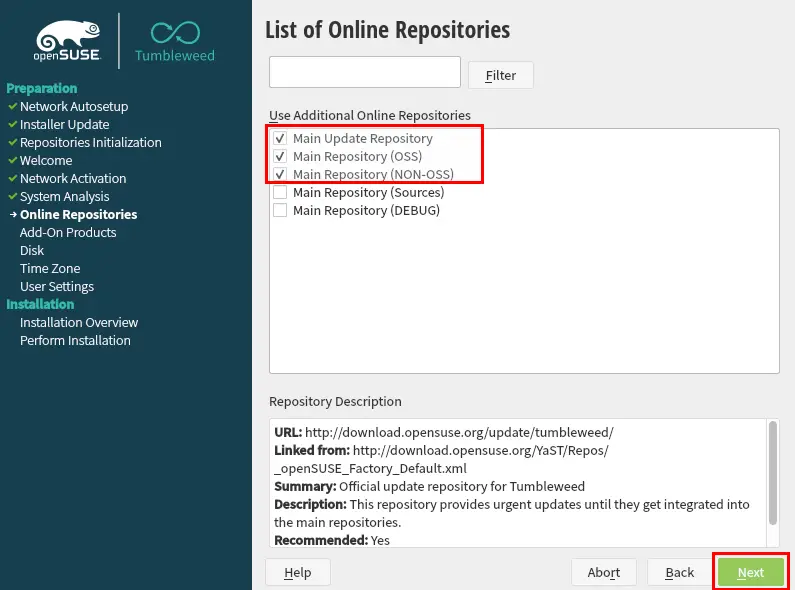
When you click on ‘Yes’, It will move to the next screen, Overthere you will see a list of Additional Online Repositories. By default top 3 Checkboxes will be checked, So you just make sure that Checkboxes are checked and click on Next to proceed further.
Step 4:- System Role
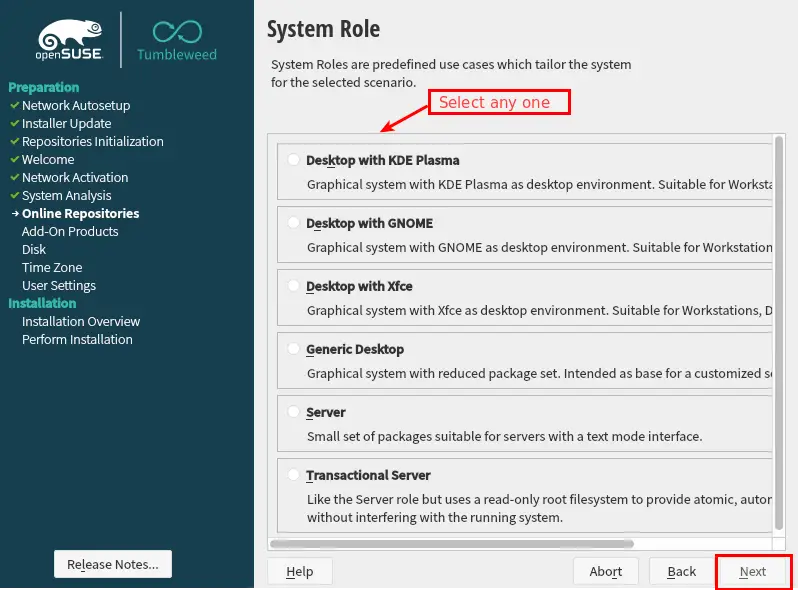
This isn’t interesting that we are allowed to choose a Desktop environment as per our preference. In some of the Linux Distributions, we need to download specific desktop environment ISO.
List of Desktop Environment available to use such as
- Desktop with KDE Plasma (Prefer to use it is close to the Windows experience)
- Desktop with GNOME (It is also one of the best Desktop environment)
- Generic Desktop (In the next screen you will choose between XFCE, LXDE, MATE, and others)
- Server (Command Line Based No GUI)
- Transactional Server (Read-only root system) no write permission is allowed.
Once you have decided what type of Desktop Environment is going to use, select the Desktop environment and click on Next.
Step 5:- Suggested Partitioning
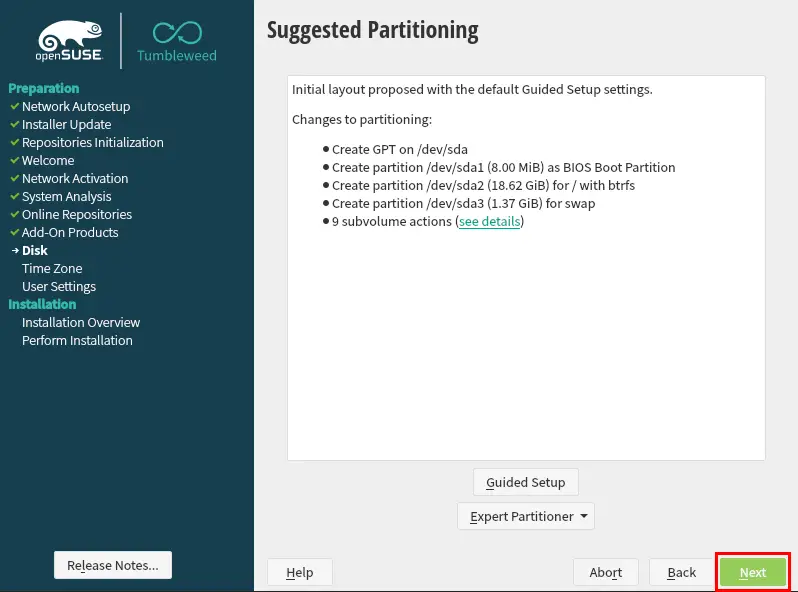
We are not far off to get openSUSE Tumbleweed to install on our system, and This is a step where we have to decide how much space or where the system should Install.
If free space is available to your Hard drive, YAST2 Installer will create a GUIDED SPACE with a btrfs file system. In case you want to create manual partitions for /, /swap, bios click on Expert Partitioner.
In this article we will go with a default Guided setup, after that click on Next to set up Clock and Time zone.
Step 6:- Clock and Time Zone
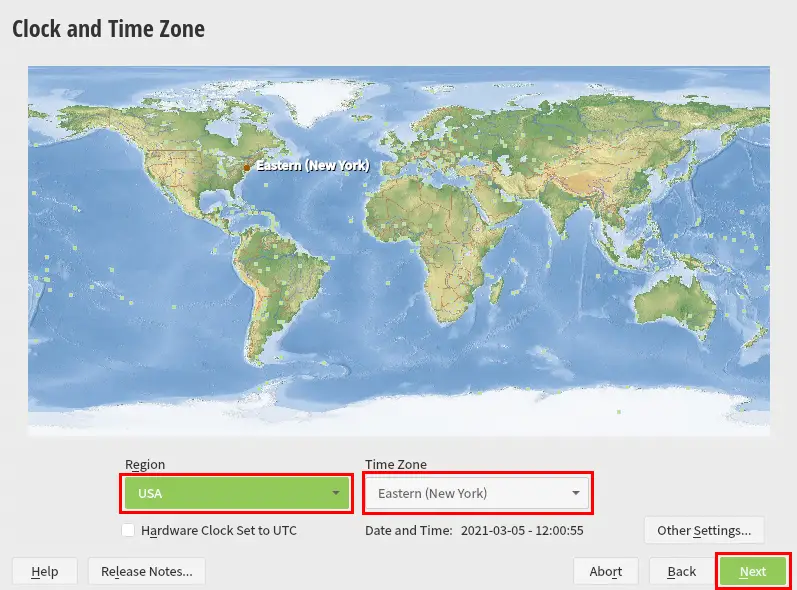
Here we need to choose a Region and Time zone. To change timezone or region, you can use a pushpin to select a region and timezone.
Even you can update the region and timezone through the drop-down menu. First, change the region afterward, change the timezone.
If you are using Windows along with Linux, make sure to check ‘Hardware Clock Set to UTC’ to avoid conflict between Windows and Linux System time.
Step 7:- Create Local User
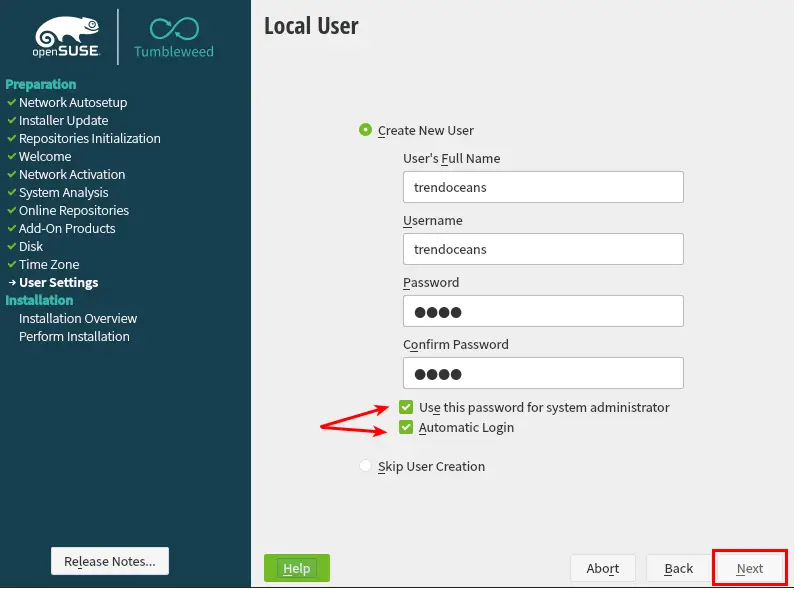
This is the step where you need to create a local user. To create a user, you need to fill in those options like User’s Full Name, Username, Password, and Confirm password.
If you want to keep the same password for system administrator (root), keep in check, but my advice is not to keep the same password for root users.
For security, purpose unchecked the Automatic Login to disable automatic login as a system get started and click on Next.
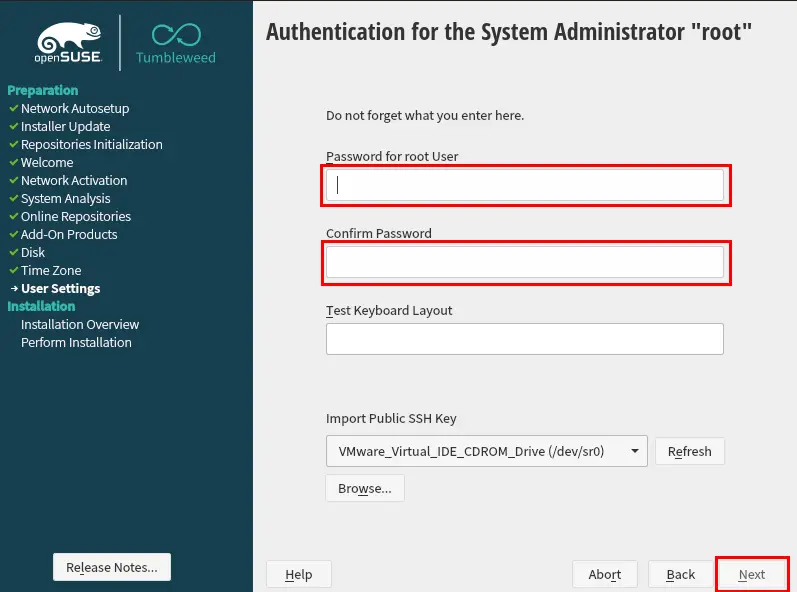
This screen will appear if you have unchecked ‘Automatic Login’. Over here, you need to provide a different password for the root user.
It’s good to see YAST2 provide options to import SSH key, and If you want to login root user as password less, you can import key at a specific location while making click on Browse.
Step 8:- Installation Settings
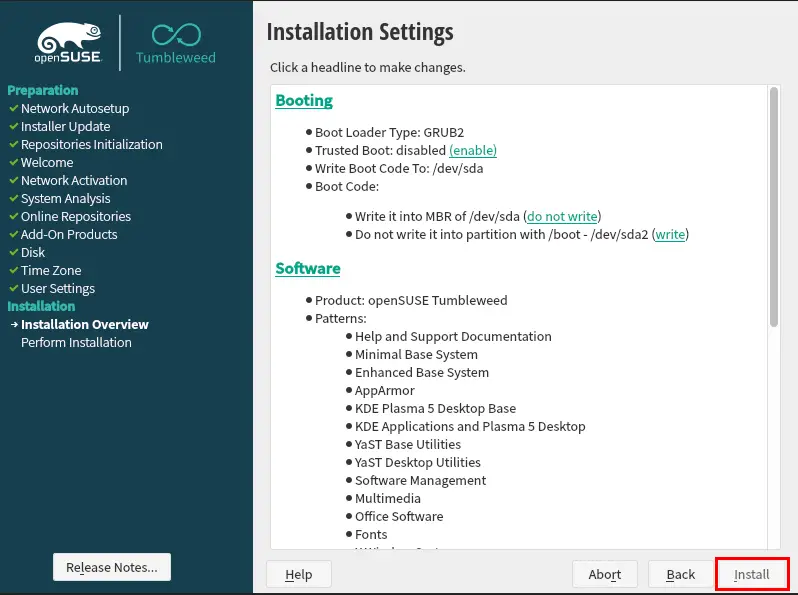
Please check once everything as per your intends If you want to make any changes click on Heading and make a change afterward, you will not be able to make any modifications.
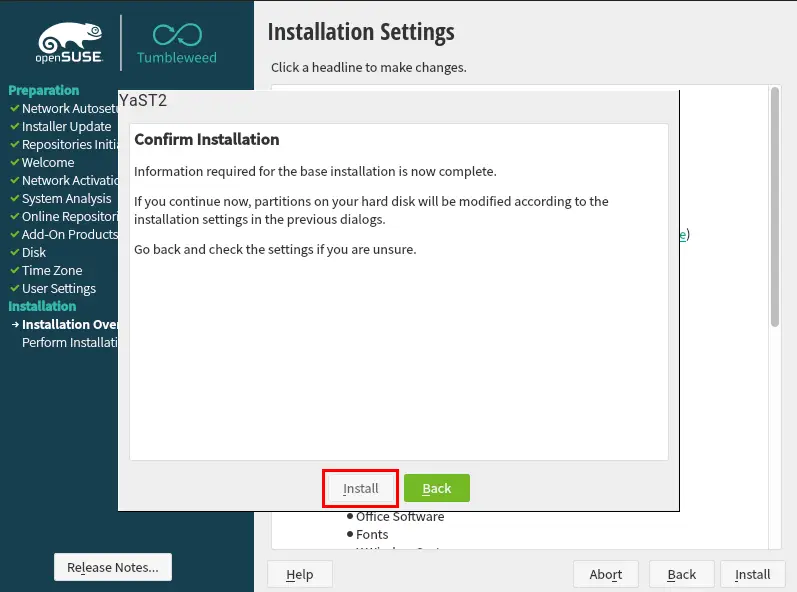
This is the final confirmation. If you are sure about your preference, click on Install; after this system will get start installing on the Hard drive, and If you feel that something is missing, please click on Back and make a correction.
Step 9:-Performing Installation
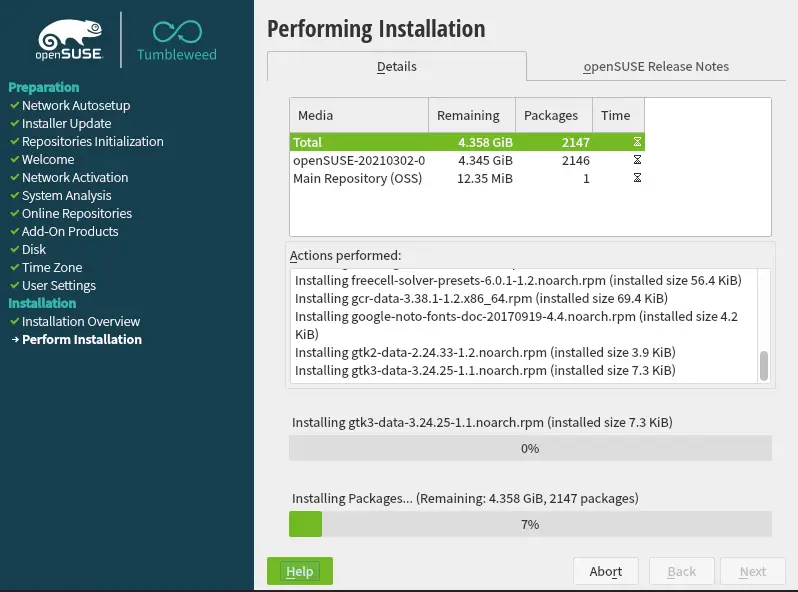
You have already initiated the installation process and this will take some time to complete. In the meantime, you can check out How to restore USB normal after bootable USB.
Step 10:- Reboot
When the installation is completed system will automatically get booted. For UEFI, users need to change the boot Order sequence from BIOS and If you are not able to boot into openSUSE Tumbleweed.
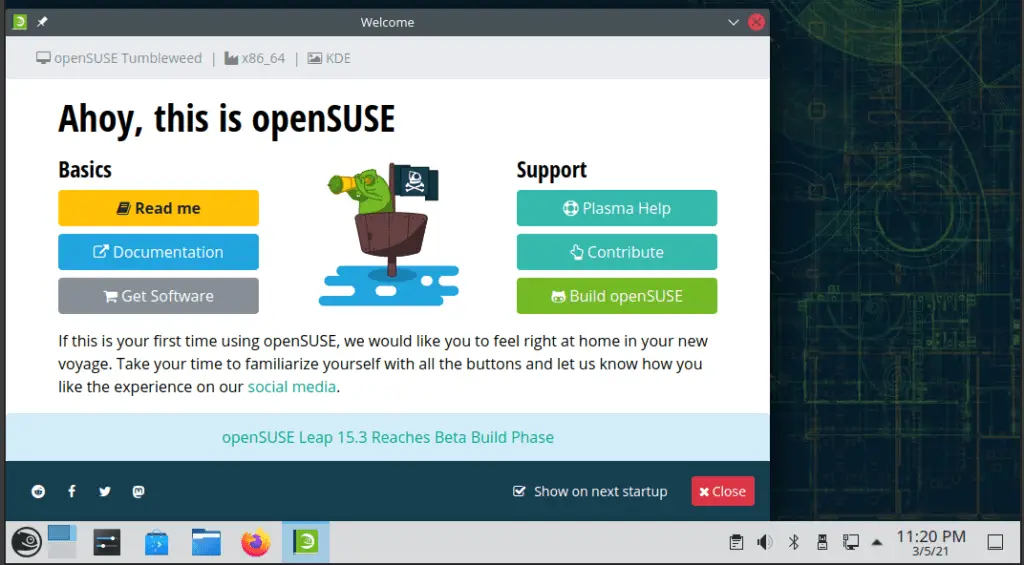
Once the installation and above issue is fixed we can log in to our openSUSE Tumbleweed KDE Desktop environment and use it as a daily driver.
Wrap-up
That’s all to Install OpenSUSE Tumbleweed. If you are stuck somewhere, please feel free to comment down; else, you can ask Questions in the openSUSE Official forum or openSUSE wiki.
If you like the article, or somewhere I missed something, please let me know to make this article more amazing.